April 1, 2026Dan Rodney/9 min read

Exporting Assets: 1x & 2x JPEG

Master JPEG Export Optimization in Sketch

Key Skills You'll Master

JPEG Optimization

Learn to balance file size and image quality for web performance. Master different compression settings for 1x and 2x exports.

Asset Export Workflow

Develop an efficient process for exporting multiple image formats and resolutions from Sketch for web development.

Transparency Handling

Understand how to work with transparency limitations in JPEG format and create optimal solutions for circular images.

Topics Covered in This Sketch Tutorial:

Exporting As JPEG, Properly Setting JPEG Quality

Exercise Preview

preview exporting jpeg

Exercise Overview

In this comprehensive exercise, you'll master the art of exporting optimized JPEGs from Sketch. You'll learn the critical difference between 1x and 2x image compression, discover why different quality settings matter for web performance, and understand how to balance visual quality with file size—skills essential for any designer working in today's mobile-first web environment.

Export Process Overview

1

Select Assets

Choose the three photos from Rate What You Ate and Start Remembering Now sections that need to be exported

2

Configure Export Settings

Set up both 1x and 2x JPEG export formats with proper quality settings for each resolution

3

Export and Optimize

Export assets twice with different quality settings, then merge the optimized files for best results

Making Photos Exportable

Before we can export our images, we need to properly prepare them in Sketch. This foundational step ensures consistent, professional results across all your exported assets.

  1. In Sketch, go to File > Open Local Document.
  2. Navigate into Desktop > Class Files > Sketch Class > iTastify and double–click on iTastify Ready for Export JPEG.sketch to open it.
  3. Scroll down to the Rate What You Ate section.
  4. There are three photos we want to export. On the artboard, click on the background photo in the Rate What You Ate section to select it.
  5. Below that, Shift–click the angled iPhone mockup to add it to the selection.
  6. Scroll down to the Start Remembering Now section.
  7. Shift–click the background photo for the Start Remembering Now section.
  8. Three photos should now be selected, and you should see their corresponding folders highlighted in the Sidebar:

    • Ratings-bg
    • Iphone-isometric-view
    • Call-to-action-bg
  9. In the Inspector, click Make Exportable.
  10. Set the Format to JPG.
  11. In the Inspector's Export section, check on Trim transparent pixels. This ensures your exported images don't include unnecessary transparent space, keeping file sizes lean.
  12. We need both 1x and 2x (low-res and hi-res), so in the Inspector's Export section, to the far right of Presets click the plus button to add a new export size.
  13. Set the Format of the 2x to JPG.

    TIP: In place of the 1x or 2x size, you can enter a specific width or height (such as 250w or 300h). This flexibility is particularly valuable when creating multiple versions of an asset, such as thumbnails for different breakpoints or social media platforms.

Asset Selection Checklist

0/4

Exporting & JPEG Quality

Understanding JPEG compression is crucial for modern web design. Here's the key principle that many designers miss:

Even though a 2x image contains four times as many pixels as a 1x image, it occupies the same visual space on the webpage. This means each pixel in the 2x image is displayed at half the size, making compression artifacts significantly less noticeable to users.

This fundamental principle allows you to compress 2x images more aggressively than their 1x counterparts—often using settings that would be completely unacceptable for standard resolution images. Failing to take advantage of this means you're delivering unnecessarily large files, impacting page load times and user experience, especially on mobile connections.

Unfortunately, Sketch applies uniform quality settings across all export sizes, which isn't optimal. To achieve the best results, we'll perform two separate exports:

  • An export for 1x size at higher quality (preserving detail for standard displays).
  • An export for 2x size at lower quality (leveraging pixel density to hide compression artifacts).

We'll then strategically combine these exports to create the ideal compression balance for both resolutions.

  1. With the three photos still selected, at the bottom right of the Inspector, click the Export Selected button.
  2. Set the following (you may need to click the Options button to see them):

    • JPG Quality: 60%
    • Progressive JPG and Save for web should be checked.
  3. Navigate into Desktop > Class Files > Sketch Class > iTastify > assets-for-developer > JPEG—1x Quality.
  4. Click Export.

    NOTE: Sketch lacks a real-time JPEG quality preview, which remains a limitation in 2026. The settings we use in this exercise provide an excellent starting point based on industry best practices, but always review your exported JPEGs for both visual quality and file size. When in doubt, re-export with adjusted settings—this iterative approach ensures optimal results for your specific content.

2x Image Compression Principle

2x images occupy the same webpage space as 1x images, making their pixels effectively half the size. This means compression artifacts are smaller and less visible, allowing for more aggressive compression without quality loss.

1x vs 2x JPEG Quality Settings

Feature1x Export2x Export
JPEG Quality60%35%
Visual ImpactStandard quality neededArtifacts less visible
File Size PriorityModerate compressionAggressive compression
Recommended: Use separate export passes to achieve optimal compression for each resolution

Exporting at 2x Quality

Now we'll export the same images with more aggressive compression specifically optimized for high-density displays.

  1. With the three photos still selected, at the bottom right of the Inspector, again click the Export Selected button.
  2. Set the following (you may need to click the Options button to see them):

    • JPG Quality: 35%
    • Progressive JPG and Save for web should be checked.
  3. We need to switch to the 2x folder now. Navigate into Desktop > Class Files > Sketch Class > iTastify > assets-for-developer > JPEG—2x Quality.
  4. Click Export.

Export Organization

Use separate folders for 1x and 2x quality exports to maintain organization during the optimization process. This prevents confusion when merging the final optimized assets.

Merging the Exported Assets

This final step combines our strategically compressed assets, giving you the performance benefits of properly optimized images for both standard and high-density displays.

  1. Keep Sketch open and switch to the Finder (the Desktop).
  2. Navigate to Class Files > Sketch Class > iTastify > assets-for-developer.
  3. So that we can compare file sizes, switch to List view by hitting Cmd–2 (or choosing View > As List).
  4. Expand both folders (JPEG—1x Quality and JPEG—2x Quality) so we can compare the files in them.
  5. In the 2x Quality folder, notice that call-to-action-bg@2x.jpg is around 58 KB.
  6. In the 1x Quality folder, notice that call-to-action-bg@2x.jpg is around 136 KB. This dramatic difference—more than 50% smaller—demonstrates the power of proper 2x compression!
  7. The @2x files in the 2x Quality folder are properly compressed and ready for production use. We need to move them into the 1x Quality folder, replacing the oversized versions there.

    In the JPEG—2x Quality folder, select the three @2x files (which are listed below). Use Cmd–click to add files to your selection.

    • call-to-action-bg@2x.jpg
    • iphone-isometric-view@2x.jpg
    • ratings-bg@2x.jpg
  8. Drag the selected files into the JPEG—1x Quality folder.
  9. When asked if you want to replace call-to-action-bg@2x.jpg, check Apply to All, and click Replace.

    Congratulations! All the files in the 1x Quality folder are now properly compressed for their intended use case.

  10. Select the remaining three files in the JPEG—2x Quality folder.
  11. These files are over-compressed for 1x use, so let's delete them to avoid confusion. Hit Cmd–Delete to throw the files in the Trash.

    The JPEG—2x Quality folder should now be empty.

  12. Select all the JPEGs in the JPEG—1x Quality folder.
  13. Drag the selected files out of that folder and drop them into the parent assets-for-developer folder.
  14. Keep the two empty JPEG folders for future exports—this workflow will serve you well on future projects.

    Notice how the 2x JPEGs, while still larger than their 1x counterparts (as expected), now maintain a reasonable file size ratio that won't punish users on slower connections.

File Size Optimization Results

58 KB
KB - Properly compressed 2x file
136 KB
KB - Over-sized 2x file

Asset Merging Process

1

Compare File Sizes

Use Finder's List view to compare the file sizes between 1x and 2x quality folders

2

Move Optimized 2x Files

Select all @2x files from the 2x Quality folder and drag them to replace the larger versions in 1x Quality folder

3

Clean Up and Organize

Delete over-compressed files and move final assets to the parent assets-for-developer folder

Optional Bonus: Being Smart About Transparency

This advanced technique demonstrates how thoughtful export strategies can solve common design challenges while maintaining both quality and performance.

  1. Return to Sketch.
  2. Near the bottom of the artboard find the three photos of people.

    Circular photos on backgrounds like this present a classic optimization challenge. While photos are ideally exported as JPEG for superior compression, JPEG doesn't support transparency. PNG-24 supports transparency but results in files 3-4 times larger than equivalent JPEGs. The professional solution? Export rectangular JPEGs and let the web developer apply CSS border-radius to create the circular mask. This approach delivers the visual result while maintaining optimal performance.

    Anticipating this workflow, we created these masks in Sketch using rounded rectangles rather than perfect circles. This allows us to temporarily remove the rounded corners, export clean rectangular JPEGs, then restore the original design appearance.

  3. On the artboard, select the photo of Layla Ryan.
  4. In the Sidebar, go into the highlighted layla folder and select the Mask layer.
  5. We want to select the other masks. In the Sidebar, Cmd–click the Mask in the brad and matthew folders:

    headshot mask folders

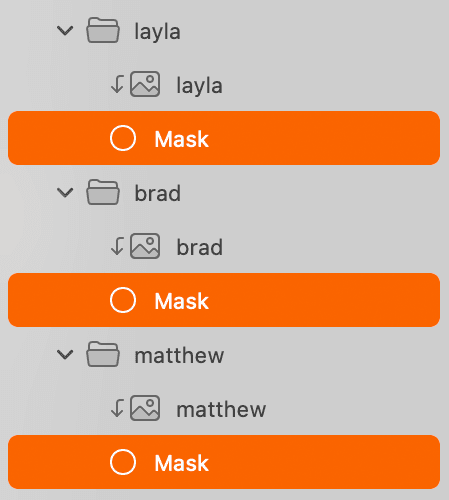
  6. You should now have all three Masks selected. In the Inspector on the right, reduce the Corners setting to 0.
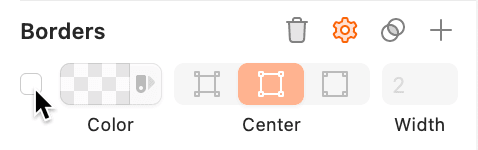
  7. Further down in the Inspector, uncheck the Border:

    uncheck borders

  8. You should now have three square photos ready for export:

    square user photos

  9. In the Sidebar, select the layla folder.
  10. Cmd–click the brad and matthew folders so that all three are selected.
  11. In the Inspector, click Make Exportable.
  12. Set the Format to JPG.
  13. Set Size to 2x.
  14. For Prefix/Suffix type @2x and hit Return to apply it.

    As high-density screens have become standard across devices, many development teams now deploy only 2x graphics—especially when they're properly compressed. While creating both 1x and 2x versions remains the gold standard for performance optimization, the 2x-only approach reflects current market realities where standard-density screens represent a shrinking user base. For this export, we'll focus on 2x to streamline the process, though you can always expand to include 1x versions for maximum optimization.

  15. We want to export only these three selected photos, so at the bottom of the Inspector click the Export Selected button.
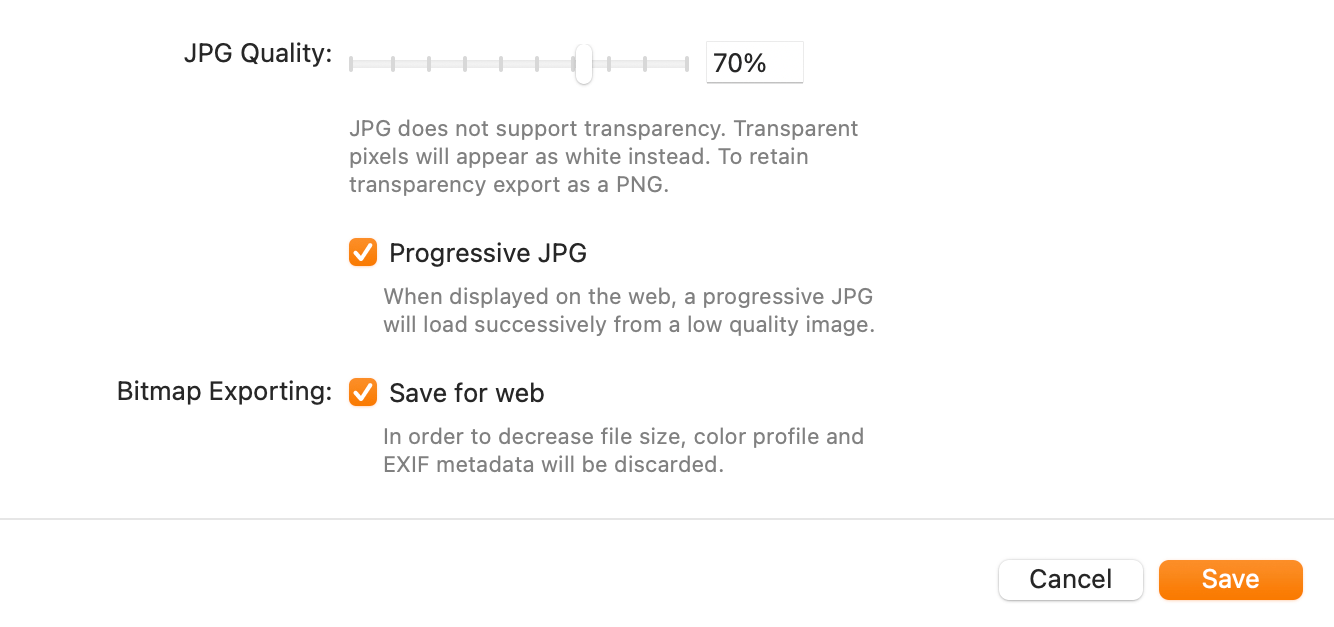
  16. In the dialog that appears, set the following (you may need to click the Options button to see them):

    • JPG Quality: 35%
    • Progressive JPG and Save for web should be checked.
  17. Navigate into Class Files > Sketch Class > iTastify > assets-for-developer.
  18. Click Export.
  19. Keep Sketch open and switch to the Finder (the Desktop).
  20. Navigate to Class Files > Sketch Class > iTastify > assets-for-developer.
  21. Click once on layla@2x.jpg to select it.
  22. Hit the Spacebar to see a preview of the photo.
  23. Hit the Spacebar again to close the preview.

    NOTE: At approximately 13 KB, this JPEG delivers excellent quality while being dramatically smaller than an equivalent PNG—often 70-80% smaller. This size difference compounds significantly when multiplied across an entire website's image assets.

  24. Switch back to Sketch.
  25. We should restore the original appearance of the user photos. Click the Mask within the layla folder.
  26. Hold Cmd and click on the Mask in both the brad and matthew folders (so you have all three masks selected).
  27. In the Inspector, drag the Corners slider all the way to the right.
  28. Check the Border back on.

    This restoration step maintains design file integrity—your Sketch file should always reflect the final intended design. When future exports are needed, simply repeat this temporary modification process.

  29. Save the file and close it.

JPEG vs PNG for Circular Photos

Pros
JPEG provides much smaller file sizes for photos
CSS border-radius can create circular masks efficiently
Better performance for photo content
Rectangular JPEG at 13 KB vs much larger PNG alternative
Cons
JPEG does not support transparency
Requires CSS implementation for circular appearance
Need to temporarily modify masks for export

Transparency Workaround Process

1

Modify Masks

Select all three mask layers and reduce corner radius to 0 to create rectangular photos

2

Export as JPEG

Export the rectangular photos as 2x JPEG with 35% quality for optimal file size

3

Restore Original Design

Return corner radius and borders to maintain the original circular appearance in Sketch

Feature Request: Different JPEG Qualities

Years ago, we requested that Bohemian Coding (the makers of Sketch) implement separate quality settings for different export sizes—a feature that would eliminate the manual workflow demonstrated in this tutorial. While they acknowledged it as a valuable addition, this functionality remains absent in 2026. Other design tools like Figma have begun addressing similar optimization challenges, putting pressure on Sketch to evolve. If this feature would improve your workflow, consider reaching out to Bohemian Coding—user demand remains the primary driver for feature development in professional design tools.

Sketch Limitation Workaround

The current workflow of dual exports exists because Sketch applies the same JPEG quality to all export sizes. This feature request for separate quality settings per export size would streamline the optimization process significantly.

Key Takeaways

12x images can be compressed more aggressively than 1x images because their pixels appear smaller on screen, making compression artifacts less visible
2Sketch requires two separate export passes to achieve optimal JPEG compression - one at 60% quality for 1x and another at 35% quality for 2x files
3Proper JPEG optimization can reduce 2x file sizes from 136 KB to 58 KB while maintaining acceptable visual quality
4For circular photos, exporting rectangular JPEGs and using CSS border-radius provides better file size optimization than PNG with transparency
5The trim transparent pixels option should be enabled when exporting JPEGs to remove unnecessary whitespace
6Progressive JPEG and Save for web settings improve loading performance and file optimization
7Organizing exports into separate folders during the optimization process prevents confusion when merging final assets
8Always preview exported JPEG quality and file sizes to fine-tune compression settings based on actual results rather than assumptions

RELATED ARTICLES