The Interview: The Source Monitor & Adding B-Roll in Premiere Pro
What This Tutorial Covers
Source Monitor
Preview and trim clips before timeline insertion.
B-Roll Strategy
Cover cuts and add visual interest.
Insert vs Overwrite
Two ways to add clips into a sequence.
Noble Desktop's Video Editing & Motion Graphics Certificate teaches Premiere Pro alongside After Effects, DaVinci Resolve, and the full motion design toolkit.
Dive deep into the world of Premiere Pro with this comprehensive tutorial covering topics such as Trimming Clips in the Source Monitor, Adding B-Roll, Working with Slow Motion Footage, and Changing the Size of Footage.
Exercise Preview
Trimming Clips in the Source Monitor: Adding B-Roll
A–roll is the primary footage you are working with. In this case that’s the interview.
B-roll is secondary footage. In the case that’s when the speaker talks about college life or how software works. We can use B-roll to show visuals that help explain or illustrate what they are talking about.
If you have a long clip for B-roll but only want to use a part of it on the Timeline, you can use the Source monitor to trim it to a manageable length and to focus on a specific area of the clip. Let’s learn some techniques to add clips to the timeline.
In this section we will be using an editing technique called a three–point edit to add clips from the Source monitor to the Timeline. A three-point edit is a technique used in video editing where three points (shared between the timeline and a clip) in a video clip are defined and used to determine the duration of the clip.
In the Timeline, move the playhead to 16:09 (when the speaker is finishing saying “books”).
Press I on the keyboard to mark an In point on the timeline.
- Move the playhead to 21:01
Press O to mark the Out point.
- In the Project panel, go into 01—Video > B-Roll.
Double–click on Book Cover.mp4 to open it in the Source panel (at the top left of the window).
In the Source panel, move the playhead to 4:25 (Please note that the Source panel has its own timecode on the left, which is different from the Timeline’s timecode.)
Press I to mark an In point on the clip. This gives a total of 3 points between the Source and Timeline panels.
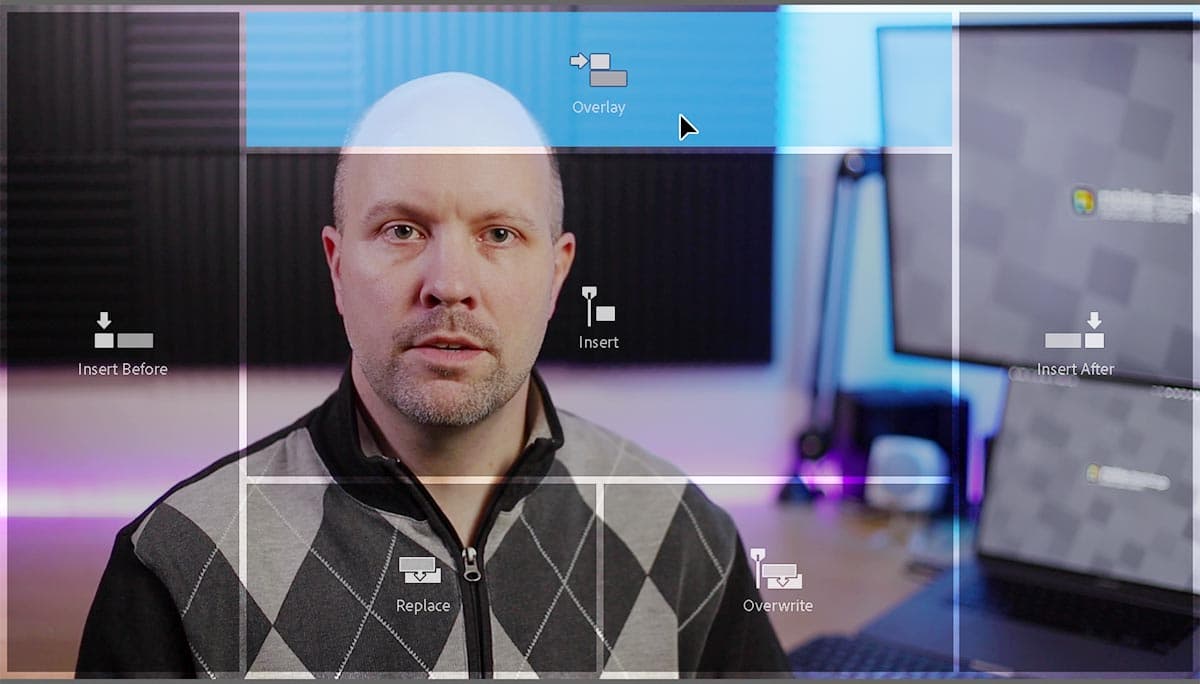
As shown below, in the Source panel, drag the Drag Video Only icon
 to the Program panel and drop it on the Overlay option.
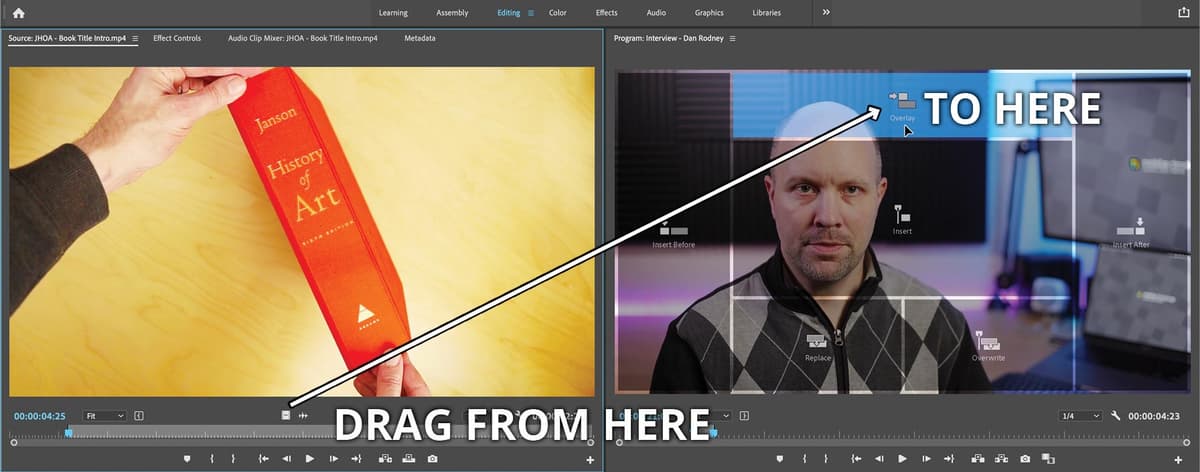
Play from the beginning of the timeline through the new b-roll footage, to see the new clip you just added.
This clip would work better if it ended on the book title. We can fix this by playing the footage in reverse.
CTRL–click (Mac) or Right–click (Windows) on the Book Cover.mp4 clip on the timeline and choose Speed/Duration.
- In the dialog that appears, check on Reverse Speed.
- Click OK.
Move the playhead just before the Book Cover.mp4 clip and press Spacebar to preview the timeline.
Choose File > Save or hit Cmd–S (Mac) or CTRL–S (Windows).
Working with Slow Motion (Slowmo) Footage
Slow Motion or Slomo footage is video that is shot at a higher frame rate then you intend to use it at. When this high frame rate video is played back at a slower frame rate, the result is a video where everything moves in slow motion. With a few simple steps your footage will be ready to work with in Premiere Pro.
Lets set the target In Point first. On the Timeline, move the playhead to 21:02 (the end of Book Cover.)
Press I to mark the In point.
Let’s add some footage of the inside of the book. In the Project panel, find the Book Page Flipping—Slomo.mov clip (it’s in the B-Roll bin).
To the right of Book Page Flipping—Slomo.mov notice the Frame Rate is 119.99 fps which is much higher that our sequence’s frame rate of 29.97.
This video was recorded at a high frame rate so we could slow down the video and still end up with 29.97 fps for smooth looking slow motion video. But we have to change this clip’s frame rate for it to play in slow motion.
Double–click on Book Page Flipping—Slomo.mov to open it in the Source panel.
Press the Spacebar to play some of the video in the Source panel, noticing it plays at normal speed.
In the Project panel, CTRL–click (Mac) or Right–click (Windows) on the Book Page Flipping—Slomo.mov clip and choose Modify > Interpret Footage.
Check on Assume this frame rate and set it to 29.97 fps.
Click OK.
Click on the Source panel and press the Spacebar to play some of the video, noticing it now plays very slowly (but it’s still smooth video).
NOTE: If you try to create slow motion video with footage that is a lower frame rate (such as 29.97), it will not look smooth like this.
In the Source panel, move the playhead to 22:00
Press I to mark the In point.
Still in the Source panel, move the playhead to 25:29 and press O to mark the Out point.
Drag the Drag Video Only icon
to the Program panel and drop it onto Overlay.Play the Timeline to see both b-roll clips.