Noble Desktop Ad: Adding Clips to the Timeline in Premiere Pro
What This Tutorial Covers
Project Panel
Browse and select source media for the timeline.
Insert vs Overwrite
Two ways to add clips into a sequence.
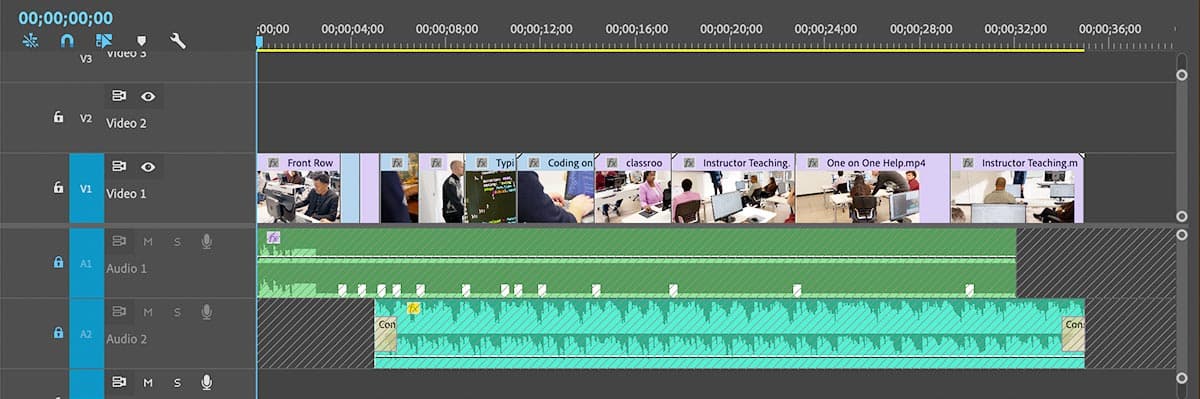
Timeline Tracks
Stack video and audio tracks for layered editing.
Noble Desktop's Video Editing & Motion Graphics Certificate teaches Premiere Pro alongside After Effects, DaVinci Resolve, and the full motion design toolkit.
Explore our detailed Premiere Pro tutorial, covering topics that include adding clips to the timeline, timeline editing tools, and a thorough exercise on working on a promotional ad.
Topics Covered in This Premiere Pro Tutorial:
Adding Clips to the Timeline, Timeline Editing Tools
Exercise Preview
Exercise Overview
In this exercise you will continue working on a promotional ad, adding video clips to coordinate with the voice over you created in the previous exercise.
Previewing the Final Video
Let’s see a preview of what you’ll be making.
On the Desktop, navigate to Class Files > Premiere Pro Intermediate > Noble Promotional Ad and double–click Noble Promo.mp4
Notice the video cuts to match the voice-over and not the music’s beat.
Close the video when done.
Getting Started
There were a lot of markers to set in the previous exercise, so we’ll start with a file that has all that work done.
In Premiere Pro, if you have a project open, choose File > Close All Projects.
Choose File > Open Project or hit Cmd–O (Mac) or CTRL–O (Windows).
Navigate to Desktop > Class Files > Premiere Pro Intermediate > Noble Promotional Ad > Finished Projects.
Double–click on Noble Promo Ad—VO Completed.prproj to open it.
NOTE: If you see a dialog about Converting Project (from a prior version) refer to Fixing Version Compatibility Issues section in Exercise 1A. If the Link Media dialog opens refer to Locating Missing Media in Exercise 1A.
Go to File > Save As and:
- Name it Noble Promo Ad—Your Name.prproj
- Save it into Desktop > Class Files > Premiere Pro Intermediate > Noble Promotional Ad (replacing the one that’s already there).
Adding Clips to Match a Voice-Over
For a voice-over, videos clips must match what is being said. Background music helps hold everything together, but the spoken word drives the entire sequence. To add video clips to match the voice-over, we’ll use a technique called a three–point edit.
In the Timeline, lock the Audio 1 and Audio 2 tracks.
Move the Playhead to the beginning of the Timeline. We’re going to add In and Out points for three–point edits:
- Press Shift–M to jump to the 1st marker at 3;18
- Press I to set the In point on the Timeline.
- Press Shift–M to jump to the next marker at 4;12
- Press O to set the Out point.
In the Project panel expand the 01—Video > Designing bin and:
Double–click Woman using Adobe Illustrator.mp4 to open it in the Source panel.
NOTE: Instead of expanding the bin you could start typing part of the file name you’re looking for in the Project panel’s search field.
Now in the Source panel, move the playhead to 0;20 and:
- Press I to set an In point.
Press the . (period) key to perform an Overwrite edit onto the Timeline.
Because the target audio track (Audio 1) is locked, only the video is added to the Timeline.
Scrub (drag back and forth) the Playhead over this clip in the Timeline. Notice it’s smaller than the frame size of the sequence (there’s empty black area around it).
CTRL–click (Mac) or Right–click (Windows) on the clip in the Timeline and choose Set To Frame Size.
Adding Video for the “Using Premiere Pro” Audio
Still in the Timeline, move the Playhead to the 2nd marker at 4;12
- Press I to set a new In point.
- Press Shift–M to jump to the 3rd marker at 5;07
- Press O to mark the new Out point.
In the Project panel, double–click on the Using Premiere Pro.mp4 clip.
In the Source panel, move the Playhead to 9;15
- Press I to mark the In point.
- Press . (period) to Overwrite this clip onto the Timeline.
Adding Video for the “Designing a Web Page” Audio
Move the Timeline Playhead to the 3rd marker at 5;07
- Press I to set the In point.
- Move the playhead 2 markers ahead to the 5th marker at 6;27
- Press O to mark the Out point.
In the Project panel, double–click on Designing a Web Page.mp4.
In the Source panel, move the Playhead to 8;15
- Press I to set the In point.
- Press . (period) to add this clip to the timeline.
Adding Video for the “Teaching” Audio
Move the Timeline Playhead to 5th marker at 6;27 and press I.
Move the playhead to the next marker at 8;24 and press O.
In the Project panel, expand the 01—Video > Classroom bin and:
- Double–click on the Teaching—Front of Classroom.mov clip.
- In the Source panel, move the playhead to 0;15 and press I.
- Press . (period) to add this clip to the timeline.
Adding Video for the “Front Row Helping” Audio
- Move the playhead to the beginning of the Timeline and press I.
Hit Shift–M to move the playhead to the 1st marker at 3;18 and press O.
In the Project panel, double–click on Front Row Helping.mov.
- In the Source panel, move the playhead to 5;15 and press I.
- Press . (period) to add this clip to the timeline.
Choose File > Save or press Cmd–S (Mac) or CTRL–S (Windows).
TIP: Shift–M jumps to the next marker. Cmd–Shift–M (Mac) or CTRL–Shift–M (Windows) jumps to the previous marker.
Optional Bonus: Adding the Rest of the Clips
If you want to keep working on this for more practice, below is a table with the edit points for the rest of the video using the 3–point editing technique.
Steps to a 3–point Edit:
- Make In and Out Points on the timeline.
- Make an In point on the clip in the Source panel.
- Perform an Overwrite edit to add the clip to the Timeline.
| Timeline In | Timeline Out | Clip Name | Source In |
|---|---|---|---|
| 8;24 | 11;01 | Typing Code | 0;05 |
| 11;01 | 14;09 | Coding on a Laptop | 0;00 |
| 14;09 | 17;17 | Classroom Pan 01 | 0;00 |
| 17;17 | 22;24 | Instructor Teaching | 0;00 |
| 22;24 | 29;10 | One on One Help | 1;10 |
| 29;10 | 34;29 | Instructor Teaching | 13;10 |