Lists: Retaining User Data with Persistent Storage
What This Tutorial Covers
UserDefaults
Lightweight key-value storage for app settings and small data.
File-Based Storage
JSON or property-list persistence for structured data.
Core Data
Apple's framework for object persistence at scale.
Noble Desktop's Full-Stack Web Development Certificate teaches programming fundamentals that transfer across mobile, web, and desktop development.
Dive into this comprehensive iOS Development tutorial that covers topics such as retaining the check button's state, data modules in Swift, converting and importing information stored in UserDefaults, syncing the UI with persistent storage, and testing the persistent storage.
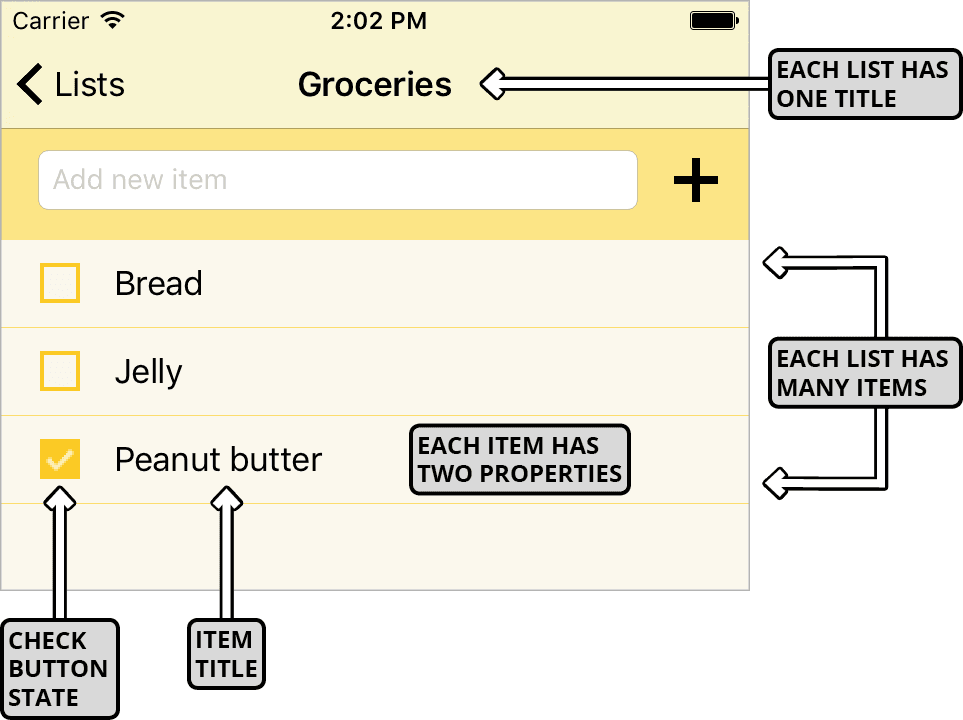
Exercise Preview
Retaining the Check Button’s Checked/Unchecked State
Persistent storage holds on to the data a user has input, so it’s all still there when the app is relaunched. Before we implement this, we need to fix an issue in which data is discarded even before we relaunch the app.
If the Simulator isn’t still running, go to Xcode and Run
 it now.
If you don’t have any lists on the first screen, use the text field and Plus (+) button to add one now.
Click on a list name to segue to the next screen.
If there aren’t any items, add at least two now.
Click the Check button
 next to one of the items.
If you want, rinse and repeat for some of the other items. Keep a mental note of which are checked and which are not checked.
Click the
<Lists button to return to the previous screen, then click the name of the list once more to segue back to the second screen.Oh no, where did all the Checked images
 go? It looks like our app didn’t remember their checked/unchecked state…
To solve the issue, switch back to Xcode.
The method that changes the button image is in ListItemTVCell.swift, so go to the top of Xcode and click on its tab if you aren’t already there.
In the checkButtonTapped method, highlight this entire line and copy it:
checkButton.setImage(item.checked ? UIImage(named: "Checked.png") : UIImage(named: "Unchecked.png"), for:.normal)To solve the issue, we need to add similar code to the parent View Controller’s file. We’ll tell you why soon. Switch to the ListItemsVC.swift tab.
Paste the code in the cellForRowAt method where shown in bold:
func tableView(_ tableView: UITableView, cellForRowAt indexPath: IndexPath) -> UITableViewCell {
   let listItemTVCell = tableView.dequeueReusableCell(withIdentifier: "ListItemTVCell", for: indexPath) as! ListItemTVCell
   listItemTVCell.item = list.items[indexPath.row]
   listItemTVCell.itemNameLabel.text = listItemTVCell.item.title
   checkButton.setImage(item.checked ? UIImage(named: "Checked.png") : UIImage(named: "Unchecked.png"), for:.normal)

   return listItemTVCell
}
The checkButton and item are properties of the listItemTVCell, so add the bold code:
listItemTVCell. checkButton.setImage(listItemTVCell. item.checked ? UIImage(named: "Checked.png") : UIImage(named: "Unchecked.png"), for:.normal)Let’s see if this worked. Click the Run button
once more.Add a list to the first screen. Click on it, then add a few items to the second screen.
Click the Check button
next to some of the items. Keep a mental note of which are checked and which are not checked.Click the
<Lists button to return to the previous screen, then click the name of the list once more to segue back to the second screen.All the items you checked
should still be checked!Why did we need to put similar code in two files? To find out, switch back to Xcode.
You should be back in ListItemsVC.swift. In its cellForRowAt method, locate the following line:
let listItemTVCell = tableView.dequeueReusableCell(withIdentifier: "ListItemTVCell", for: indexPath) as! ListItemTVCellIn earlier exercises, we’ve mentioned that Table View Cells that we no longer need get put into a queue where these objects (but not the specific data on them) wait to be reused. When a new cell is needed, iOS executes this line. This code takes the specified
"ListItemTVCell"out of the queue, fills it in with the relevant data, and puts it back on-screen for an encore performance.This innovative memory management solution ensures smooth scrolling through a Table View, as there are never all that many active cells at a time. However, when a cell enters the queue, the app forgets all its specific info because it’s no longer useful.
This is why you cannot rely on a Table View Cell to store boolean states such as checked or unchecked! The solution is to put your state changing code in the interactive control’s handler (in this case the checkButtonTapped method) AND the cellForRowAt method for the cell’s parent Table View.
Data Modules in Swift
Multiple files in our app will need to access the user’s data from persistent storage, so the code needs to be accessible app-wide. Data Model.swift is the perfect place for this, but now that it will host more than our model, we should rename the file.
Modules are standalone files that can be incorporated into a project using the import keyword. Many developers create third party modules that can be downloaded at swiftmodules.com. Because these files make it more convenient to do a certain task such as storing data, let’s rename it to Data Module.
At the top, click on the Data Model.swift tab.
In the Project navigator
 , click on the word Data Model to make it editable.
Type Data Module and press Return to apply the change.
To make sure you won’t be confused if you return to this project later on, let’s change the comment near the very top of the file as shown in bold:
//
//  Data Module.swift
//  Lists
TIP: The renaming process is more complicated if you’re renaming a file that is referenced in your code. To learn how to quickly do this everywhere in your app, read the Renaming Classes reference at the back of the book.
Separate our data model from the persistent storage code with a MARK comment:
import UIKit

// MARK:—Data Model————————————

class ListItem {
At the very bottom of the file, add another MARK comment:
var lists = [List]() { didSet { lists.sort() { $0.title < $1.title } } }


// MARK:—Methods for Persistent Storage————————————
We’ll need two methods to make our persistent storage work. Type them as shown:
// MARK:—Methods for Persistent Storage————————————func loadLists() {

}


func saveLists() {

}
The loadLists method will go into the persistent storage and convert its simple types into our List and ListItem classes. We need to do this so we can load all the preexisting lists a user has input into the data model and UI.
The saveLists method saves any changes to the user’s lists and their items so the persistent storage stays up-to-date when the user adds or deletes a list or list item. In order to do this, we’ll need to convert our classes into simple types.
Importing & Converting Info Stored in the UserDefaults
There are multiple strategies for implementing persistent storage on the user’s device, and some are more complicated than others. For our project, the simplest way is to store the data in the UserDefaults. To understand what this is, let’s take a step back and think about how Apple keeps its iOS platform as secure as possible.
Each iOS application gets placed in a sandbox when the user installs it on their device. If one of a user’s apps gets hacked or something goes wrong, these “walls” contain the damage, protecting the operating system and their other apps.
For those safety reasons, an app cannot store its data outside of the sandbox. This is why each app has its own UserDefaults database, which is part of the sandbox. It can store a few user settings—usually a user’s preferences for the app. (Storing large amounts of data will make your app launch more slowly.) Let’s see how we can take advantage of this built-in storage for our lists and their items!
We first need to create an instance of the UserDefaults class by assigning a reference to UserDefaults.standard. In the loadLists method, add the following bold constant so we can work with the app’s UserDefaults:
func loadLists() {
   let retrievedData = UserDefaults.standard
}
Because the UserDefaults stores settings in a property list (or plist), it can only accept values with basic types such as strings, arrays, and dictionaries. To add a dictionary, call the UserDefaults class’ predefined dictionary method as shown:
let retrievedData = UserDefaults.standard.dictionary(forKey: "ListOfLists")Each item in the UserDefaults must have a unique key (not just dictionaries, which also have key-value pairs). You can name a key whatever you want, but it’s best to use a name such as ListOfLists that helps you remember what data that item stores.
TIP: To see how a property list is structured into keys and values, you can open up the app’s Info.plist file in a new tab.
In case iOS fails to create the retrievedData constant or cannot access it, we want to stop executing the loadLists method. Add a guard statement:
guard let retrievedData = UserDefaults.standard.dictionary(forKey: "ListOfLists") else { return }A guard statement is a simple way to create a firewall of sorts. A guard statement’s else condition specifies what happens if iOS fails to find a value. If this code finds a value, we know for sure that our retrievedData constant is safe to use.
This code goes into the app’s UserDefaults and attempts to collect everything stored in the dictionary with the ListOfLists key. If it’s successful, that data gets put into the retrievedData constant.
We want our model to be perfectly synced with the UserDefaults. To ensure that we don’t have any duplicate data, add the bold line of code:
guard let retrievedData = UserDefaults.standard.dictionary(forKey: "ListOfLists") else { return }
lists.removeAll()
NOTE: Remember that lists is our global variable that models all the user’s lists. This array is our “list of lists”, so it stores the same information as our dictionary.
We need to repopulate the model’s lists array with information retrieved from the UserDefaults plist. In order to successfully do that, we need to format the plist so its types match the preexisting relationships between objects in our model. Look at the following screenshot for guidance:
Earlier, we set up a dictionary in the UserDefaults so we could use a list’s title as the key for each entry. To fill in the values, we’ll nest two arrays inside the dictionary. The first array will hold all the list’s items. The second one will contain two types of information: the list item’s name and its checked/unchecked status.
Format the plist using a dictionary of arrays of arrays:
lists.removeAll()

let dictionaryOfArraysOfArrays = retrievedData as! [String:[[Any]]]
Let’s break that down:
- The
[String:[[Any]]]format means that our dictionary (in the outermost set of brackets) will have strings as keys, and two arrays as values. The inner array has a type of Any because it will have two different data types inside. - retrievedData stores our raw, unformatted data. dictionaryOfArraysOfArrays casts this raw data as the format we want to read. We instantiated this new constant so we can work with a native Swift complex type with nested collections.
- The
Earlier, we mentioned that a plist such as the UserDefaults can only store simple types such as strings and dictionaries. This means we are going to need to convert the
[String:[[Any]]]format to our native format—the List and ListItem classes. We’ll need to iterate through every object in the dictionary of nested arrays. Iterate through the entire dictionary as shown:let dictionaryOfArraysOfArrays = retrievedData as! [String:[[Any]]] for (listTitle, listItems) in dictionaryOfArraysOfArrays { }Remember that we use the for (key, value) in dictionary syntax to iterate through a dictionary. This goes to show that once we read from the UserDefaults (in the guard let statement) and cast the data inside the defaults as the desired types, the remaining code won’t be all that different from code you’ve written in the past.
Like any other for-in loop, we need to specify what to do with the listTitle key and the listItems value. Use the listTitle key to generate a new object of the List class (from our data model) by adding the bold code:
for (listTitle, listItems) in dictionaryOfArraysOfArrays {
   let newList = List(listTitle: listTitle)!
}
This newList is just another object of the List class. Remember that to instantiate a List, you need to fill in the listTitle: parameter. The second listTitle is the key that the for-in loop is iterating through. This means the first listTitle comes from our model, and the second one is part of the dictionary of nested arrays.
Let’s next tell the loop what to do with the listItems value. Assign it to the first array that stores all the list items on a given list:
for (listTitle, listItems) in dictionaryOfArraysOfArrays {
   let newList = List(listTitle: listTitle)!
   let arrayOfArrays = listItems
}
Remember that each list item has two properties—the name and the checked/unchecked state. In order to properly get both of these values, we need to iterate through each individual item in the arrayOfArrays as shown:
for (listTitle, listItems) in dictionaryOfArraysOfArrays {
   let newList = List(listTitle: listTitle)!
   let arrayOfArrays = listItems
   for array in arrayOfArrays {

   }
}
We next need to convert the data the loop finds to our class-based format. We’ll do that by using constants such as newList to create new instances of our classes.
In this nested for-in loop, we need to instantiate a new object of the ListItem class. Type the following bold code to append this object to the newList constant (it isn’t all the code this line needs, so you’ll have a red error for a few steps):
for array in arrayOfArrays {
   newList.items.append(ListItem
}
NOTE: Remember that the newList constant is an object of the List class, which has a set of items as a property. That’s why we needed to use dot syntax.
After the ListItem type, add a left parenthesis ((). You should see a list of suggestions. Select the initializer with two properties, as shown:
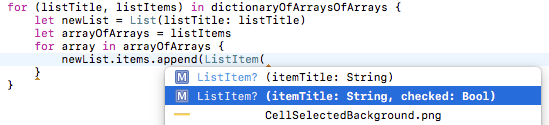
NOTE: In the data model, you will see that when a ListItem is instantiated, the checked property is set to false by default. Because of this default value, there are two versions of the initializer—one with the checked and one without.
You should have the following code, which includes the two properties’ data types:
newList.items.append(ListItem(itemTitle: String, checked: Bool)Fill in the itemTitle and checked parameters with data that comes from the inner array’s first
[0]and second[1]indexes:newList.items.append(ListItem(itemTitle: array[0] as! String, checked: array[1] as! Bool)Remember that the array is the nested array of type Any. Because an array of this type can store objects with different data types, we needed to specify what type of data each index stores.
Let’s use a checked off Peanut butter item in a Groceries list as an example. The Peanut butter title is stored in the first (zero) index of the array, and we’re telling iOS to interpret that as a String. The boolean checked status is the array’s other index.
To get rid of the error, unwrap the ListItem class by adding an exclamation mark (!). Don’t forget to add the final right parenthesis the append method needs!
newList.items.append(ListItem(itemTitle: array[0] as! String, checked: array[1] as! Bool)!)NOTE: Remember that the initializer for the ListItem class is fallible, to prevent the user from accidentally adding a blank item. We can feel 100% safe unwrapping the newList constant’s initialization. Remember the guard statement earlier in the loadLists method? It ensures that once we get to this point, we definitely have the valid item title we need, because its “firewall” got passed.
Below the second for-in loop but within the first one, append the contents of the entire newList (with its two nested arrays) to the lists array from our model:
for array in arrayOfArrays {
   newList.items.append(ListItem(itemTitle: array[0] as! String, checked: array[1] as! Bool)!)
}
lists.append(newList)
NOTE: Remember that the lists array is a global variable that stores all instances of the List class—with all the corresponding objects of the ListItems class.
Testing the Persistent Storage
Let’s test out our persistent storage! At the top, click the Run button
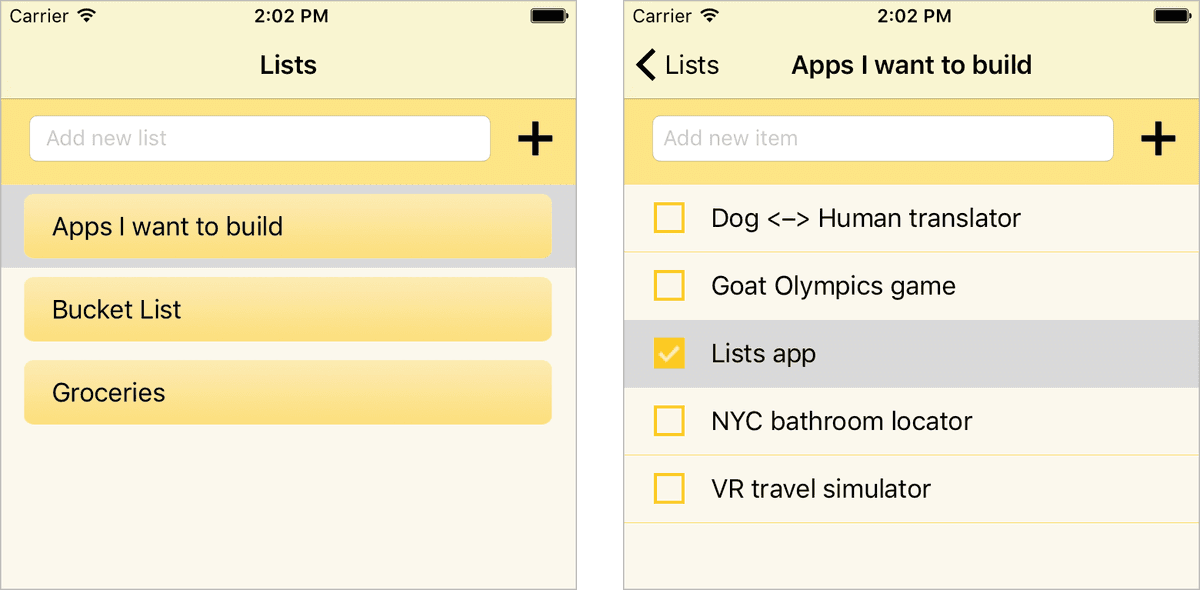
.Because this is the first time we’re using the persistent storage, we have a blank screen. Add two lists (such as a Bucket List and a list of Apps I want to build).
Click on one of the lists (such as Apps I want to build).
Add three items (we input NYC bathroom locator, Lists app, and VR travel simulator).
Hover over an item name (such as VR travel simulator—that sounds way too hard to build!) and drag to the left. Click the red Delete button to remove it.
Check off one of the items (such as Lists app) by clicking its Check button.
To see whether or not our app can retain this info, switch back to Xcode.
Now comes the moment of truth! Click the Run button
again.You should see the name of the two lists you entered in the last session! Click on the one you added items to (such as Apps I want to build).
The list item you checked should still be checked, and the item you deleted should still be gone! Because the Delete button functionality on both screens is the same, we know that our persistent storage would also remember if we were to delete a list.
To see what’s happening in the persistent storage, return to Xcode.
Let’s write a few print functions. Switch to the Data Module.swift tab.
At the end of the app’s loadLists method, add the following two comments:
func loadLists() {Code Omitted To Save Space
print("Retrieved Data: \(retrievedData) \n")
   print("Dictionary of Arrays of Arrays: \(dictionaryOfArraysOfArrays) \n")
}
We added the
\n because the log looks better with space between lines. Remember that the retrievedData constant stores the raw data. We’re printing this out so we can see the difference between it and the formatted dictionaryOfArraysOfArrays.To see how the UserDefaults info changes, add the dictionaryOfArraysOfArrays comment to the end of the saveLists method (you can copy and paste):
func saveLists() {Code Omitted To Save Space
UserDefaults.standard.set(dictionaryOfArraysOfArrays, forKey: "ListOfLists")
   print("Dictionary of Arrays of Arrays: \(dictionaryOfArraysOfArrays) \n")
}
We will see the contents of these structures in the Debug area at the bottom of Xcode. If it isn’t already showing, go to the top right and click its button
 .
.Look at the bottom right of the Debug area. Next to the trash icon, you should see two buttons
 . We want the first one to be gray (unselected) and the second one to be blue (selected), so we only see the Console half of the Debug area.
Click the Run button
once more.If you can’t see both the Simulator and the Debug area, move the Simulator now.
If the Debug area disappeared, go back to Xcode and click its button
once more.In Xcode, scroll to the top of the Debug area. You should see the Retrieved Data. Oof, that sure looks pretty raw! It’s got data types such as NSCFArray, followed by long numbers (the instance numbers for the raw arrays).
Scroll back down until you see the Dictionary of Arrays of Arrays. With the examples we used, this is what we have (you will see whatever you input):
Dictionary of Arrays of Arrays: ["Bucket List": [], "Apps I want to build": [[Lists app, 1], [NYC bathroom locator, 0]]]This formatting is similar to what you will use when you store data on an external Cloud-based service such as Firebase, so let’s break this down:
- We told you to enter two lists, only one of which has items. That’s why our dictionary with the key of
"Bucket List"has an empty array[]. - The other dictionary has some nested arrays, containing the name of the item in the first index and the status of the Check button in the second index. (The number 1 means true and 0 is false.)
- We told you to enter two lists, only one of which has items. That’s why our dictionary with the key of
These two comments show the state of the app in the last saved configuration. Change something and look in the Console. This is what we got when we segued to the second screen and unchecked an item that used to be checked:
Dictionary of Arrays of Arrays: ["Bucket List": [], "Apps I want to build": [["Lists app", false], ["NYC bathroom locator", false]]]In this example, we unchecked our Lists app because we could stand to improve the user experience in a few places. We’ll do that in the next and final exercise.
Now that you’ve seen how the persistent storage works behind the scenes, there’s no need to print the UserDefaults contents to the log. Return to Xcode and delete the three print functions.
Save the file and keep Xcode open so that we can finish up this project in the next exercise.