Creating Simple Cells & Managing Retina Images
What This Tutorial Covers
Custom Cells
Subclass UITableViewCell for custom layouts.
Retina Assets
Provide @2x and @3x image variants.
Image Reuse
Set images correctly in cellForRowAt to avoid flicker.
Noble Desktop's Full-Stack Web Development Certificate teaches programming fundamentals that transfer across mobile, web, and desktop development.
Dive into the world of iOS development with this detailed tutorial that covers a range of topics including creating a single view application, adding cells, and adding images to an app for retina devices.
Exercise Preview
Creating a Single View App
- In the Project navigator, in the Jive Factory folder, notice that a few files were created automatically. Because we chose Single View App when creating this project, Xcode automatically created a View Controller as well as an AppDelegate.swift file. For this app, we’ll be using a different View Controller, which we’ll create shortly.
- Click on Main.
- Make sure the Document Outline is showing. If you don’t see it, click the Show Document Outline button
 at the bottom left of the Editor area.
 In the Document Outline, expand View Controller Scene then click on View Controller to select it.
We want more functionality than what the default View Controller provides. Let’s replace it with a Table View Controller.
- With the View Controller still selected, hit Delete.
- At the top right of the window, above the Editor panel, in the Object library
 , find the Table View Controller object.
 - Drag the Table View Controller onto the Editor.
- In the Document Outline, select Table View Controller.
In the Attributes inspector
 , under View Controller, check on Is Initial View Controller. This specifies the Storyboard Entry Point, which disappeared when we deleted the first View Controller.
Adding Cells
- In the Document Outline, expand Table View Controller if it is not already expanded.
- Click on Table View.
- In the Utilities area on the right, go to the Attributes inspector tab .
Under Table View, from the Content menu, choose Static Cells.
NOTE: In a later exercise we’ll show you how to create Dynamic Prototype cells using code. In this exercise, we just want to mock up what this View Controller will look like, so we’ll use Static Cells for now.
- In the Document Outline, expand Table View.
- Expand Table View Section.
- Notice there are three Table View Cells listed. Right now we only want to work with one, which we’ll make copies of later, so let’s delete the two extra Table View Cells. Click on the second Table View Cell to select it.
- Hold Shift and click on the last Table View Cell to select them both.
- Hit Delete.
- Click the remaining Table View Cell to select it.
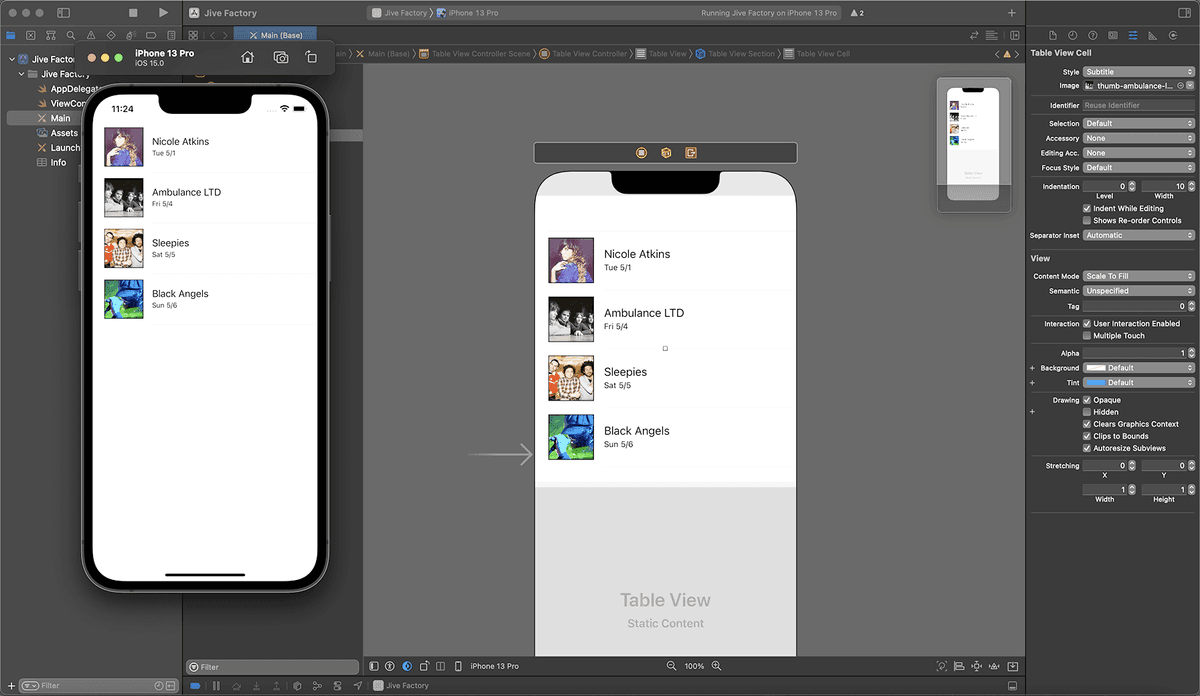
- In the Attributes inspector , set the Style menu to Subtitle.
- In the Document Outline, expand Table View Cell then expand Content View.
- Notice there are two labels: Title and Subtitle. Click on Title.
In the Attributes inspector
, below the Text menu in the field that currently says Title, delete the text and change it to: Nicole Atkins- Click on Subtitle.
Underneath the Text menu in the field that currently says Subtitle, change it to: Tue 5/1
Adding Images to an App
We want to add an image of the band to the cell. First we need to add the thumbnail images we will be using to our project.
- In the Project navigator, click on Assets.xcassets. We want to add the images we need here.
Switch to the Desktop and navigate into: Class Files > yourname-iOS Dev Level 2 Class > Band Images > thumbnails
Notice that each image has three differently named versions. Retina displays are twice the resolution of regular displays. Therefore, an image that is 30x30 on a regular screen will display as 60x60 on a Retina screen. Because of this higher pixel density, to provide crisp images for these devices we also have to include higher-resolution images in the app. This important naming convention allows apps to automatically detect the higher-resolution images and display them instead of the regular images.
Press Cmd–A to select all the images in that folder.
With Xcode still visible, drag the images to either column of the Editor area.
Notice that all the images have been placed in the appropriate 1x, 2x, or 3x spaces automatically.
NOTE: Ever since the release of iPhone 6 Plus, it is best practice to make three versions of every image for your app (@1x, @2x, @3x). For example, let’s say we start with a @1x image at 29x29. For Retina screens, we’d need @2x versions at 58x58. For Retina HD (iPhone 6 Plus or later), we’d need @3x versions at 87x87.
When we add images using the assets catalog, the files are automatically copied over to the project folder. Let’s take a look. In the Project navigator, CTRL–click or Right–click on Assets.xcassets and choose Show in Finder. This reveals the folder in the Finder.
Go into the Assets.xcassets folder and notice all our thumbnail images have been copied into this folder. Sweet!
Switch back to Xcode and click on Main.storyboard.
Now we’ll add an image to the Table View Cell. In the Document Outline, click on Table View Cell.
In the Attributes inspector
, from the Image menu, choose thumb-nicole-atkins.Notice the space for a thumbnail image has been added next to the title. Unfortunately Xcode doesn’t show us the image preview unless we run the app. Let’s do so now.
Set the active scheme (top-left corner) to Jive Factory > iPhone 8 to preview what the app looks like on an iPhone 8.
NOTE: The app will automatically choose the higher-resolution images because of the @2x (or @3x) naming convention!
Go to the top left and click the Run button
 .
.Once the Simulator finishes loading the app, notice that the thumbnail image is a little small. Right now it’s being resized because the cell isn’t tall enough. Let’s make the cell taller.
Switch back to Xcode and make sure Table View Cell is selected.
In the Utilities area on the right, click the Size inspector tab
 .
.Next to Row Height, enter 88 and press Return.
Click Run to see the improved look of our cell. Awesome!
Adding More Cells
- Switch back to Xcode.
- In the Document Outline, click on Table View Section.
- In the Utilities area on the right, click the Attributes inspector tab .
- Next to Rows change 1 to 4 and hit Return. Voilà! We now have four copies of the original cell in the Editor!
- In the Editor, click on the second Nicole Atkins cell.
In the Attributes inspector
, from the Image menu, choose thumb-ambulance-ltd.We’ll need to run the app to view the new image. We’ll check this shortly.
- Double–click the Nicole Atkins text in the second cell and change it to: Ambulance LTD
- Double–click the Tue 5/1 text below that and change it to: Fri 5/4
Edit the third and fourth cells for the remaining bands, Sleepies and Black Angels using the details below:
Band Date Image Filename Sleepies Sat 5/5 thumb-sleepies Black Angels Sun 5/6 thumb-black-angels - Let’s preview our work so far. Click the Run button.
- Switch back to Xcode.
- Click the Stop button.
- In the Project navigator click on the storyboard, Main.
Leave the project open. We’ll continue building this app in the next exercise.