Connecting to an External Datasource
iOS Architecture Patterns
MVC
Model-View-Controller — Apple's classic UIKit pattern.
MVVM
View Model handles UI logic — testable and clean.
Coordinator
Separate routing/navigation from views.
Composable Architecture
TCA — newer, state-driven, growing in popularity.
Noble Desktop's Full-Stack Web Development Certificate teaches programming fundamentals that transfer across mobile, web, and desktop development.
Learn how to create a database in Firebase and connect it to your iOS application with this in-depth tutorial, featuring step-by-step instructions and a practical exercise.
Exercise Preview
Creating a Database in Firebase
Now that we have Firebase set up we can create our own database of bands that will feed our app and make it a real functioning app. We can do this through the user interface in the console.
- If your user dashboard isn’t still open in your web browser, go to firebase.com/login/ If you are not logged in, do so now.
- Click on the Jive Factory project if you’re not inside the project’s console already.
- On the left, click Realtime Database.
- To add data to our database, hover over your app’s unique identifier (something like jive-factory-d1ce2) and click the green + (plus) symbol next to it.
Set the following in the text fields that appear:
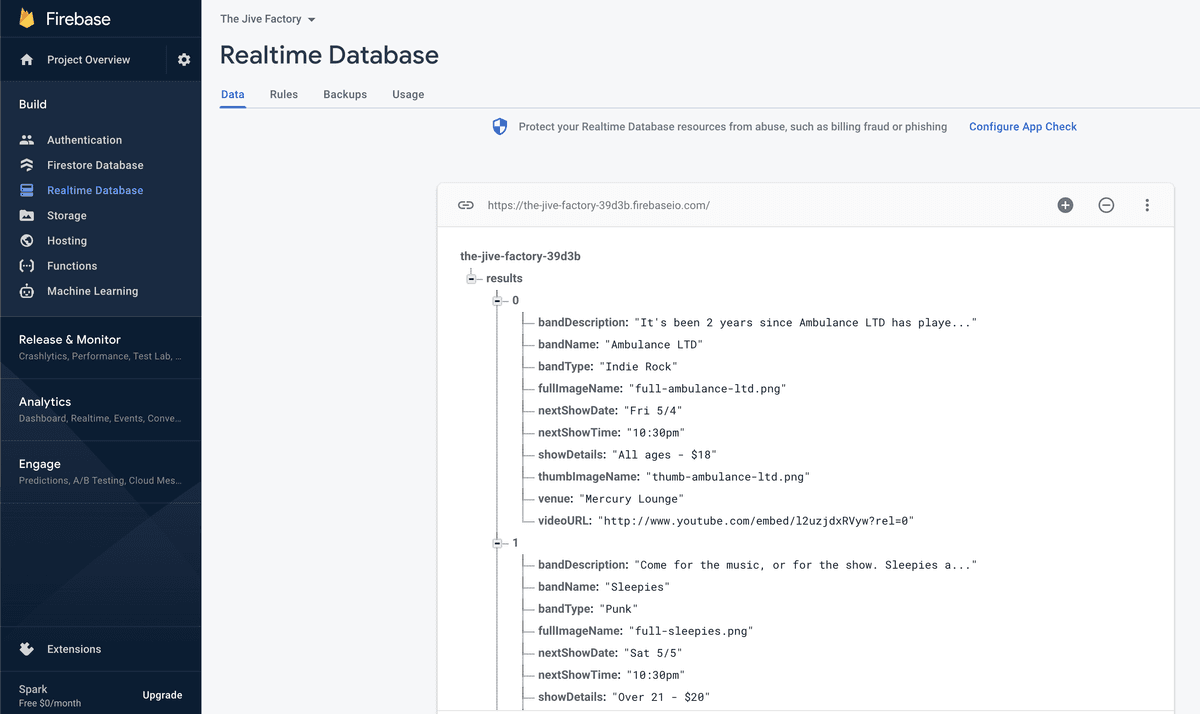
Name: results Value: Leave it blank Now that we have a dataset available to us, let’s take a minute to learn a bit about it. Databases are traditionally made up of tables. This is what Firebase presents to us in its interface. In a table, each entry will be a row. The row we just added will act like an array, as we did not give it a value. It will be the parent of all the data we want to add.
- Let’s create another array of data within the parent object. Click the plus next to Value to make another set of text fields appear.
Set Name to 0 (indicating the zeroth index of an array). Leave Value blank and click the plus next to it.
NOTE: This ensures that each band will get its own row in the database (represented by its own index in the array). We’ll only add one band’s data for now.
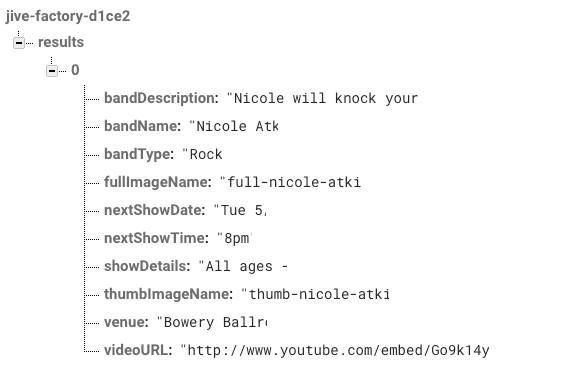
We next want to add columns within the array for all of Nicole Atkins’ band details. In the next set of text fields, set the following and do NOT click the plus yet:
Name: bandName Value: Nicole Atkins Setting both a name and a value creates a key-value pair. In iOS, this is stored in a collection of objects called a Dictionary. The name corresponds to a property in our BandsModel, and the value is the one that corresponds to Nicole Atkins’ info.
To create a new column at the same array index, click the plus next to 0:

- In the new text fields, set Name to bandType and Value to Rock.
- Once again, click the plus next to the 0 a couple of rows above.
- It’s important that the names of the keys and values in the database match the properties and values in our app exactly. Some of the values we’re about to add are a real mouthful, so it’s a good idea to copy/paste them. Switch to Xcode.
- In the Project navigator
 open BandsModel.swift.
 - Copy bandDescription from the fourth line of the Nicole Atkins Band Detail, then switch back to the Firebase dashboard, and paste it into the open Name field.
Copy and paste all of the following key-value pairs between the BandsModel.swift file and Firebase (make sure to click the + next to Name to get new rows).
Name Value bandDescription Nicole will knock your socks off. fullImageName full-nicole-atkins.png thumbImageName thumb-nicole-atkins.png nextShowDate Tue 5/1 nextShowTime 8pm venue Bowery Ballroom showDetails All ages—$35 videoURL http://www.youtube.com/embed/Go9k14yrxeQ?rel=0 Click Add. You should have two columns and 10 rows, similar to this:
Connecting the Model with Firebase
Now that we have a database populated with some data, we will need to update our model to fetch and parse the data.
- Switch to Xcode and in the Project navigator , click on BandsModel.swift if it isn’t already open.
At the top of the file, import Firebase and the Firebase Database by adding the bold code:
import UIKit
import FirebaseDatabase

class BandsModel: NSObject {
Select and delete the entire fetch() method as shown:
func fetch() {Code Omitted To Save Space
}Start coding up a new, more real-world fetch() method as shown in bold below:
var bandDetails = [BandDetail]()

func fetch(complete:@escaping() -> ()) {

}
NOTE: This method will utilize blocks/closures to signal completion, so the code we added takes a parameter with no type and returns an object with no type.
The first thing we want to do is initialize the Firebase object by pointing it to your project’s database.
func fetch(complete:@escaping() -> ()) {

   let myRootRef = Database.database().reference()

}
NOTE: The GoogleService.plist we added includes the Firebase URL we need to reference. In older versions of Firebase we needed to reference the app’s URL within the code.
Now we need to add a closure so our app can read the data stored in the database. As shown below in bold, use Firebase’s observeDataEventType method to set up an event listener that can listen for any changes to our database (don’t worry about the error messages that will pop up):
let myRootRef = Database.database().reference()

myRootRef.observe(DataEventType.value, with: {[weak self] snapshot in
})
The code we just added gets pinged automatically every time there’s new data in the database. This is all we need to keep the app’s data up-to-date. Let’s take a moment to learn how it works:
- We’re getting a snapshot passed back in the completion block. A snapshot is a representation of the current data in a particular place in our database.
- There are a few different types of events Firebase can listen for. We set it up to listen for .value events, which fire anytime a snapshot changes.
- If you want to access properties of the main class within a closure, you need to use self. That can create a memory management nightmare called a strong reference cycle. We added a [weak self] block to make the BandsModel class’ properties a weak reference within the closure, essentially avoiding that.
Strong Reference Cycles & How to Avoid Them
IOS uses ARC, or Automatic Reference Counting to manage your app’s memory usage without you needing to do much work. However, sometimes you can end up inadvertently making it so an object that is no longer needed cannot be destroyed because it still has one or more strong references pointing to it. This is a strong reference cycle (or retain cycle), and it’s a huge waste of memory.
You have to be very careful not to create a strong reference back to a class’ properties outside of the closure. To avoid that, we created a weak reference to the entire class inside the closure. For more info on this tricky topic, go to tinyurl.com/ref-in-swift
Place the cursor between snapshot in and }) and add the following bold block that returns a DataSnapshot object (Firebase’s custom data type for a snapshot) that contains our data:
myRootRef.observe(DataEventType.value, with: {[weak self] snapshot in

if let snapshots = snapshot.children.allObjects as? [DataSnapshot] {
   print(snapshot.value!)

}    })
Earlier in the exercise, we structured our data so the parent object (results) holds arrays for each band. These nested arrays and the key-value pairs stored within them are the children of snapshot, and we want all these child objects to get returned. To see if this works, we’re going to print those contents to the log.
Now that we have a constant that stores all the snapshot’s child objects, we want to iterate through each array index. Add the following bold code:
print(snapshot.value!)

for snap in snapshots {
   if let array = snap.value as? NSArray {

   }
}
Essentially what we’re doing here is using conditional binding to ensure that the child objects are of the NSArray data type. This is because we might have other types of objects in our database. snap is helping us pull out each item from the array. If the value of that snap is an array, it’ll get set to the array constant.
If you remember from earlier, the array with a key of 0 has multiple key-value pairs. These are each entries in a Dictionary. Now that we’ve iterated through that array, we need to iterate through its child dictionaries. To do that, add the bold code:
if let array = snap.value as? NSArray {
   for dict in array {
      if let object = dict as? Dictionary<String, AnyObject> {

      }
   }
}
NOTE: dict is helping us pull out each item from the dictionary. We’re making sure dict is actually a Dictionary with String objects for keys and values that are objects of any data type (AnyObject). This is because we don’t know necessarily what the type of the value is going to be. If it passes, we’ll continue on, and our dictionary data will be set to the object constant.
- Next we need to specify what happens when we loop through all these objects. To save you time, we already typed up this code for you. Go to File > Open.
- Navigate to the Desktop > Class Files > yourname-iOS Dev Level 2 Class > Code Snippets folder and open BandsModelFetch.txt.
- Scan the code. Notice that we’re creating an instance of the bandDetail object, then assigning values to all of the properties in our bandDetail object. We are accessing the values using the keys that we stored in our Firebase database (such as bandName) and Firebase will give us the value associated with that key. We say as? String, to coerce it into being a string.
- Press Cmd–A to select all the code.
- Press Cmd–C to copy it.
- Close the file. If you aren’t back in BandsModel.swift, switch to it.
Paste (Cmd–V) the code inside the loop so it looks like this:
if let object = dict as? Dictionary<String, AnyObject> {
   let bandDetail = BandDetail()
   bandDetail.bandName = object["bandName"] as? String
   bandDetail.bandType = object["bandType"] as? String
   bandDetail.bandDescription = object["bandDescription"] as? String
   bandDetail.fullImageName = object["fullImageName"] as? String
   bandDetail.thumbImageName = object["thumbImageName"] as? String
   bandDetail.nextShowDate = object["nextShowDate"] as? String
   bandDetail.nextShowTime = object["nextShowTime"] as? String
   bandDetail.venue = object["venue"] as? String
   bandDetail.showDetails = object["showDetails"] as? String
   bandDetail.videoURL = object["videoURL"] as? String
}
Finally we need to add our bandDetail object to our bandDetails array. To do so while using memory management best practices, type the following right after the block of text you just added:
bandDetail.videoURL = object["videoURL"] as? String

   if let strongSelf = self {
      strongSelf.bandDetails.append(bandDetail)
   }
}
Let’s break down the memory management aspect of the code we just wrote:
- This code refers to the [weak self] block we added to the closure above. That previous code basically turned self into a weak reference within the closure, preventing a strong reference cycle.
- Here we’re saying “if self doesn’t equal nil, then we’re creating a strong reference to a version of self that will only live inside of the closure.”
- The weak self/strong self type design pattern we’re using here and in the block is a very typical technique. It guarantees that the instance of self that we created up in the [weak self] block doesn’t disappear, or we don’t try to access it because it was released for some reason.
- strongSelf.bandDetails is a strongly referred to item within the closure, but it’s weakly referred to in regard to the entire class. It should get you a nice reference to your object.
Since Firebase’s observeDataEventType function executes asynchronously, we need to use a completion block and not just a return. Add a complete() at the end of our method, outside of our loop:
if let strongSelf = self {
                        strongSelf.bandDetails.append(bandDetail)
                     }

                  }
               }
            }
            complete()
         }
      }
   })
}
NOTE: As you’d expect, this code gets called when we have completed adding the data to our array.
Connecting the View Controller with the Model
Now that we have updated our model to work with our external data source, let’s update our BandsViewController to work with the model.
- In the Project navigator , go to BandsTableViewController.swift.
- In the viewDidLoad() method, select the bandsModel.fetch() method and delete it.
Type the following bold code:
override func viewDidLoad() {
   super.viewDidLoad()

   FirebaseApp.configure()
   bandsModel.fetch {[weak self] () -> () in
      if let strongSelf = self {
         strongSelf.tableView.reloadData()
      }
   }

}
This method also has this weak self/strong self type design pattern. When this view loads, we hit and call the fetch() method which talks to our model. Our model then talks to Firebase, and when it is done, it calls complete(), which pings our fetch() method, and tells the table view to reload. So let’s try it.
- For testing purposes, we added a print() function to our model. It should print out the contents of our Firebase array. This helpful feedback will show up in the Debug area at the bottom of the screen, so if it isn’t showing, go to the top and click Hide or show the Debug area
 .
. Click Run
 to fire up the simulator so we can test.
Nicole’s row on the table view should look the same as in previous exercises. That’s because the data is still the same as when we had static data in our model. It’s just coming from an external datasource on the internet now.
Switch back to Xcode and find the log on the right side of the Debug area.
In our log file you should see the entire results array, which means the whole object is there. This is our snapshot. All the code we added ensures that Firebase returns all the objects from the child array and dictionary. Exactly what we want!
- Now that we know the code works, we no longer need the print() function. Still in Xcode, switch to BandsModel.swift.
Locate and delete the following line of code:
print(snapshot.value!)
Importing More Data
We need to add details for the other three bands. We had you hand-import Nicole’s data so you could understand how the structure of a database works, and so you could get your hands wet. But manually typing in data is tedious, and there’s a better way.
JSON, short for JavaScript Object Notation, is a text format that can share data with apps or sites written in any language. It is the current standard for data transfer via REST APIs. Firebase allows us to import data directly from a JSON file.
The Firebase data we already have is structured just like JSON, which is organized as one parent object (like our results array), followed by other arrays (which can have key-value pairs nested within). This means that all it takes to get more data into our app is simply to import our data in JSON format. Let’s check it out to make sure.
- Return to Firebase in your browser, and in the Data tab (within Database), click the top right Import Data button
 to choose Import JSON.
 - In the dialog that pops up, click Browse.
- Navigate to Desktop > Class Files > yourname-iOS Dev Level 2 Class > Code Snippets and double–click on Bands.json to select it.
- With the file chosen, now click Import.
- You should be returned to the dashboard, where the new data will appear. Expand the new arrays named 1, 2, and 3 to see key-value pairs for each new band.
- Let’s see what the app looks like now. Return to Xcode.
- Click Run to see the app now has all four bands included.
- Great! Now we have a fully-functioning, real-world app that is using an external datasource. Take a few minutes to experiment with your data on Firebase.