Card War: The Data Model & Linking the UI to Code
What This Tutorial Covers
Model Classes
Represent game data with Swift structs and classes.
IBOutlet & IBAction
Connect storyboard elements to your code.
Update Cycle
Reflect data changes back to the UI.
Noble Desktop's Full-Stack Web Development Certificate teaches programming fundamentals that transfer across mobile, web, and desktop development.
Dive into iOS development with this comprehensive guide that covers topics such as connecting the UI to the View Controller, adding card and deck classes, and implementing shuffle functionality.
Connecting the UI to the View Controller
We can refer to these elements in our app, let’s add outlet or action connections to link up the visuals with the View Controller.
In the Project navigator, make sure Main is selected.
Go to the top right and click the Adjust Editor Options icon
 and choose the Assistant option.
ViewController.swift should appear to the right of the Storyboard.
If you need to hide some of Xcode’s interface to make room on-screen, feel free to go to the top right and click one or both the Hide or show the Navigator
 and Utilities
  buttons. Do not hide the Document Outline!
In the View Controller on the right, delete everything inside class ViewController’s curly braces so it is empty:
class ViewController: UIViewController {

}
Let’s first link the card back button to the code. In the Storyboard, make sure the button under the word Deck is visible. Then hold the Control key (or the Right mouse button) and drag from the Deck button to the View Controller. Release once you see the blue connector line under this line of code:
class ViewController: UIViewController {In the prompt that appears, set the following:
Name: deckButton (Remember to pay attention to uppercase vs. lowercase!) Type: UIButton Storage: Weak To apply the connection, click Connect (or press Return).
We’ve got our first outlet! We’ll eventually use this deckButton variable to change the image when the game ends and there are no more cards in our virtual deck.
We need to keep track of each player’s score so whenever a player wins a round, their score number increments up. So one at a time, we’ll need to drag from a zero. To make sure we don’t accidentally make a connection for the wrong label, go to the Storyboard and in the Document Outline nested under superView, select the top 0.
Hold Control (or the Right mouse button) and drag from the top 0 to the View Controller, releasing once you see the blue line under the following:
@IBOutlet weak var deckButton: UIButton!In the prompt that appears, set Name to player1ScoreLabel and click Connect.
Rinse and repeat for the bottom 0. Once again, it will be easiest to drag from the Document Outline instead of the Editor. Release the mouse when the blue line is between the most recent line of code and the final curly brace.
In the prompt, set Name to player2ScoreLabel and press Return.
Whenever the user clicks either the deck button or restart button, our app will need to execute some logic. That means we’ll need to create an action for these two. (We’ll just create them now, and flesh them out in another exercise.)
In the Storyboard, hold the Control key (or the Right mouse button) and drag from the Deck button to the View Controller underneath this line of code:
@IBOutlet weak var player2ScoreLabel: UILabel!In the prompt that appears, set the following:
Connection: Action (don’t forget this setting!) Name: drawCards Type: Any Click Connect (or press Return).
In the Storyboard, hold Control (or the Right mouse button) and drag from the Restart button to the View Controller. Release the mouse once the blue connector line is underneath the previous function, but within the ViewController class’ final curly bracket.
In the prompt that appears, create another action as follows:
Connection: Action Name: restartButton Type: Any Click Connect (or press Return).
Make sure your code looks like this (feel free to add any additional spacing, as we did to enhance readability):
class ViewController: UIViewController {

   @IBOutlet weak var deckButton: UIButton!
   @IBOutlet weak var player1ScoreLabel: UILabel!
   @IBOutlet weak var player2ScoreLabel: UILabel!

   @IBAction func drawCards(_ sender: Any) {

   }

   @IBAction func restartButton(_ sender: Any) {

   }

}
We’re done with the UI, so let’s get to coding! We’ll start by modeling our data.
Creating the Data Model Swift File
In the Project navigator, select the Card War folder so that the file is added inside.
Go to File > New > File or use the shortcut Cmd–N.
Under iOS and Source, double–click on the Swift File template.
Next to Save As, type: Data Model.swift
Navigate to Desktop > Class Files > yourname-iOS App Dev 1 Class > Card War (or Card War Ready for Data Model) > Card War.
Click Create.
If you previously hid the Project navigator on the left, go to the top right and click the Hide or show the Navigator button
to make it reappear.Notice that Data Model.swift was created. (If it is not currently selected, click on it to open it in the Editor.)
Also near the top right, click the Show the Standard editor icon
 so the files are no longer displayed side-by-side.
We will model the properties and methods for our cards and deck in this new file. When you’re learning how to model data, it can be helpful to see a visual reference of the objects you will be creating a template for. To open an image in a new tab:
- Press Cmd–T to open a new tab.
- With the new tab active, go to the Project navigator and click on the Assets.xcassets folder.
- Click on Deck near the bottom.
- Select the 1x deck image in the right column and press Spacebar so we can take a closer look at the visual representation of all of our cards.
Take note of the unique properties of our cards (we’ll need to model these):
- Each card has a different image and has a different letter or number.
- Each row of cards is a different suit: Hearts, Diamonds, Clubs, and Spades.
- Within each row, the cards are displayed in order of their value (starting with the lowly 2 and ending with the omnipotent Ace).
Press Spacebar again once you’re done previewing the deck image.
Modeling a Single Card by Adding a Card Class
Near the top of Xcode, click on the Data Model.swift tab to switch to this file.
In order to display cards in our UI, we need to use Apple’s provided UIImage class. It’s part of UIKit, so we need to import that. Change the import line as shown:
import UIKitWe’ll need a Card class to model each card. (Remember that we use UpperCamelCase for class names.) Add the bold code shown below:
import UIKit

class Card {

}
Ignore the red error
 for now. We’ll be adding the initializer to fix this shortly.
Let’s start adding properties to the Card class. Add an image property:
class Card {

   var image: UIImage

}
The suit property will be a set of special characters that will represent each of the four suits. We’ll see how to add these characters shortly. For now, set the suit property to a String value as shown below:
var image: UIImage
   var suit: String

}
Add a rank property that takes a String value as shown in bold:
var image: UIImage
var suit: String
var rank: String
This property represents the letter or number on the card. We are using the String data type because the value can be either a number between 2 and 10, or one of the letters: J, Q, K, or A.
Add one final property to the class as shown:
var image: UIImage
var suit: String
var rank: String
var value: Int
The value property models what the card’s letter or number means in terms of its value. For instance, a 2 card will have the lowest value of 2, and an Ace will have the highest value—13. These are all whole numbers, so we’re using the integer type.
Now that we’ve created our four properties, we need to create an initializer. As shown below, add the following bold initializer that will take the three parameters for suit, rank, and value, and assign the properties for each:
var value: Int

   init(suit: String, rank: String, value: Int) {
      self.suit = suit
      self.rank = rank
      self.value = value
   }

}
We are using the self instance to refer the variables to the parameters that are passed into the initializer.
Hmm, we still have a red error
. Click on it to see that we still haven’t initialized all the properties. But how do we initialize the image?Take a look through the Assets.xcassets folder to see that each card has its own file. They are all named using the same format: the suit (using the emoji character that represents the suit’s symbol), followed by the rank (2–A).
NOTE: Emoji characters are accessed from the Edit menu when typing the filename.
Back in our Data Model code, initialize the image so the card loads its own image. When a card is given a suit and rank, it will create its own string interpolation and load a UIImage with the exact same name:
init(suit: String, rank: String, value: Int) {
   self.suit = suit
   self.rank = rank
   self.value = value
   image = UIImage(named: "\(suit)\(rank)")!
}
The image does not need a self instance, as we did not specify it in the initializer.
Modeling All the Cards by Adding a Deck Class
To define the attributes and behaviors of the entire deck of 52 cards, let’s create another class. Above the Card class block of code, add the Deck class as shown:
import UIKit

class Deck {

}

class Card {
Let’s create a deck variable that will contain an array of the Card class. Type the following (you will see a red error—we’ll make it disappear in the next step):
class Deck {

   private var deck: [Card] = {

   }()

}
The deck array is initialized with a closure (indicated by the curly braces {}). Keep in mind that if a function does not take any parameters, we indicate this using empty parentheses (). We’ll explain why the deck variable is private later in this exercise.
We’ll generate the card deck to fill up the array over the next few steps, but for now, let’s simply get rid of the red error. Type the following bold code:
private var deck: [Card] = {
   var cards = [Card]()

   return cards
}()
Upon initialization, we want the private deck variable to receive the contents of the cards array once it’s filled. For this reason, we want to return the cards variable.
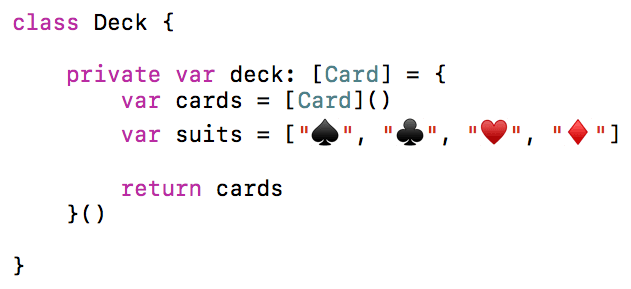
To start filling up our deck with cards, we first need to know which suits to add. Let’s create an array containing the four suit characters. Set up the array as follows:
var cards = [Card]()
var suits = ["", "", "", ""]

return cards
We need to insert emoji characters into this array. Go to Edit > Emoji & Symbols.
The window that appears allows you to insert emoji or other special characters. It can be expanded or contracted, depending on your preference. You can only drag a character when using the expanded version, so let’s make sure we’re all seeing the same thing.
Look at the top of the window. If it doesn’t say Characters, go to the top right and click the
 button to expand it.
At the top right of the window, click into the search field and type: suit
We want to use the four suit symbols beginning with the left spade selected in the screenshot below:
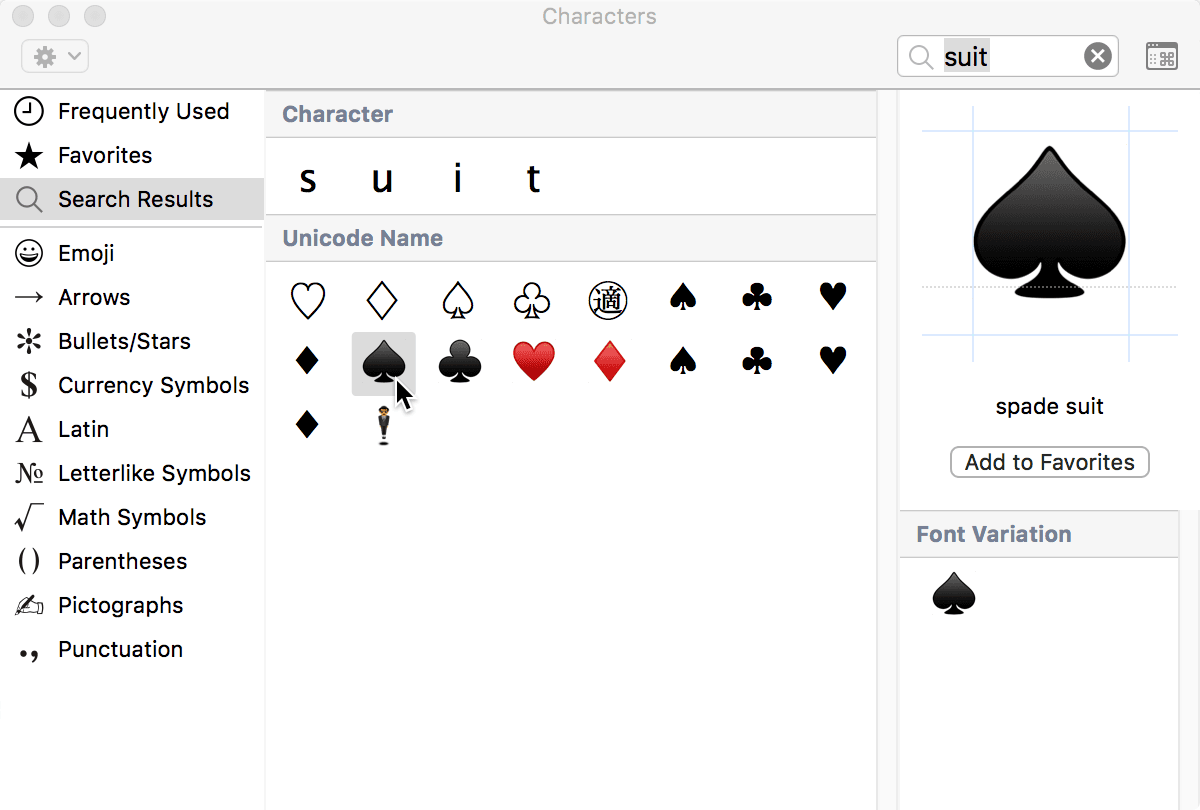
With Xcode still visible, drag in one of each of the four suit characters to fill the suits array as shown:
Close the window of special characters when done.
Next, we’ll add another array of all 13 different ranks. Type the following:
var ranks = ["2", "3", "4", "5", "6", "7", "8", "9", "10", "J", "Q", "K", "A"]To generate all 52 of the cards, we’ll need to iterate through both of the arrays we just added using two for loops. (The second one will be nested inside the first.) First we need to iterate through the suits array. Add the beginning of its loop as follows:
var ranks = ["2", "3", "4", "5", "6", "7", "8", "9", "10", "J", "Q", "K", "A"]
for suit in suits {

}
return cards
Every time we start with a new suit, we want to reset the card value to 1. Add the bold code shown below:
for suit in suits {
   var value = 1
}
Now that we have all of our suits present, we need to iterate through the ranks array. Let’s nest a new loop within the suits loop as follows:
var value = 1
for rank in ranks {
   cards.append(Card(suit: suit, rank: rank, value: value))
   value += 1
}
return cards
This loop is increasing the value by 1 each time. To generate the cards, we are calling the main initializer of the Card class, and giving each card a suit, rank, and value. The card will load its own image based on these, and append the generated card to the deck array, which will hold all the cards in order!