April 1, 2026Noble Desktop Publishing Team/10 min read

Card War: Adding Variables to the View Controller

Master iOS View Controllers with Interactive Card Game Development

Core iOS Development Concepts

Variable Declaration

Learn to declare and initialize variables that manage UI state and game logic in your iOS applications.

Property Observers

Master didSet property observers to automatically respond to variable changes with animated transitions.

View Controller Integration

Connect your data models with UI components through proper View Controller architecture patterns.

Topics Covered in This iOS Development Tutorial:

Declaring variables with proper scope management, implementing property observers with didSet for reactive UI updates, and building the foundation for card drawing functionality in a complete iOS game

Exercise Overview

In this comprehensive exercise, we transition from our data model architecture to the View Controller implementation—the critical bridge between your app's logic and user interface. You'll master the art of defining variables and constants that enable your View Controller to dynamically represent cards from our deck, while learning to create variables that trigger smooth animated transitions whenever their values change. This hands-on approach demonstrates how professional iOS developers structure View Controller code to seamlessly interact with both Storyboard UI elements and underlying data models, establishing patterns you'll use throughout your career in mobile development.

Card War Development Progress

Previous Exercises

Data Model Creation

Built Card and Deck classes with proper data structure

Current Exercise

View Controller Variables

Adding variables and constants for UI representation

Upcoming Steps

Card Drawing Logic

Implementing the core game functionality

Getting Started

  1. Launch Xcode if it isn't already running. Ensure you're working with the latest version for optimal performance and access to current iOS development features.

  2. If you completed the previous exercise, Card War.xcodeproj should remain open in your workspace. If you closed it, navigate back and reopen the project file.

  3. We strongly recommend completing the previous exercises (5A–5B) before proceeding, as this tutorial builds directly on those foundational concepts. If you did not complete the previous exercises, follow these steps to catch up:

    • Navigate to File > Open in the menu bar.
    • Browse to Desktop > Class Files > yourname-iOS App Dev 1 Class > Card War Ready for View Controller Variables and double-click Card War.xcodeproj to launch the prepared project.

Pre-Exercise Requirements

0/4

Declaring Variables

With our data model architecture complete, we now focus on the View Controller—the orchestrator of your app's user experience. Here, we'll establish the variables that manage UI state changes as gameplay progresses, following iOS development best practices for memory management and performance optimization.

  1. Professional iOS development requires understanding how different components interact. To visualize these relationships effectively, ensure you have Main.storyboard and Data Model.swift open in separate Editor tabs. This multi-pane approach mirrors real-world development workflows where developers constantly reference interconnected files. Use Cmd–T to open new tabs as needed.

  2. Create another tab with Cmd–T, then select ViewController.swift from the Project navigator. This file will contain the core logic driving your app's interactive behavior.

  3. We'll begin by instantiating our custom Deck class within the View Controller. Below the three @IBOutlets and before the @IBAction functions, add this essential variable:

    @IBOutlet weak var player2ScoreLabel: UILabel!
    
    var deck = Deck()
    
    @IBAction func drawCards(_ sender: Any) {

    This creates a direct connection between your View Controller and the data model, enabling seamless card management throughout the game lifecycle.

  4. Modern iOS apps require efficient memory management, especially when dealing with dynamically created UI elements. Each card draw generates two UIImageView instances for visual representation. Add this array to manage these views effectively:

    var deck = Deck()
    var cardsImageViews = [UIImageView]()
    
    @IBAction func drawCards(_ sender: Any) {

    This array provides centralized storage for all UIImageViews created during gameplay, enabling proper cleanup when games restart. Without this management system, new game cards would overlay previous cards, creating visual chaos and memory leaks that could crash your app—a critical consideration in professional iOS development.

  5. Game state tracking requires precise monitoring of user interactions. Implement a counter for card draw events:

    var cardsImageViews = [UIImageView]()
    
    var drawNumber = 0
    
    @IBAction func drawCards(_ sender: Any) {

    With 52 cards distributed between two players, drawNumber reaches a maximum of 26. Starting at 0 ensures your app recognizes the initial state where no cards have been drawn. This variable will increment with each draw, providing essential game flow control.

  6. Professional iOS apps must adapt to various device sizes and orientations. Create a responsive layout system for card positioning:

    var drawNumber = 0
    var cardLayoutDistance: CGFloat!
    
    @IBAction func drawCards(_ sender: Any) {

    This CGFloat variable ensures consistent, proportional spacing between cards across different iOS devices, from iPhone SE to iPad Pro. The calculated spacing factor maintains visual harmony regardless of screen dimensions.

  7. As an implicitly unwrapped optional, this variable requires initialization when the view appears. Implement the viewDidAppear method for precise timing:

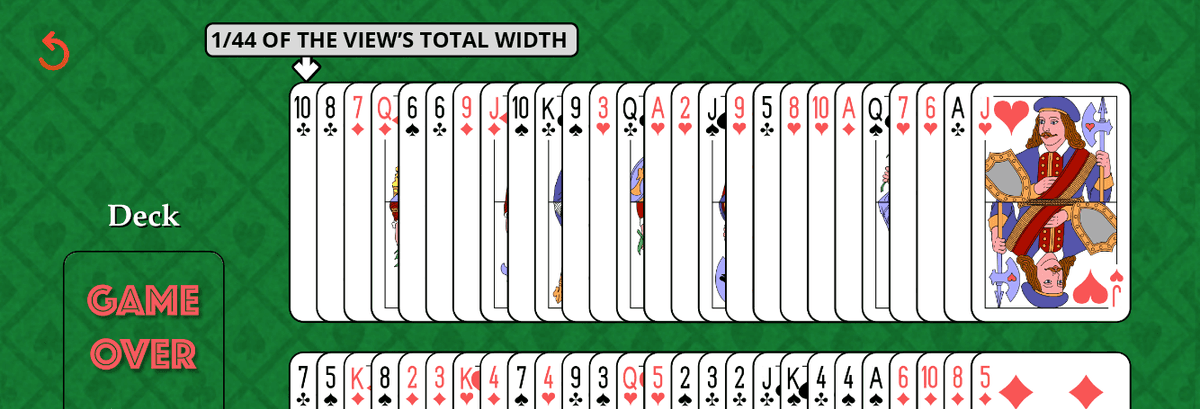
    var cardLayoutDistance: CGFloat!
    
    override func viewDidAppear(_ animated: Bool) { cardLayoutDistance = view.frame.width / 44 }
    
    @IBAction func drawCards(_ sender: Any) {
  8. Understanding the calculation logic enhances your development skills:

    • The viewDidAppear method ensures accurate view dimensions are available before calculation. Attempting this in viewDidLoad could result in incorrect measurements since Auto Layout constraints haven't fully resolved.

    • The division factor of 44 represents optimal visual spacing derived through iterative testing across multiple device sizes. This approach demonstrates how professional developers balance mathematical precision with visual design principles. As shown in the end-game screenshot below, this calculation ensures all cards remain visible with appropriate margins.

    cardLayoutDistance example

Essential View Controller Variables

Deck Instance

Single deck variable manages all card data and shuffling operations for the entire game session.

Cards Array Management

UIImageView array prevents memory overflow by tracking and removing old card displays during game restart.

Draw Counter

Tracks drawing progress with maximum value of 26 for a standard 52-card deck split between players.

Layout Distance

CGFloat calculated as view width divided by 44 for optimal card spacing across different screen sizes.

Memory Management Best Practice

The cardsImageViews array prevents memory crashes by storing references to all UIImageViews so they can be properly removed during game restart, preventing card overlap.

Responding to Changes in a Variable's Value Using the DidSet Property Observer

Property observers represent one of Swift's most powerful features, enabling reactive programming patterns that keep your UI synchronized with data changes. This approach eliminates manual UI updates and reduces bugs common in traditional imperative programming.

  1. Implement score tracking variables for both players with clean initialization:

    var cardsImageViews = [UIImageView]()
    
    var player1Score = 0
    var player2Score = 0
    
    var drawNumber = 0
  2. Property observers enable automatic UI updates whenever score values change—a cornerstone of modern iOS development. Add the didSet observer to player1Score:

    var player1Score = 0 {
       didSet {  }
    }
    var player2Score = 0 {

    The didSet property observer executes immediately after a variable's value changes, providing a clean separation between data updates and UI responses. This pattern ensures your interface remains synchronized with underlying game state without manual intervention.

  3. iOS provides sophisticated animation APIs for engaging user experiences. Begin implementing the transition animation by typing UIView.transition within the didSet block and selecting the transition(with: option from Xcode's intelligent code completion:

    var player1Score = 0 {
       didSet { UIView.transition(with: UIView, duration: TimeInterval, options: UIViewAnimationOptions, animations: (() -> Void)?, completion: ((Bool) -> Void)?) }
    }

    This UIView class method orchestrates smooth animated transitions, providing professional polish that distinguishes quality apps from basic implementations.

  4. Specify the target for animation by replacing the UIView placeholder with our score label. Replace the highlighted placeholder and press Tab to advance:

    didSet { UIView.transition(with: player1ScoreLabel, duration: TimeInterval, options: UIViewAnimationOptions, animations: (() -> Void)?, completion: ((Bool) -> Void)?) }

    The player1ScoreLabel IBOutlet connects to the numeric display in your Storyboard, creating the bridge between code logic and visual presentation.

  5. Configure animation timing and style for optimal user experience. Set duration and transition type by filling the next placeholders:

    didSet { UIView.transition(with: player1ScoreLabel, duration: 0.3, options: .transitionCurlUp, animations: (() -> Void)?, completion: ((Bool) -> Void)?) }

    The 0.3-second duration provides noticeable feedback without slowing gameplay, while the curl-up transition adds visual flair that enhances the card game aesthetic.

  6. Define the actual content change within the animations closure. This block executes during the transition, updating the label's text:

    didSet { UIView.transition(with: player1ScoreLabel, duration: 0.3, options:.transitionCurlUp, animations: { self.player1ScoreLabel.text = "\(self.player1Score)" }, completion: ((Bool) -> Void)?) }

    The self keyword is required within closures to explicitly reference the View Controller's properties. This Swift safety feature prevents retain cycles and clarifies scope, essential for memory management in professional iOS development.

  7. Complete the transition method by specifying the completion handler. Since no post-animation actions are needed, set completion to nil:

    didSet { UIView.transition(with: player1ScoreLabel, duration: 0.3, options:.transitionCurlUp, animations: { self.player1ScoreLabel.text = "\(self.player1Score)" }, completion: nil) }
  8. Copy the complete player1Score implementation for reuse with player2. Select the entire variable declaration and press Cmd–C:

    var player1Score = 0 {
       didSet { UIView.transition(with: player1ScoreLabel, duration: 0.3, options:.transitionCurlUp, animations: { self.player1ScoreLabel.text = "\(self.player1Score)" }, completion: nil) }
    }
  9. Replace the simple var player2Score = 0 line by selecting it and pasting with Cmd–V.

  10. Adapt the copied code for player2 by updating all references in the duplicated variable:

    var player1Score = 0 {
       didSet { UIView.transition(with: player1ScoreLabel, duration: 0.3, options:.transitionCurlUp, animations: { self.player1ScoreLabel.text = "\(self.player1Score)" }, completion: nil) }
    }
    var player2Score = 0 {
       didSet { UIView.transition(with: player2ScoreLabel, duration: 0.3, options:.transitionCurlUp, animations: { self.player2ScoreLabel.text = "\(self.player2Score)" }, completion: nil) }
    }

Implementing Animated Score Updates

1

Add didSet Observer

Property observer automatically detects when player score variables change and triggers animation code

2

Configure UIView Transition

Set transition target to score label with 0.3 second duration and curl-up animation effect

3

Update Label Text

Animation block updates label text with new score value using string interpolation and self reference

4

Handle Completion

Set completion parameter to nil since no additional actions needed after animation finishes

Closure Context Requirement

The self keyword is required when accessing View Controller properties inside UIView transition closures, as they run outside the main thread context.

Starting with the DrawingCards Function

The card drawing mechanism forms the heart of our War game implementation. This function orchestrates the complex interaction between user input, data manipulation, and visual feedback—demonstrating how professional iOS apps handle real-time user interactions with robust state management.

  1. Implement state management variables to prevent race conditions and handle user interactions gracefully. Add these boolean flags between cardLayoutDistance and viewDidAppear:

    var drawNumber = 0
    var cardLayoutDistance: CGFloat!
    var drawingCards = false
    
    override func viewDidAppear(_ animated: Bool) { cardLayoutDistance = view.frame.width / 44 }

    The drawingCards flag implements a simple but effective locking mechanism. When users tap the draw button, animations and score updates don't occur instantaneously. During the 0.3-second animation duration, impatient users might tap repeatedly, causing overlapping animations and inconsistent game state. This boolean prevents such issues by blocking additional draws until current operations complete.

  2. Add game completion tracking with another boolean state variable:

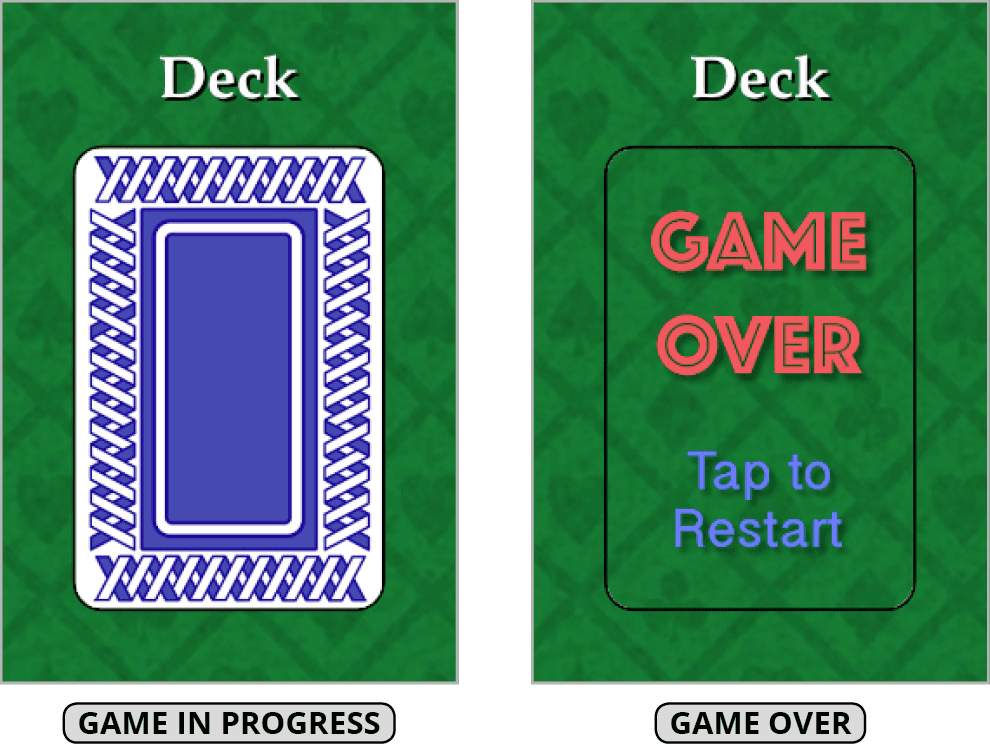
    var drawingCards = false
    var gameOver = false

    This flag transforms the card back button's behavior when the deck is exhausted, changing from "draw cards" to "restart game" functionality. Later exercises will demonstrate how this variable triggers visual changes to the button image, providing clear user feedback about available actions:

    card war deck button change

  3. Begin implementing the drawCards function with essential guard clauses. Add this protective code to prevent unwanted interactions:

    @IBAction func drawCards(_ sender: Any) {
    
       if drawingCards { return }
    
    }

    This guard clause immediately exits the function if cards are currently being drawn, preventing the concurrency issues that plague poorly designed interactive apps. The early return pattern keeps code clean and readable.

  4. Handle game completion state with appropriate restart logic. Add comprehensive game-over handling:

    @IBAction func drawCards(_ sender: Any) {
    
       if drawingCards { return }
       if gameOver {
          restartGame()
          gameOver = false
          return
       }
    
    }

    When the game ends, tapping the button triggers a restart sequence rather than attempting to draw from an empty deck. This elegant state-based approach eliminates conditional logic scattered throughout the codebase.

  5. Resolve the compiler error by creating the restartGame function stub. Add this placeholder beneath your other functions but within the ViewController class:

    @IBAction func restartButton(_ sender: Any) {
    
       }
    
       func restartGame() {
    
       }
    
    }

    This function will be implemented in subsequent exercises, but creating the signature now allows your current code to compile successfully.

  6. Implement the core card drawing logic with proper state management. Add these essential operations after the guard clauses:

    if gameOver {
       restartGame()
       gameOver = false
       return
    }
    
    drawingCards = true
    drawNumber += 1

    This dual assignment pattern first sets the lock to prevent additional draws, then increments the draw counter. Starting from 0, drawNumber tracks how many card pairs have been drawn, reaching 26 when the 52-card deck is exhausted.

  7. Extract cards from the shuffled deck using Swift's array manipulation methods. Add these card assignment statements:

    drawNumber += 1
    
    let player1Card = deck.shuffledDeck.removeLast()
    let player2Card = deck.shuffledDeck.removeLast()

    These constants capture the two topmost cards from your shuffled deck using Apple's removeLast() method, which both retrieves and removes elements atomically. The Deck class's shuffledDeck property maintains a randomized copy of the original deck, ensuring fair gameplay while preserving the original deck structure for future games. Using constants rather than variables reflects these cards' immutable nature within each draw cycle—a best practice that prevents accidental modification and clarifies intent.

  8. Save your progress with Cmd–S and keep Xcode open. The foundation you've built here establishes the essential patterns for iOS game development, combining state management, memory efficiency, and user experience considerations that define professional-quality mobile applications.

Game State Management Variables

Drawing Cards Boolean

Prevents impatient users from tapping the draw button multiple times while card animations are still in progress.

Game Over Boolean

Controls game state and triggers restart functionality when deck is exhausted, changing button visual indicator.

DrawCards Function Logic Flow

1

Check Drawing State

Return immediately if cards are currently being drawn to prevent multiple simultaneous operations

2

Handle Game Over

Restart game and reset gameOver flag if deck is exhausted, then exit function

3

Set Drawing State

Set drawingCards to true and increment drawNumber to track current round

4

Assign Player Cards

Remove last two cards from shuffled deck and assign one to each player using removeLast method

User Experience Protection

The drawingCards boolean prevents UI conflicts by blocking new card draws during the 0.3-second animation transitions, ensuring smooth gameplay.

Key Takeaways

1View Controller variables bridge data models with UI components, requiring careful initialization and memory management
2Property observers with didSet enable automatic UI updates with animated transitions when variable values change
3Implicitly unwrapped optionals like cardLayoutDistance should be initialized in viewDidAppear when view dimensions are available
4Boolean state variables prevent user interaction conflicts during animations and manage game flow transitions
5UIView transition methods require self keyword when accessing properties inside closure animations due to thread context
6Array management for UIImageViews prevents memory overflow by enabling proper cleanup during game restart cycles
7Card assignment uses removeLast method on shuffled deck arrays to simulate drawing from the top of the deck
8Layout calculations using view.frame.width divided by factors enable responsive card spacing across device sizes

RELATED ARTICLES