
Fancy Rollovers with TimelineLite

Master Interactive Animations with GreenSock TimelineLite

Core Animation Concepts

TimelineLite

Powerful sequencing tool for creating complex animations with precise timing control and interactive behavior.

CSS Clip Property

Defines visible rectangles within elements, enabling sophisticated reveal animations from specific directions.

Mouse Events

Mouseenter and mouseleave events trigger animation playback and reversal for responsive user interactions.

Topics Covered in This GreenSock Tutorial:

Master advanced GreenSock techniques including using Progress() to jump to animation endpoints, tweening the clip property for sophisticated reveals, implementing mouseenter and mouseleave events for seamless interactivity, and accounting for unexpected user interactions that can break your animations.

Exercise Preview

fancy rollovers preview

Photos courtesy of istockphoto: Image #11068094; Roberto Scandola Studio Grafico, Image #21301524
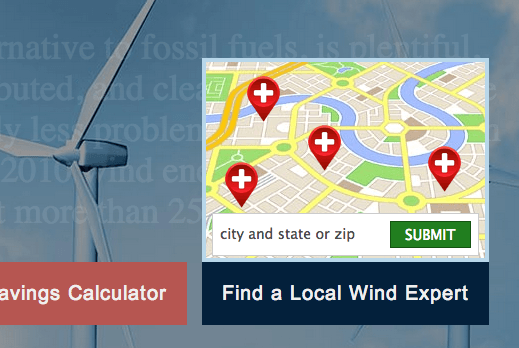
Exercise Overview

In this comprehensive exercise, we'll transform static elements into an engaging interactive experience by adding sophisticated rollover effects to the INTO THE WIND animation. You'll learn to orchestrate multiple TimelineLite instances as we build an animated map interface complete with animated location pins that responds elegantly to user interaction when they hover over the "Find a Local Wind Expert" button.

This tutorial demonstrates real-world application of advanced GreenSock techniques that you'll find invaluable in modern web development, where smooth, responsive animations separate professional implementations from amateur attempts.

Animation Sequence Breakdown

1

Map Reveal

Map panel flies up using CSS clip property animation

2

Pin Drop

Location pins animate down with staggered timing

3

Content Fade

Body copy dims while form input slides up simultaneously

Previewing the Finished Animation

  1. To examine the polished animation we'll be constructing, launch Google Chrome or your preferred modern browser that fully supports CSS3 animations and transforms.

  2. Press Cmd–O (Mac) or Ctrl–O (Windows), navigate to Desktop > Class Files > yourname-GSAP Class > TimelineLite RollOvers, and double-click finished.html.

    Notice that we've streamlined the preview by skipping the initial animation sequence from previous exercises, allowing us to focus entirely on the sophisticated rollover mechanics that make this interaction feel premium.

  3. Hover your cursor over the Find a Local Wind Expert button and observe the carefully choreographed sequence:

    • The map panel slides smoothly into view from bottom to top
    • Location pins drop down in a staggered sequence, creating visual hierarchy
    • The contact form gracefully slides up with a subtle fade-in effect
    • Background content dims automatically to maintain focus on the interactive map panel

    This level of polish demonstrates how multiple coordinated animations can create experiences that feel both sophisticated and intuitive—exactly what users expect from modern web interfaces.

Setting Up Your Development Environment

Before diving into the animation code, let's establish an optimal testing environment that will streamline your development workflow and let you iterate quickly on the interactive elements.

  1. In your preferred code editor, open yourname-GSAP Class > TimelineLite RollOvers > start.html. If your editor supports it, open the entire TimelineLite RollOvers folder to access related assets quickly.

  2. Preview start.html in your browser to establish your baseline.

    Currently, you'll see the timeline controller in the top-left corner, the complete intro animation sequence, and a map that displays throughout the entire animation duration—not yet the polished interactive experience we're building toward.

  3. To focus exclusively on crafting the rollover behavior, we'll first configure the page to bypass the intro animation and hide the development controller. Keep start.html open in your browser for easy reloading as you implement changes.

  4. Return to start.html in your code editor to begin the modifications.

  5. Locate the following comment around line 134:

    //Fancy Rollover Code
  6. To hide the development controller from the user interface, add the following code below the comment:

    //Fancy Rollover Code
    
    TweenLite.set("#controller", {visibility:"hidden"});
    
    var $mapContainer = $("#mapContainer"), 

    This implementation uses TweenLite's set() method—essentially a zero-duration tween—to immediately hide the controller element. The set() method is particularly useful for establishing initial states before animations begin, and it's more performant than direct CSS manipulation for elements you'll be animating later.

  7. Save your changes and reload the browser page. Excellent—the controller is now hidden from view.

  8. Return to your code editor and add this crucial line to skip the intro sequence:

    TweenLite.set("#controller", {visibility:"hidden"});
    tl.progress(1);

    TimelineLite's progress() method accepts values between 0 (timeline start) and 1 (timeline end). By immediately setting progress to 1, we jump directly to the animation's final state, bypassing the entire intro sequence and allowing us to focus on the rollover functionality.

  9. Save the file and refresh your browser. Perfect—now we have direct access to the elements we'll be animating.

    This streamlined testing environment eliminates distractions and allows you to iterate rapidly on the map panel interactions, which is essential for fine-tuning the timing and easing that makes animations feel professional.

Understanding the DOM Structure & JavaScript Architecture

Before implementing the animation logic, let's examine how the HTML elements are structured and how our JavaScript will reference them. Understanding this architecture is crucial for creating maintainable, scalable animation code.

  1. Examine the DOM structure on lines 29–42, paying particular attention to the hierarchical organization that enables our animation strategy:

    <div id="mapContainer">
       <div id="mapPanel">
          <img src="img/map.jpg" height="196" width="279" id="map">
          <div class="pin" id="pin1"></div>
          <div class="pin" id="pin2"></div>
          <div class="pin" id="pin3"></div>
          <div class="pin" id="pin4"></div>
          <div id="form">

    Code Omitted To Save Space

    </div>
       </div>
       <div class="button">Find a Local Wind Expert</div>
    </div>

    This nested structure is intentionally designed: the mapContainer serves as both the interactive trigger zone and the positioning context for all animated elements. By containing both the button and the map panel within the same parent div, we ensure that users can move their cursor between these elements without triggering unwanted mouseleave events—a common pitfall in interactive design.

  2. Review the JavaScript variable declarations we've prepared around lines 139–144:

    var $mapContainer = $("#mapContainer"), 
        $localExpertBtn = $("#mapContainer .button"), 
        $mapPanel = $("#mapPanel"), 
        $pins = $(".pin"), 
        $form = $("#form"), 
        mapTimeline;

    These jQuery references follow a clear naming convention: the $ prefix immediately identifies jQuery objects, making your code more readable and maintainable. We're caching these selectors at initialization rather than querying the DOM repeatedly during animations, which significantly improves performance—especially important for smooth 60fps animations.

    The mapTimeline variable will control our rollover animation sequence. Modern web applications frequently use multiple timeline instances to manage different interaction states, and GreenSock handles this elegantly without performance penalties.

  3. Initialize the TimelineLite instance by adding this code beneath the variable declarations:

    $form = $("#form"), 
       mapTimeline;
    
    mapTimeline = new TimelineLite();

    This creates a dedicated timeline for our rollover sequence, completely separate from the main page animation timeline. This separation of concerns makes your animation code more maintainable and allows for independent control of different interface behaviors.

Crafting the Button and Map Panel Animations

Now we'll build the core visual feedback that signals to users that the interface is responding to their interaction. These initial animations set the tone for the entire rollover experience.

  1. Begin building the mapTimeline by adding visual feedback to the button itself. Add this code to create an immediate color transition:

    mapTimeline = new TimelineLite();
    
    mapTimeline.to($localExpertBtn, 0.5, {backgroundColor:"#03203b"})

    This tween transforms the button's background from its default salmon color to a professional navy blue over half a second. The color change provides immediate visual feedback that the interface has registered the user's interaction—a crucial aspect of responsive design.

  2. Save your work and preview the change in your browser.

  3. Reload the page and observe the button's color transition. The animation plays immediately because our timeline isn't yet paused—we'll address that shortly.

  4. Return to your code editor to implement the map reveal effect using CSS clipping.

  5. Add the map panel reveal animation using the CSS clip property:

    mapTimeline.to($localExpertBtn, 0.5, {backgroundColor:"#03203b"})
               .from($mapPanel, 0.5, {clip:"rect(204px 287px 204px 0px)"})

Mastering the CSS Clip Property

The clip property enables precise control over element visibility by defining a rectangular clipping region. The syntax follows the pattern rect(top, right, bottom, left), with coordinates measured from the element's top-left corner.

css clip property example

Critical requirement: the element must have position: absolute or position: fixed declared in CSS for clipping to function. This property remains valuable for reveal animations even as newer CSS features like clip-path gain broader browser support.

For comprehensive technical details, reference: css-tricks.com/almanac/properties/c/clip

  • Analyze the coordinates in your clip value. Setting both top and bottom values to 204px creates a zero-height visible area at the panel's bottom edge—our starting point for the reveal animation.

  • Save and reload your browser. The reveal animation now works beautifully!

    You might wonder why only specifying the from() values creates a complete animation. The answer lies in our CSS file, where we've pre-defined the final clip state. Let's examine this setup.

  • Open TimelineLite RollOvers > css > main.css in your code editor.

  • Locate the following CSS rule around lines 118–126:

    #mapPanel {
       position:absolute;
       background-color:#b8d7ea;
       width:287px;
       height:204px;
       top:-204px;
       /* top / right / bottom / left */
       clip:rect(0px 287px 204px 0px);
    }

    The highlighted clip property defines the panel's final visible state. When our from() tween executes, GreenSock automatically interpolates between the specified starting values and these CSS end values, creating a smooth bottom-to-top reveal effect.

  • Return to editing start.html to synchronize the animations.

    Currently, the button color change and map reveal happen sequentially. For a more dynamic, professional feel, let's make them simultaneous by using timeline positioning.

  • Add a position parameter to synchronize the animations:

    .from($mapPanel, 0.5, {clip:"rect(204px 287px 204px 0px)"}, 0)

    The position parameter 0 instructs this tween to start at the timeline's beginning, making it concurrent with the button color change.

  • Save and reload your browser.

    The synchronized timing creates a more cohesive, polished interaction that feels immediate and responsive—exactly what users expect from modern interfaces.

  • Implementing Contextual Content Dimming

    Professional interactive design often involves directing user attention by de-emphasizing competing elements. Let's implement this principle by subtly dimming the background content when the map interface is active.

    1. With your browser open, notice how the main body text creates visual competition when the map overlay appears. This cognitive load reduction technique is standard in modern UI design.

    2. Return to start.html in your code editor to add the dimming effect.

    3. Append this tween to the mapTimeline sequence:

      .from($mapPanel, 0.5, {clip:"rect(204px 287px 204px 0px)"}, 0)
      .to($mainCopy, 0.5, {opacity:0.1}, 0)

      This tween reduces the main content opacity to just 10%, creating a subtle backdrop effect that keeps the content readable while clearly establishing the map as the primary interface element. The position parameter 0 ensures this happens simultaneously with our other opening animations.

    4. Save and preview your changes.

      Notice how this simple opacity change dramatically improves the interface hierarchy. This demonstrates the power of coordinated animations—by targeting elements beyond just the immediate interactive area, we create a more cohesive, professional user experience.

    Creating Dynamic Pin Drop Animations

    Now let's implement one of the most visually striking elements: animated location pins that cascade onto the map in a staggered sequence. This technique adds personality and visual interest while maintaining professional polish.

    1. Return to start.html in your code editor to implement the pin animations.

    2. Add the staggered pin animation to your timeline:

      .to($mainCopy, 0.5, {opacity:0.1}, 0)
      .staggerFrom($pins, 0.3, {y:-50, opacity:0}, 0.05)

      This staggerFrom() method is one of GreenSock's most powerful features for creating sophisticated group animations. Each pin animates from 50 pixels above its final position while fading in over 0.3 seconds, with each subsequent pin delayed by 0.05 seconds to create a cascading effect.

    3. Save and reload your browser. The pin drop effect adds compelling visual interest!

      To create an even more dynamic feel, let's start the pin animations before the map panel is fully revealed, creating overlapping action that feels more organic and engaging.

    4. Return to start.html in your code editor to fine-tune the timing.

    5. Add a negative relative position parameter to the pin animation:

      .staggerFrom($pins, 0.3, {y:-50, opacity:0}, 0.05, "-=0.1")

      The relative position "-=0.1" starts the pin animations 0.1 seconds before the previous tween completes. This overlapping creates a more sophisticated, less mechanical feel that characterizes professional animation work.

    6. Save and reload your browser. The subtle timing adjustment creates a more fluid, natural animation sequence that draws users into the interaction.

    Animating the Contact Form

    The final element in our animation sequence is the contact form, which should appear with subtle elegance to complete the interactive experience without overwhelming the user.

    1. In start.html, add the form animation to complete your timeline sequence:

      .staggerFrom($pins, 0.3, {y:-50, opacity:0}, 0.05, "-=0.1")
      .from($form, 0.2, {y:20});

      Note the semicolon ending this final tween in the sequence. The form slides up from 20 pixels below its final position over 0.2 seconds—a subtle movement that feels natural rather than jarring.

    2. Save and test the animation. The upward slide works, but could benefit from additional polish.

    3. Enhance the form entrance with a fade-in effect by modifying the tween:

    4. Add opacity animation for a more refined appearance:

      .from($form, 0.2, {y:20, opacity:0});

      Combining position and opacity changes creates a more sophisticated entrance effect that feels integrated with the overall animation style rather than mechanical or abrupt.

    5. Save and reload your browser. The form now appears with the same polished quality as the other animated elements.

    Implementing Interactive Mouse Behavior

    Now comes the crucial step: connecting our carefully crafted animation timeline to actual user interaction. We'll implement a paused-by-default approach that gives us complete control over when animations play.

    1. In start.html, locate this line around line 146:

      mapTimeline = new TimelineLite();
    2. Modify the TimelineLite initialization to start in a paused state:

      mapTimeline = new TimelineLite({paused:true});

      This configuration prevents the animation from playing automatically, giving us programmatic control over exactly when it triggers based on user interaction.

    3. Save and reload your browser. With the timeline paused, no animation occurs until we explicitly trigger it.

    4. Return to start.html to implement the mouse event handlers.

      We're targeting $mapContainer rather than just the button because this broader interaction zone allows users to move between the button and map panel without triggering unwanted mouseleave events—a critical consideration for smooth user experience.

    5. Add the mouse event handlers beneath the timeline definition, around line 154:

      $mapContainer.mouseenter(function() {
            mapTimeline.play();
         });
      
         $mapContainer.mouseleave(function() {
            mapTimeline.reverse();
         });
      
      });

      The mouseenter event triggers forward playback, while mouseleave reverses the animation. GreenSock's reverse functionality automatically plays all tweens backward from their current position, maintaining perfect synchronization.

    6. Save and test the interaction. The animation now responds to mouse events, but the reverse timing needs optimization.

      When users mouse away from interactive elements, they typically expect faster dismissal than the original appearance timing. Let's implement this UX best practice using timeScale().

    7. Return to start.html to optimize the animation timing for different interaction states.

    8. Enhance the mouse handlers with different timing scales:

      $mapContainer.mouseenter(function() {
         mapTimeline.play().timeScale(1);
      });
      
      $mapContainer.mouseleave(function() {
         mapTimeline.reverse().timeScale(3);
      });

      The timeScale(1) maintains normal speed for the entrance animation, while timeScale(3) triples the reverse speed. This creates the responsive dismissal behavior users expect from professional interfaces.

    9. Save and test the optimized interaction. The faster reverse animation feels more responsive and prevents user frustration.

    10. To view the complete experience, remove the timeline skip by deleting this line around line 137:

      tl.progress(1);
    11. Save and reload your browser. Now you can experience the full animation sequence followed by the interactive rollover functionality.

    Handling Edge Cases and User Experience Polish

    Professional interactive development requires anticipating and handling unexpected user behaviors. One common issue occurs when users interact with elements before the main animation completes, potentially creating conflicts or broken states.

    1. Test this scenario by reloading start.html and hovering over the map button area while the intro animation plays. Notice how this premature interaction can disrupt the intended experience flow.

    2. Return to start.html in your code editor to implement a robust solution.

      We'll use a callback-based approach to enable the map interaction only after the main timeline completes, ensuring users can't accidentally trigger conflicting animations.

    3. Modify the main timeline initialization around line 73 to include a completion callback:

      tl = new TimelineLite({onUpdate:updateSlider, onComplete:initMapButton});

      The onComplete callback will execute our mouse event binding only when the main animation finishes, preventing premature interaction.

    4. Create the initialization function around line 154 by wrapping your existing mouse event code:

      function initMapButton(){
         $mapContainer.mouseenter(function() {
            mapTimeline.play().timeScale(1);
         });
      
         $mapContainer.mouseleave(function() {
            mapTimeline.reverse().timeScale(3);
         });
      }

      This function encapsulates the interactive behavior and only executes when the main timeline signals completion, creating a more robust and predictable user experience.

    5. Save and thoroughly test the implementation by reloading the page and attempting to interact with the map area during the intro animation.

      Perfect! The interaction now waits for the appropriate moment, demonstrating the kind of attention to detail that separates professional implementations from amateur attempts. This callback-driven approach is essential for complex interactive experiences where multiple animation systems must coordinate seamlessly.

    Key Takeaways

    1TimelineLite supports multiple instances on a single page, enabling complex interactive animations with independent control systems
    2The CSS clip property requires absolute or fixed positioning and uses top, right, bottom, left coordinate order for defining visible rectangles
    3Position parameters and negative relative positioning (-=0.1) create overlapping animations for smoother, more natural motion sequences
    4Using progress(1) during development skips lengthy animations, creating efficient testing environments for interactive features
    5Strategic DOM organization with container elements prevents unwanted mouseleave events and improves user interaction experience
    6TimeScale() method allows different animation speeds for play and reverse states, optimizing user experience with faster closing animations
    7OnComplete callbacks prevent premature user interactions by delaying event handler initialization until intro animations finish
    8Staggered animations with methods like staggerFrom() create sophisticated sequential effects with precise timing control between elements

    RELATED ARTICLES