An Introduction to Cinema 4D Lite
What This Tutorial Covers
Cinema 4D Lite
Free version bundled with After Effects subscriptions.
Interface Tour
Viewport, object manager, and timeline basics.
Basic 3D Workflow
Modeling, lighting, and rendering in one tool.
Noble Desktop's Video Editing & Motion Graphics Certificate teaches Cinema 4D alongside After Effects, Premiere Pro, and motion design fundamentals.
Explore the integration of Cinema 4D and After Effects in this tutorial, learning to navigate the C4D interface, use its tools, and understand common 3D terminology, with step-by-step guidance on how to manage projects, activate licenses, and render animations.
Exercise Preview
The Cinema 4D Lite Interface
If you have never used a 3D application before the interface can seem quite daunting. But with a little guidance and some practice it will all start to make sense.
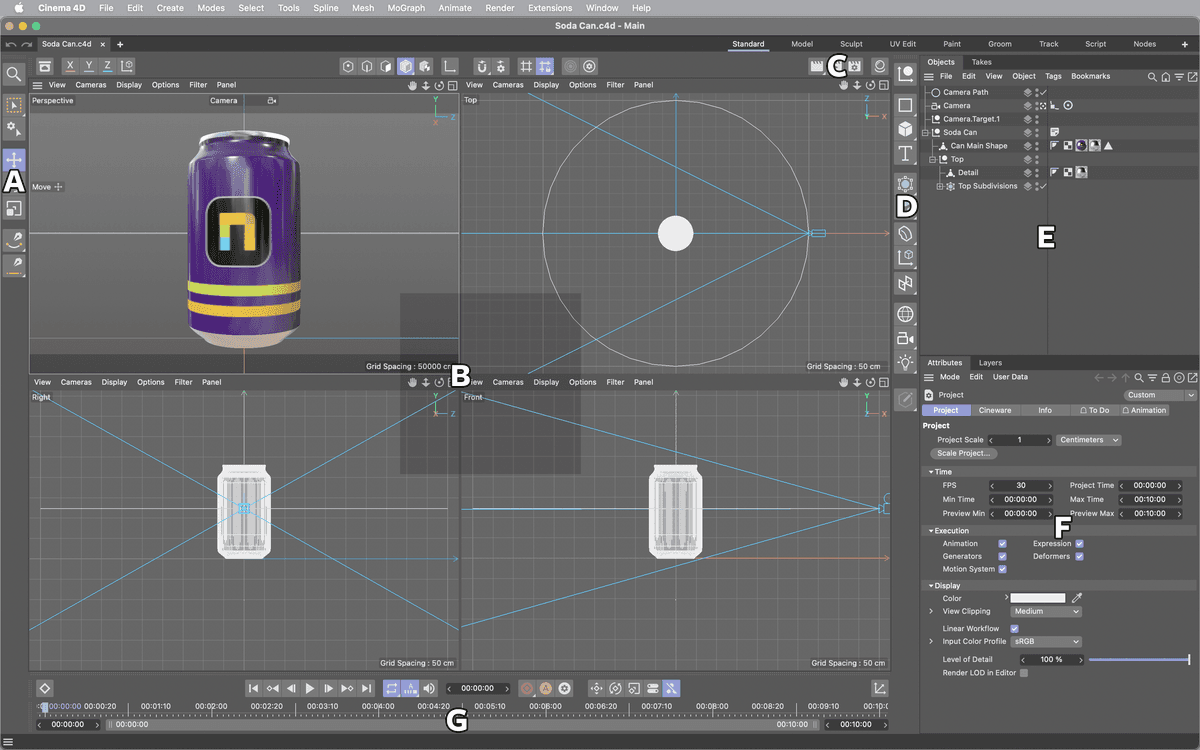
A: Tools Menu, B: Views & Viewports, C: Render Menu, D: Create Menu, E: Object & Take Managers, F: Attribute & Layer Managers, G: The Animation Palette
Tools Menu: In addition to the Move, Rotate and Scale Tools you will find Selection and Spline Drawing tools here as well.
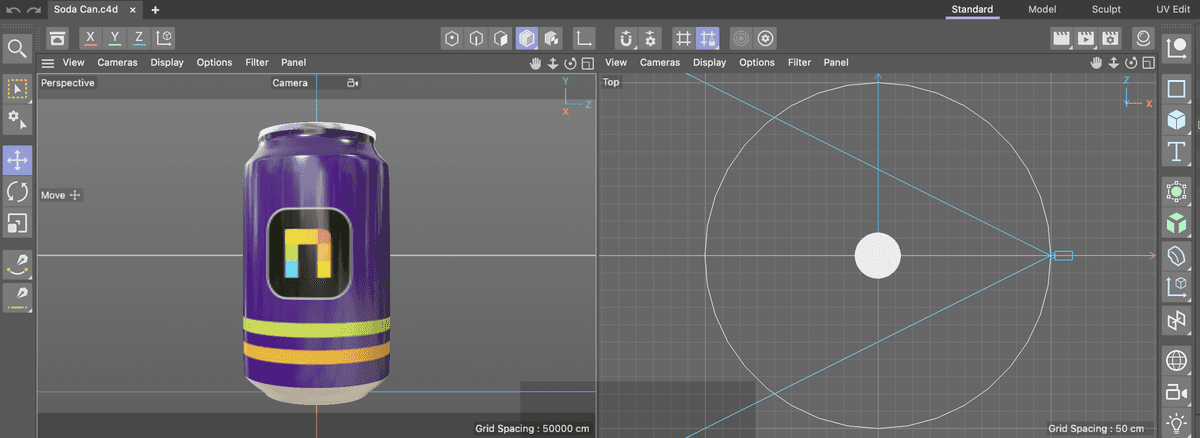
Views & Viewports: You can open as many view panels as you like. Each view panel has its own display settings. A view panel can display up to four viewports (views of a scene), each with its own display settings.
Render Menu: The Render menu contains all the options you need to render a picture or animation. You can define several render presets such as for preview and for final rendering. This saves you having to change the settings one by one each time. Using the render settings, you can also switch on effects such as Multi-Pass rendering.
Create Menu: This menu contains most basic objects that can be created in Cinema 4D Lite. Objects are the most indispensable items in Cinema 4D Lite. After all, objects are the most-rendered items in 3D, be it parametric primitives, polygon objects or a variety of other types of objects. Additionally, there are many helper objects that can be used to form or duplicate your actual objects or make renderable objects from splines, and much more. Some objects even share nearly identical properties, e.g., those of the Basic tab. All object properties for a selected object will be displayed and can be edited in the Attributes Manager.
Object Manager: The Object Manager is the control center for all objects in the scene including their tags.
Take Manager: The Take function allows you to store various animations, render settings, camera perspectives and a variety of other variations in a single file.
Attribute Manager: The Attribute Manager gives you quick access to almost every parameter in CINEMA 4D Lite, including the parameters of objects, tools, tags, materials, etc. In addition, you can animate directly in the Attribute Manager without ever opening the Timeline! You can animate any parameters that have a circle next to their name.
Layer Manager: The layer concept helps you to easily manage complex scenes such as imported CAD files which often contain thousands of polygon objects. So what are layers? Layers are nothing other than groups of scene items that can be controlled together.
The Animation Palette: The Animation Palette contains the most-used navigation and recording tools from the Timeline itself. The three main elements of the palette are: The Timeline Ruler, The Powerslider and Navigation & Mode icons.
Navigate Around the Viewport with 123
In C4D Lite you can navigate around a scene using a mouse and the 123 keys. Or if you prefer, you can use the onscreen Navigation  buttons located in the upper right-hand corner of any Viewport.
1 key + left mouse button (or in upper right-hand corner): translate view – takes you left, right up and down. Like the Hand tool in Adobe programs.
1 key + right mouse button or 2 key + left mouse button: zoom in/out of the view. Like Zoom tool in Adobe.
3 key + left mouse button or 3 key + right mouse button: rotate around the visual axis
NOTE: If you use the 1,2, & 3 keys with your mouse, the zoom and rotation will be based on your mouse position. That doesn’t happen with the onscreen icons at the top of the Viewport—the rotation and zoom will always be centered when you use these.
In the Top viewport use the 1,2, & 3 keys and your mouse to change the viewport display.
Choose View > Frame Default from the Viewport menu to reset the view.
NOTE: Cmd–Shift–Z (Mac) or CTRL–Shift–Z (Windows) is the keyboard command to undo viewport changes.
Changing Position, Rotation or Scale
The camera is moving around the soda can using a feature of C4D called a align to Spline. This allows a camera or other object to follow a specific path around the scene. Adjusting the spline will change the camera’s movement but this is why the camera in this scene cannot be manually adjusted. You can however move any other object in this scene around.
In the Object Manager click on the Camera Path spline to select it.
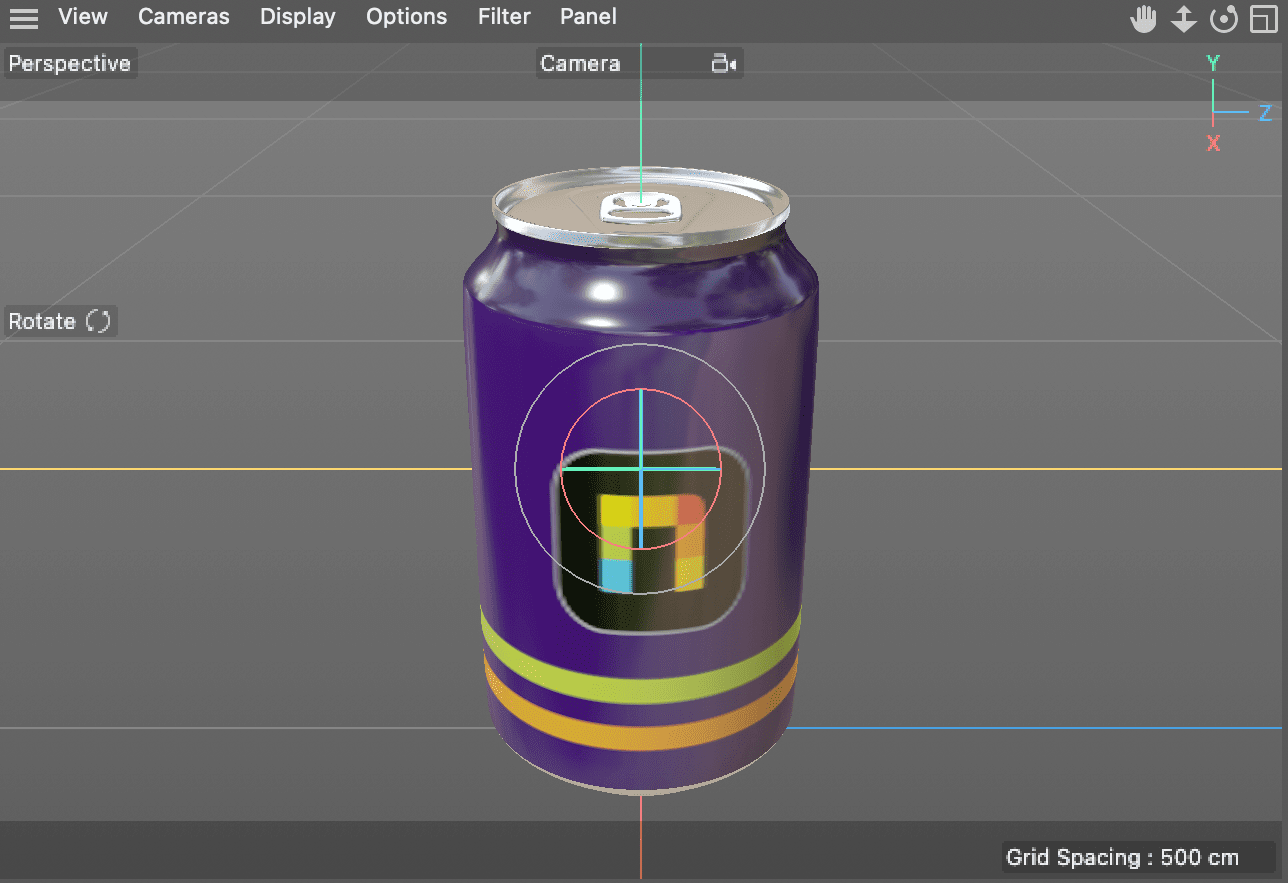
Press R on your keyboard or click on the Rotate tool to activate it.
In the Right viewport hover your cursor over the blue circle on the can until it turns white.

Drag the circle until you are looking at a top down view of the can in the Perspective view. In our example we had a R.B of -25.
Drag (Scrub) the playhead back and forth in the Timeline to see the animation of this scene.
Make sure the playhead is at the beginning of the timeline 00:00:00
Animating Transform Properties
The camera animation in this scene was OK but it will be a much better and more visually appealing animation if instead of a moving camera it was the can that was moving.
Since the can is already in the right position, scale and rotation for the end of the animation we will animate it backwards creating the last keyframe of the animation first.
Move the Playhead to where you want to create the ending keyframe of the animation. In this exercise that is going to be at 1:00 (1 second).
NOTE: In Cinema 4D just typipng 1 into the time field and pressing Return (Mac) or Enter (Windows) on the keyboard will move the time indicator to 1 second.
In the Object Manager click on the Soda Can to select it.
The Soda Can is a null object that is the parent of the entire soda can model.
What is a Null Object
A null object in Cinema 4D is an invisible placeholder used to control and organize other objects in a scene. Null objects can be used as a parent object for other objects, allowing you to control the position, rotation, and scale of multiple objects at once. Null objects can also be used as a reference point for cameras and lights, making it easier to create complex animations. They do not affect the final render and are only used for organizational and control purposes.
In the Attribute Manager click on the Coordinates tab.
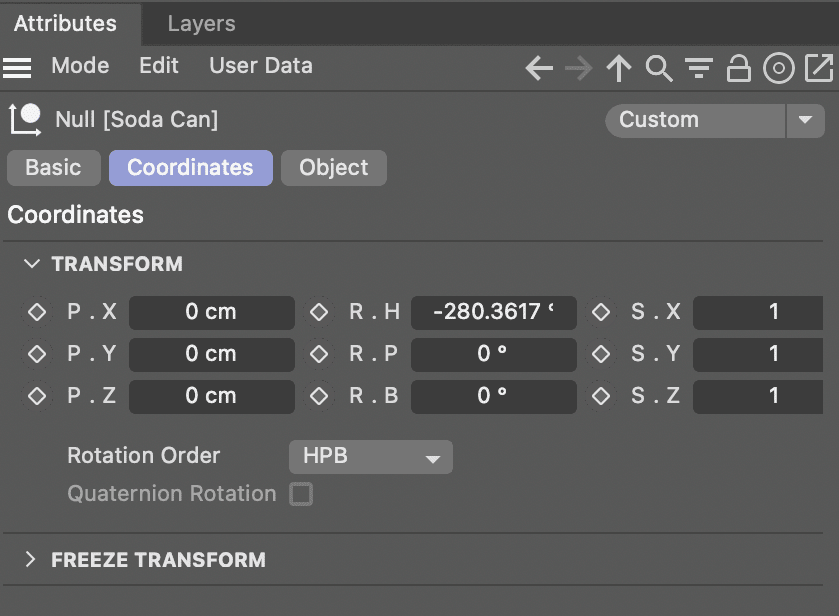
Change the Rotation Order menu to XYZ. This doesn’t actually affect the animation it just switches to a coordinate system that we are more familiar with.
Click the gray diamond
 next to the three Rotation (R.X, R.Y, R.Z) and Scale (S.X, S.Y. S.Z) attributes to create keyframes for each of them.
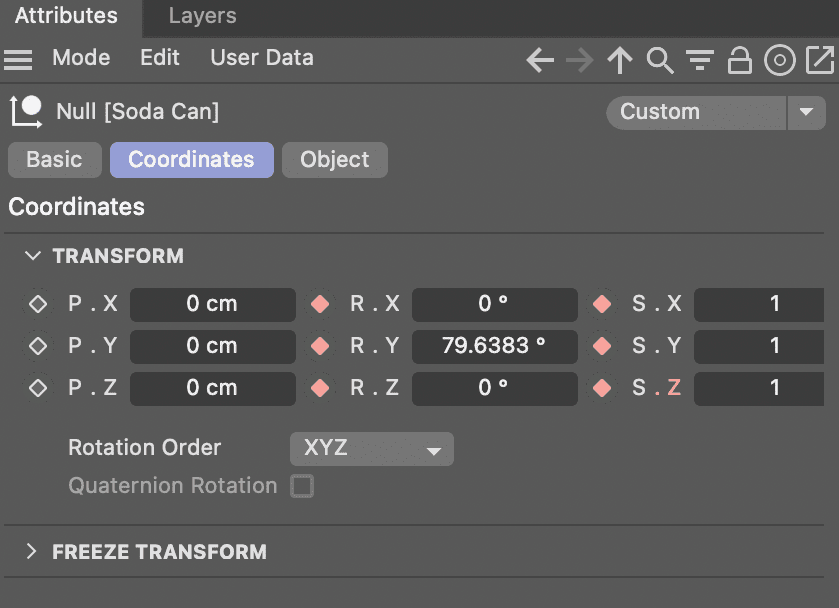
Move the Time Indicator (most video programs all it a playhead) to the beginning of the timeline.
Change the Attributes to the following values:
Rotation Value Scale Value R.X 360 S.X 0 R.Y 0 S.Y 0 R.Z 240 S.Z 0 Click the diamonds
 (the red outlines indicate there is no keyframe at this time) next to each attribute to create new keyframes for them.
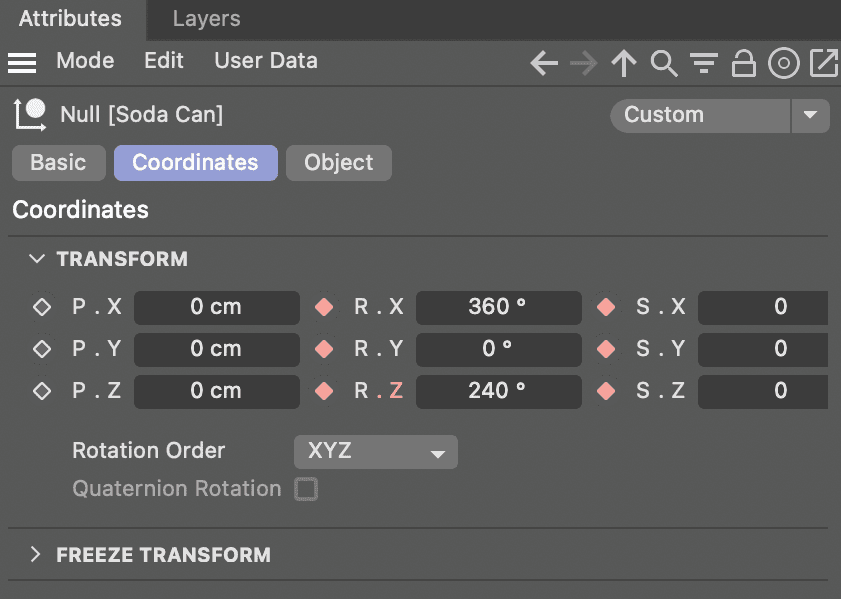
Press the Play Forwards button or F8 on your keyboard to preview the animation.
Press the Pause button or F8 again to stop the playback. The can rotates and scales from the bottom because this is where its axis (called an anchor point in AE) is located.
Press Cmd–S (Mac) or CTRL–S (Windows) or choose File > Save Project.
Changing the Axis of an Object
In Cinema 4D, the axis of an object refers to the virtual point that represents the orientation of the object in 3D space. Each object has its own axis, with the origin of the axis being the pivot point and origin of all transformation (position, rotation, scale). This point can be edited when in Axis Modification mode.
Move the time indicator to any time after the animation of the can has finished.
Click the
 button to enter axis modification mode.
Click the Move
 tool to activate it.
Drag the axis point from the bottom of the can to the middle.
Click off the Enable Axis button to leave axis modification mode.
Press the Go To Start button or Shift–F on the keyboard.
Press the Play Forwards button or F8 on your keyboard to preview the animation.
Press Cmd–S (Mac) or CTRL–S (Windows) or choose File > Save Project.