Social Media Ad: Adding Audio & Animating Position
What This Tutorial Covers
Audio Layer Basics
Drop audio into AE compositions and align with visual cuts.
Position Keyframes
Animate layer position with smooth easing curves.
Audio-Driven Animation
Use waveform markers to time visual hits to audio cues.
Noble Desktop's Video Editing & Motion Graphics Certificate teaches After Effects alongside Premiere Pro, Cinema 4D, and DaVinci Resolve.
Improve your skills in After Effects with this comprehensive tutorial covering topics such as working with audio, animating transform properties, adding easing, and swapping out layer content while keeping keyframes.
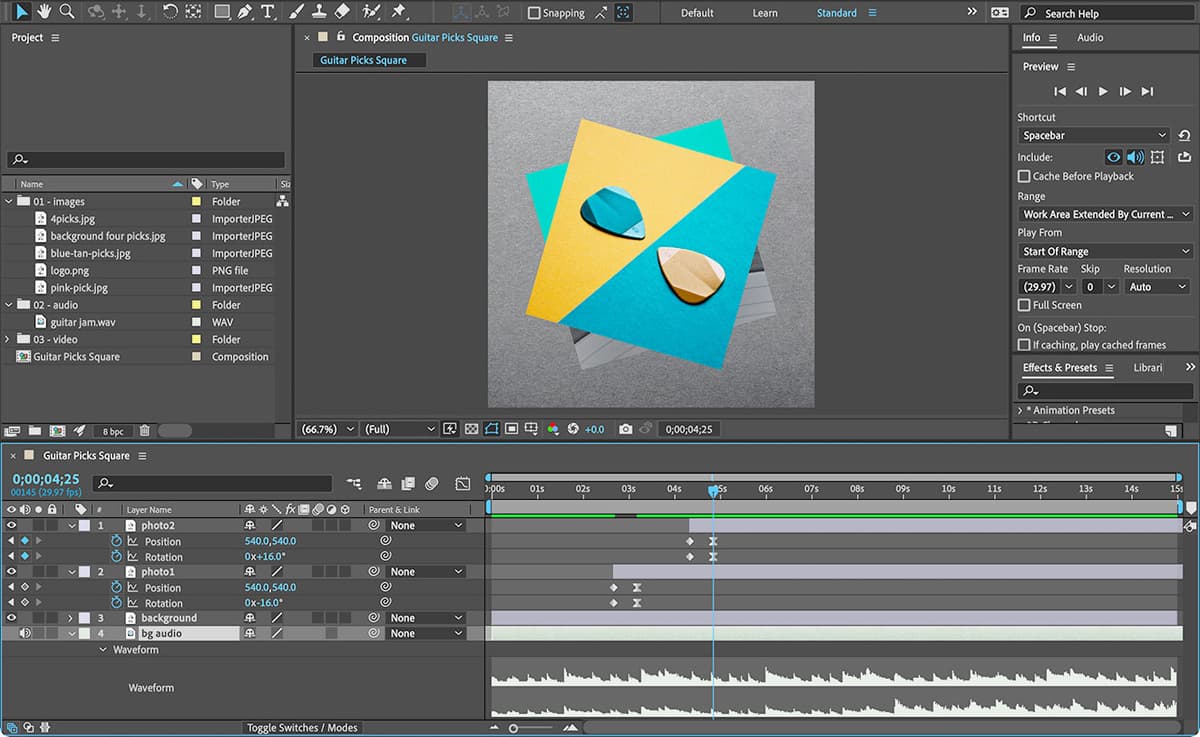
Exercise Preview
Getting Started
You should still have Your Name—Guitar Picks.aep open in After Effects. If you closed it, re-open it now by going to File > Open Project then Desktop > Class Files > After Effects Class > Guitar Picks. We recommend you finish the previous exercise (1B) before starting this one. If you haven’t, do the following sidebar.
If You Did Not Do the Previous Exercise (1B)
- If a project is open in After Effects, go to File > Save, then File > Close Project.
- Go to File > Open Project and navigate to Desktop > Class Files > After Effects Class > Guitar Picks > Finished Projects.
- Double–click on Guitar Picks—Ready For Audio.aep.
- Go to File > Save As > Save As. Name the file Your Name—Guitar Picks.aep and save it to Desktop > Class Files > After Effects Class > Guitar Picks (replacing the file if it’s already there).
Understanding Timecode
Timecode is a system used in video editing and animation to keep track of the specific frame or time within a video. It’s usually shown as hours, minutes, seconds, and frames (HH:MM:SS:FF). This allows you to easily navigate to a specific point in a video or on a timeline and make precise changes.
Adding Audio
- In the Project panel, expand the 02—audio folder.
Drag the guitar jam.wav file into the left side of the Timeline below the background layer (so it’s the bottom layer).
With the guitar jam.wav layer selected:
- Hit Return (Mac) or Enter (Windows) to edit the name.
- Rename it bg audio
- Hit Return (Mac) or Enter (Windows) to finalize the change.
With the bg audio layer selected, hit the L key twice (LL) to reveal its waveform.
NOTE: You can also use the layer’s arrow to show its options, then expand into Audio, then Waveform.
Notice the waveform is flat for about the beginning 4 seconds (which means it will be silent there).
NOTE: The waveform is a representation of an audio file’s volume over time. Where the waveform is higher (called peaks) it’s louder. Where it’s lower (sometimes completely flat, called troughs) the audio file is quieter.
There should be a Preview panel on the right side of the window.
If needed, expand the height of the Preview panel by dragging down the panel’s bottom divider to see all of its options.
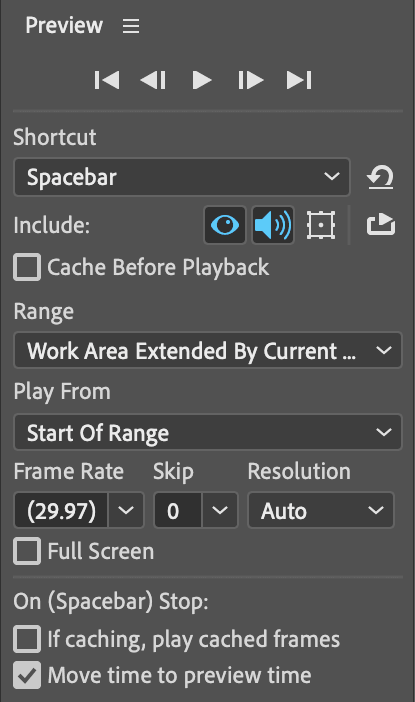
- In the middle of the Preview panel, set Play From to Start of Range.
Return the Preview panel to its original size by dragging the bottom divider back up.
You’re about to preview something with sound. Make sure your speakers are on or your headphones are connected.
Press the Spacebar to preview the timeline.
Notice the audio does not play for the first couple of second (about 4 to be exact) where they waveform is flat.
Press Spacebar again to stop the playback.
We want to trim off the beginning 4 seconds and 15 frames of the layer, so move the playhead
 (officially called the Current Time Indicator) to 04;15
In the Timeline, each layer’s colored bar indicates when you can see or hear the layer.
As shown below, hover over the beginning (called the In point) of the bg audio layer’s colored bar so you see a trim cursor
 .
.Hold Shift (to snap to the playhead) and drag the start to the playhead.
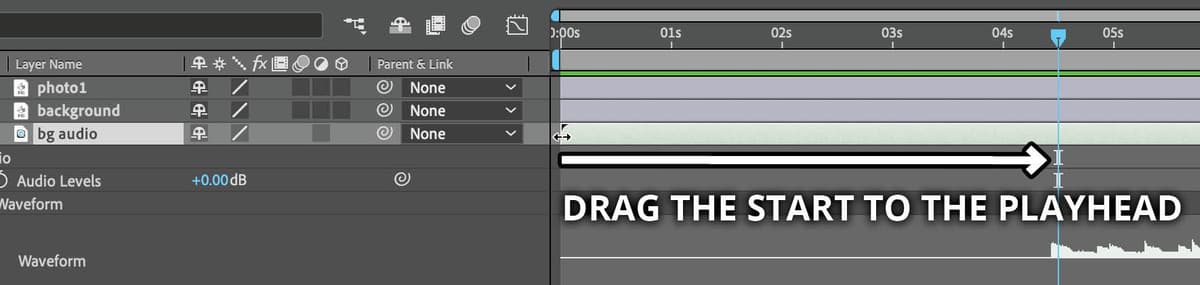
TIP: The keyboard shortcut to trim the In point to the playhead is Opt–
[(Mac) or ALT–[(Windows).Move the playhead
back to the beginning of the Timeline.With the bg audio layer still selected, press the
[left bracket key.This moves the beginning of the selected layer to the playhead.
Press Spacebar to preview the timeline.
That’s much better with the audio starting at the beginning.
Press Spacebar again to stop the playback.
With the bg audio layer still selected, press Cmd ~ (Mac) or CTRL ~ (Windows) to hide the layer properties.
Animating Transform Properties: Position & Rotation
We want our animation to start with the background image on screen alone for a few seconds. Then the rotated photo will drop down to cover it. Because we already have the photo at the position and rotation that we want at the end of the animation, we will animate it into its final resting pose.
At the top left of the Timeline, click on the time display (timecode)
to edit it.Type 100 and hit Return (Mac) or Enter (Windows).
This will move the playhead to 0;00;01;00 (1 second).
In the Timeline select the photo1 layer.
Hit the P key to reveal the Position property.
Click the stopwatch
 next to the Position property.
Move the playhead
back to the beginning of the timeline.Hover the cursor over the photo1 layer’s second Position value.
Drag the value to the left until it reads approximately -520.0
NOTE: To change the value more rapidly, you can hold Shift as you scrub. You can also click on the value and use the Up Arrow or Down Arrow to nudge it 1 pixel at a time. If you hold Shift while using the up/down arrows, it moves 10 pixels at a time.
Use the Spacebar to play through the animation.
The photo drops down, but let’s make it more interesting by removing the rotation when it’s offscreen. Then it will rotate as it moves down.
- Move the playhead back to the beginning of the timeline.
Hit the K key to jump to the keyframe at 1 second.
NOTE: J & K are used to move between keyframes. J jumps the playhead to the next visible keyframe. K jumps to the previous visible keyframe.
With the photo1 layer still selected, press Shift–R to add Rotation to the currently visible properties.
Click on the stopwatch
for the photo1 layer’s Rotation to add a keyframe.Hit the J key to jump to the keyframe at the beginning of the timeline.
Change the photo1 layer’s Rotation to 0x+0° (click on the number after X and type in 0).
Press the Spacebar to preview the animation.
Not bad, but its a little slow. Speeding up the animation should make it look better, more like it’s falling down.
At the top left of the Timeline:
- Click on the Timecode
- Type 15
- Hit Return (Mac) or Enter (Windows) to move the playhead to 0;00;00;15 (15 frames, or half a second).
In the Timeline, draw a selection box around the last 2 keyframes to select them.

Drag the selected keyframes towards the playhead line. As you drag, hold Shift so they snap to the playhead line.
NOTE: It’s important to hold Shift after you start dragging. If you hold Shift before you drag it will de–select the keyframe.
Press Spacebar to preview the animation.
Press Spacebar again to stop at anytime.
Adding Easing
Diamond-shaped keyframes  signify linear motion, where the layer moves at a constant speed. Our photo starts animating, moves at a constant speed, and abruptly stops. Objects in real life don’t usually move that way. Let’s add easing, which will slow the animation down gradually going into (or out of) a keyframe.
In the Timeline, make sure the last 2 keyframes are still selected. If they are not, draw a selection box around the last 2 keyframes to select them.
CTRL–click (Mac) or Right–click (Windows) on either of the highlighted keyframes and choose Keyframe Assistant > Easy Ease.
Use the Spacebar to preview the timeline.
It’s subtle, but they now slow up a bit when coming to their final position.
Click on the Timecode, type 220 and hit Return (Mac) or Enter (Windows) to jump the playhead to 02;20
Make sure the photo1 layer is selected.
Press
[to move the layer so it starts at the playhead’s current position.Press Spacebar to preview the timeline.
There is now enough space at the beginning of the timeline to view the initial background screen and also accommodate the fade–in we will eventually add.
Choose File > Save or hit Cmd–S (Mac) or CTRL–S (Windows) to save your file.
How to Remove Easing
The fastest way to remove easing is by holding Cmd (Mac) or CTRL (Windows) and clicking on a keyframe .
You can also CTRL–click (Mac) or Right–click (Windows) on a keyframe and choose Keyframe Interpolation. Set Temporal Interpolation to Linear.
Swapping Out the Photo
In the Project panel, locate blue-tan-picks.jpg (in the 01—images folder).
- Hold Option (Mac) or ALT (Windows) and drag blue-tan-picks.jpg onto the photo2 layer in the Timeline.
With the photo2 layer selected, press U to reveal its keyframes.
The keyframes should still be there, which is what we want.
Press Spacebar to preview the timeline.
You should see the second photo is now a different image, but it kept the animation!
Let’s rotate the second photo so we can still see some of the first photo below it. Make sure the photo2 layer is selected.
Hold Shift as you drag the playhead
(so it snaps to things) and move the playhead to the end keyframes on the photo2 layer.Change Rotation from negative to positive, so it’s 0x+16° as follows:
- Click on the second part of the number (after the X) to make it editable.
- Type in 16 and hit Return (Mac) or Enter (Windows).
NOTE: We do not type in the + because that makes it a relative value. Typing in +16 would have added 16 to the current value, instead of changing the value to 16.
Press Spacebar to preview the animation once more.
Choose File > Save or hit Cmd–S (Mac) or CTRL–S (Windows) to save your file.
Understanding Keyframes
Most animation in After Effects is created using keyframes. Think of keyframes as poses. Each keyframe stores a specific property value at a specific point in time. You set the keyframes, and After Effects creates the frames in between them. Animation requires at least two keyframes for a property, each with different values.
Any property with a stopwatch can be animated. Each property’s keyframes are independent of the keyframes of any other property.
Keyframes in After Effects are points on the timeline where you specify a specific value for a property of a layer or effect such as its position, opacity, or scale. By creating keyframes at different points in time, you can specify how the value of that property should change over time. For example, you might set a keyframe at the beginning of a timeline to specify that a layer should start at a certain position, and then set another keyframe later on to specify that the layer should move to a different position. After Effects will automatically create a transition between these two keyframes, so that the layer moves from one position to the other over time.
In simple terms, keyframes are markers on the timeline that indicate where a change in the animation occurs.
There are 5 basic steps to creating a keyframed animation:
Move the playhead to where you want the first keyframe to be created.
Set the property to the value you want for that keyframe.
Click on the stopwatch
to enable animation and create the first keyframe. This keyframe is placed at the position of the playhead.Move the playhead to the part of the Timeline where you want the next keyframe.
Change the property’s value. This will automatically create a keyframe at the position of the playhead.