Motion Tracking
What This Tutorial Covers
Track Points
Pick high-contrast features for reliable tracking.
Track Motion
Position, rotation, scale, or perspective tracking.
Apply Tracking Data
Pin layers, masks, or effects to tracked motion.
Noble Desktop's Video Editing & Motion Graphics Certificate teaches After Effects alongside Premiere Pro, Cinema 4D, and DaVinci Resolve.
Master the Motion Tracker feature in After Effects with this comprehensive tutorial that takes you step-by-step through Point Tracking, Motion Tracking, working with Null Object Layers, Multiple Trackers, and importing After Effects Comps.
Exercise Preview

Creating Compositions from Footage
When working with video footage you’re going to track, it’s helpful to make your composition match the settings (dimensions, length, framerate, etc.) of the video.
In the Project panel, expand the 01—Video folder.
- Double–click Green Fruits and Vegetables.mp4 to open it in the Footage panel.
At the bottom left of the Footage panel, click the Preview Time button
 .
.Type in 815 and hit OK.
At the bottom of the Footage panel (below the time ruler), click the Set Out Point button
 .
.This trims the clip’s out point to the playhead. When this clip is used in After Effects, only the active area will be visible on the timeline.
Close the Footage panel by clicking the X to the left of the tab.
In the Project panel, CTRL–click (Mac) or Right–click (Windows) on Green Fruits and Vegetables.mp4 and choose New Comp from Selection.
This creates a new comp that matches the video file’s settings.
Drag the new comp Green Fruits and Vegetables out of the 01—Video folder.
With the Green Fruits and Vegetables comp selected:
- Hit Return (Mac) or Enter (Windows) to make the name editable.
- Rename the comp Fun Facts about Fruit
- Hit Return (Mac) or Enter (Windows) again to finalize.
Motion Tracking Video: Tracking the Avocado
The built in point tracker in After Effects allows us to track the movement of a group of pixels in a video file. We can then apply that tracked data to another layer so that it can move along as the content in the video does.
- Click on the Timeline to make it active.
Choose Layer > New > Null Object.
- Rename the new
[Null 1]layer to Avocado Pos
- Rename the new
Press Cmd–D (Mac) or CTRL–D (Windows) to duplicate the null object layer.
- Rename the new layer Apple Pos
Move the playhead to the beginning of the timeline.
CTRL–click (Mac) or Right–click (Windows) on the Green Fruits and Vegetables.mp4 layer and choose Track & Stabilize > Track Motion.
This opens both the Layer and Tracker panels. The Tracker can only be run from the Layer panel.
The 3 Parts of the Point Tracker
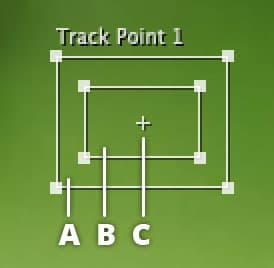
A = Search Region: The area After Effects searches to locate the pixels that are defined by the Feature Region.
B = Feature Region: The area of pixels to track. It should be a distinctive feature with as much contrast as possible.
C = Attach Point: Where the target layer’s anchor point will be attached to.
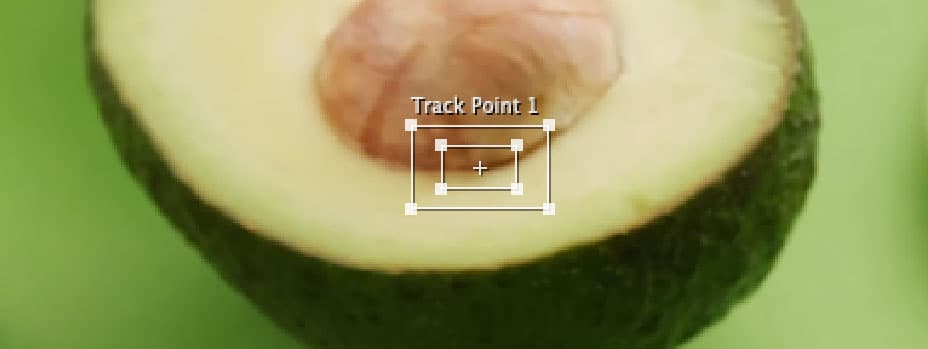
In the Layer panel, hover over Track Point 1 until you see the black move tool.

- Drag Track Point 1 to the seed of the avocado.
- Drag the control points of the Search and Feature regions to match this example (enclose a high contrast area with distinct features):
In the Tracker panel, click Edit Target and:
- Set Layer to 2. Avocado Pos
- Click OK.
In the Tracker panel, click Options and:
- Set Track Name to Avocado Tracker
- Click OK.
In the Tracker panel’s Analyze section:
- Click the Analyze Forward
 button.
While Tracking this button becomes the stop track button.
NOTE: The Tracker analyzes how the pixels in the feature region change from frame to frame and uses this to construct a motion path. If the track point starts to drift, stop the track, go back to where you started tracking, adjust the Feature and Search regions, then try again.
- Click the Analyze Forward
When the tracking is finished, click Apply at the bottom of the Tracker panel.
- Set Apply Dimensions to X and Y.
- Click OK to apply the tracking data to Avocado Pos null.
NOTE: Depending on your workspace and panel layout, this may automatically return you to the Composition panel.
Motion Tracking Video: Tracking the Apple
Each item in your video that you want to track requires it’s own tracker and each tracker must then be tracked individually.
Make sure the playhead is at the beginning of the timeline and your video layer is selected.
Click on the Layer panel (at the top next to the Composition panel’s tab) so you can continue with tracking the apple.
NOTE: In order to use the tracker you have to be in the Layer panel and the video layer must be selected.
In the Tracker panel, click the Track Motion button at the top. This creates a second tracker, this one will be for the apple.
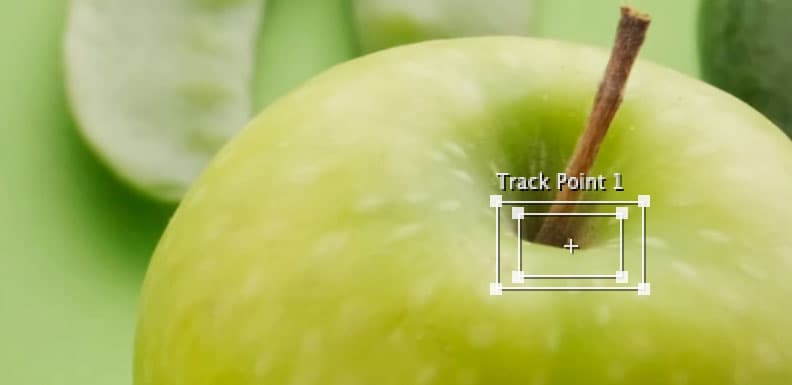
In the Layer panel, hover over Track Point 1 until you see the black move tool.
- Drag Track Point 1 to the stem of the apple.
- Drag the control points of the Search and Feature regions to match this example:
In the Tracker panel, click Edit Target and:
- Set Layer to 1.Apple Pos
- Click OK.
In the Tracker panel, click Options and:
- Set Track Name to Apple Tracker
- Click OK.
In the Tracker panel’s Analyze section:
- Click the Analyze Forward button.
- Click the Analyze Forward
When the tracking finishes, click Apply at the bottom of the Tracker panel.
- Set Apply Dimensions to X and Y.
- Click OK.
You should now see the Composition panel again.
Drag the playhead back and forth through the timeline and notice that the two null object layers now move with the avocado and apple.
NOTE: If you find it hard to see the null object layers you can change their color by changing the layer’s label color.
Choose Window > Workspace > Reset “Standard” to Saved Layout.
Choose File > Save or hit Cmd–S (Mac) or CTRL–S (Windows).
Applying Tracking Data to Layers with Parenting
Now that we have the Avocado and Apple tracked and the graphics we want to use imported. It is time to connect everything together.
- Drag the callout 01 comp from the Project panel into the left side of the Timeline below the Avocado Pos layer.
- Rename the callout 01 layer to Avocado Callout
Move the playhead to 2;00
This is towards the end of the callout animation so we can see its size and position on screen.
In the Tools panel, choose the Pan Behind tool
 (or hit the Y key).
- In the Tool options to the right of the Tools panel, make sure Snapping is unchecked.
Drag the Anchor Point
 of the Avocado Callout layer to the center of the circular part of the callout.
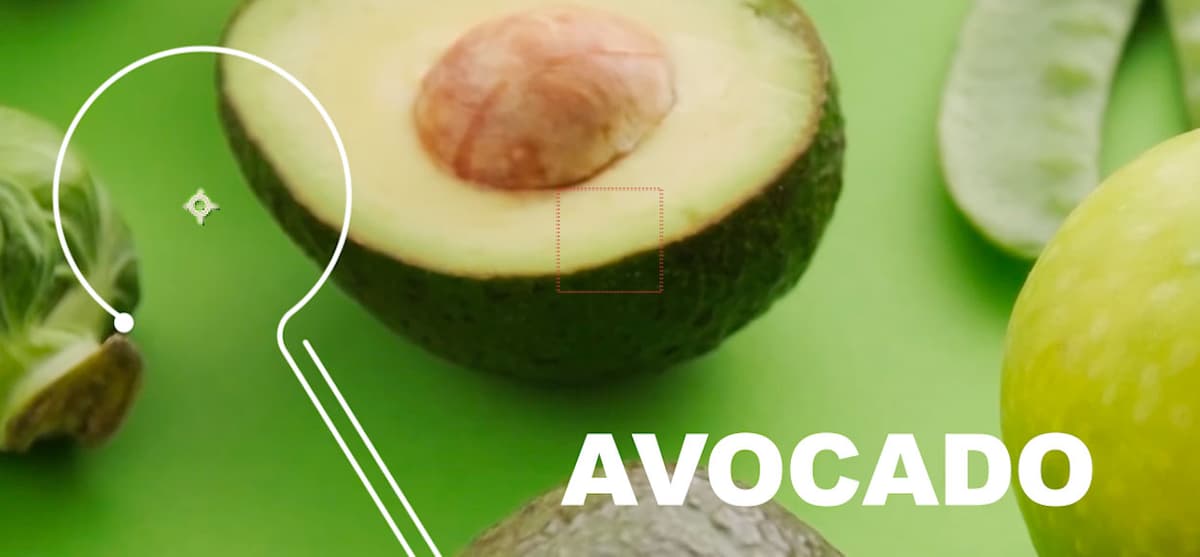
In the Tools panel, choose the Selection tool
 (or hit the V key to choose it).
Drag the Avocado Callout until the layer’s anchor point
is positioned over the avocado’s seed.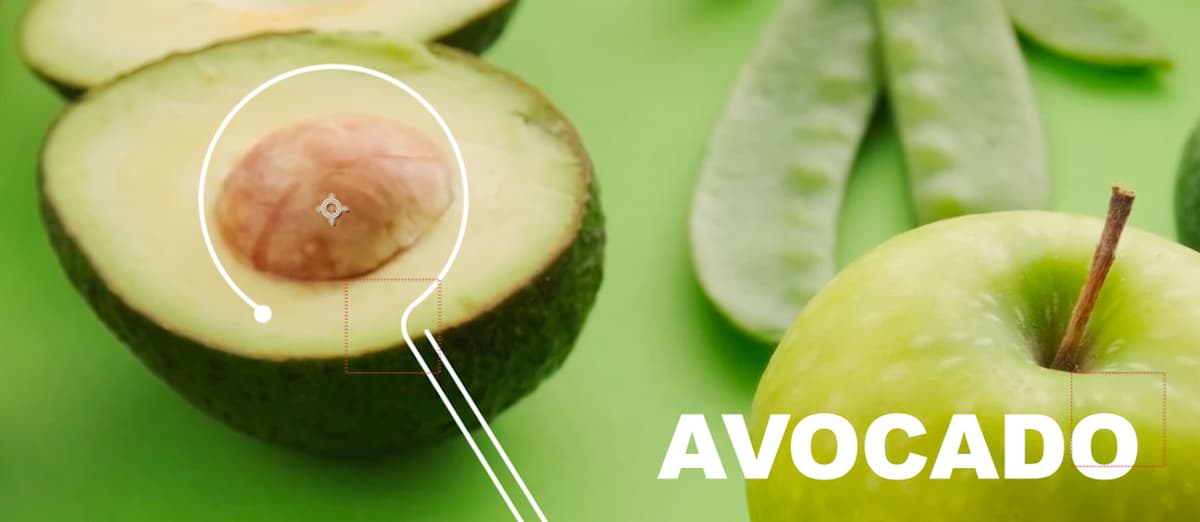
In the Timeline, to the right of the Avocado Callout layer set the Parent menu to 2.Avocado Pos.
With the Avocado Callout layer selected, hit S to reveal Scale.
- Change Scale to 60
- Press S to hide Scale.
Use the Spacebar to preview the animation.
The callout now follows the position of the avocado!
- Drag callout 02 comp from the Project panel into the left side of the Timeline below the Apple Pos layer.
- Rename the callout 02 layer to Apple Callout
- Move the playhead to the end of the timeline so we can see the callout animation.
- In the Tools panel, choose the Pan Behind tool (or hit the Y key).
- Drag the Anchor Point of the Apple Callout layer to the center of the circular part of the callout.
- Move the playhead to 4;00
- In the Tools panel, choose the Selection tool (or hit the V key to choose it).
Drag the Apple Callout until the layer’s anchor point
is positioned at the base of the apple’s stem.- In the Timeline, to the right of the Apple Callout layer set the Parent menu to 1.Apple Pos.
Press S to reveal Scale.
- Change the scale to 60
- Press S again to hide the property.
Hit
[to slide the beginning of the Apple Callout layer to the playhead.Use the Spacebar to preview the animation.
Choose File > Save or hit Cmd–S (Mac) or CTRL–S (Windows).
Optional Bonus: Editing a Nested Composition
The smaller text is a bit hard to read. Let’s make it bold so it stands out more. This is one of the major advantages of importing a native After Effects project instead of working with pre-rendered video.
- In the Timeline, double–click on the Avocado Callout composition layer.
- Move the playhead to the beginning of the timeline.
- Click the reveal arrow next to the text layer.
Click the reveal arrow for the Text properties.
- Click the eye
 for Animator 1 to hide it.
- Click the eye
In the Timeline, double–click on the name of the text layer.
NOTE: This does two things, it selects the text in the comp panel and automatically switches to the Type tool.
- In the Composition panel, select the text “member of the same family as cinnamon”.
- In the Character panel on the right, change the font style to bold.
- In the Timeline, show the Animator 1 by clicking in the eye column .
- Click on the X for the callout 01 timeline to close it and return to the Fun Facts about Fruit composition.
- Double–click on the Apple Callout comp layer to open callout 02.
- Move the playhead so you can read all the text.
- In the Timeline, double–click on the name of the text layer.
- In the Composition panel, select the text “member of the same family as the rose”.
- In the Character panel on the right, change the font style to bold.
- Click on the X for the callout 02 timeline to close it and return to the Fun Facts about Fruit composition.
Use the Spacebar to preview the animation.
Notice the callout text has now been updated.
Choose File > Save or hit Cmd–S (Mac) or CTRL–S (Windows).
You’re done, so choose File > Close Project.