Music Video: Adjustment Layers & Color Correcting Videos in Premiere Pro
Color-Correct via Adjustment Layers
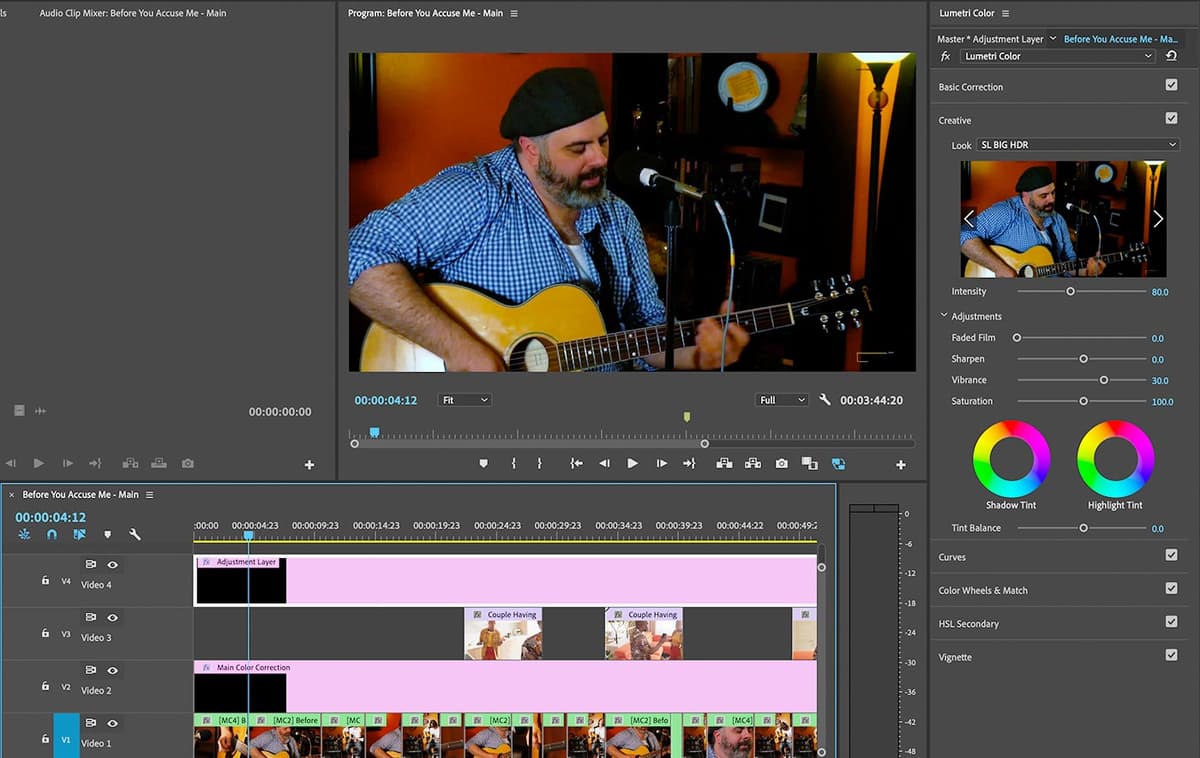
Adjustment Layers Are Not Clips
They affect every clip below them on the timeline — perfect for global color correction.
Open the Multi-Cam Project
Before You Accuse Me—Color Correcting.prproj — already has multi-cam edits and b-roll done.
Apply Lumetri Color to the Adjustment Layer
Effects → Lumetri Color → drop on the adjustment layer to grade the whole sequence.
Layer Multiple Adjustment Layers
One for primary color correction, another for creative grading — easy to toggle on/off.
Noble Desktop's Video Editing & Motion Graphics Certificate teaches Premiere Pro alongside After Effects.
Discover the ins and outs of color correction in Premiere Pro with this detailed tutorial, covering topics such as adjustment layers, achieving the right look and feel for your video, and using correct color aberrations.
Exercise Preview
Color Correcting with an Adjustment Layer
If the colors in your video don’t seem right to you, a couple of basic adjustments can often help refine them.
- Choose Window > Workspaces > Editing.
- Choose Window > Workspaces > Reset to Saved Layout.
- Hit the
\(backslash) key to zoom out to see everything in the Timeline. On the left side of the Timeline, CTRL–click (Mac) or Right–click (Windows) on the Video 1 track name and choose Add Track.
This adds a new track above the one we clicked on.
Hold Shift and hit the + (plus) key to expand the height of all tracks on the Timeline.
In the Project panel, click on any empty area to deselect any active files or bins.
At the bottom right of the Project panel, click on the New Item
 button and choose Adjustment Layer.
- The default settings are fine, so click OK.
Drag the new Adjustment Layer clip to the beginning of the Video 2 track on Timeline.
- Choose the Selection tool
 .
. Drag the end of the Adjustment Layer clip until it matches the length of the video on the Video 1 track.
- Choose Window > Workspaces > Color.
Choose Window > Workspaces > Reset to Saved Layout.
If necessary, click on the Adjustment Layer clip on the Timeline to select it.
Move the Timeline playhead to 4:15 so you can see a clip of the main performer.
In the Lumetri Color panel on the right, if the Basic Correction is closed, click on it to expand it.
Under White Balance, drag the Temperature slider to the left until it reads -75.
This cools off the image, removing the orange tint that is present in all of the music video footage.
Under Tone, change Highlights to 40.
This brightens up the lighter areas of the video.
Also in the Tone section, change Shadows to 20.
This brightens up the darker areas of the video.
Preview the Timeline to see that these color adjustments affect any video that is located below the Adjustment Layer.
In the Timeline, CTRL–click (Mac) or Right–click (Windows) on the Adjustment Layer clip and choose Rename.
Rename it to Main Color Correction and click OK.
Choose File > Save or hit Cmd–S (Mac) or CTRL–S (Windows).