Using Filters for Special Effects
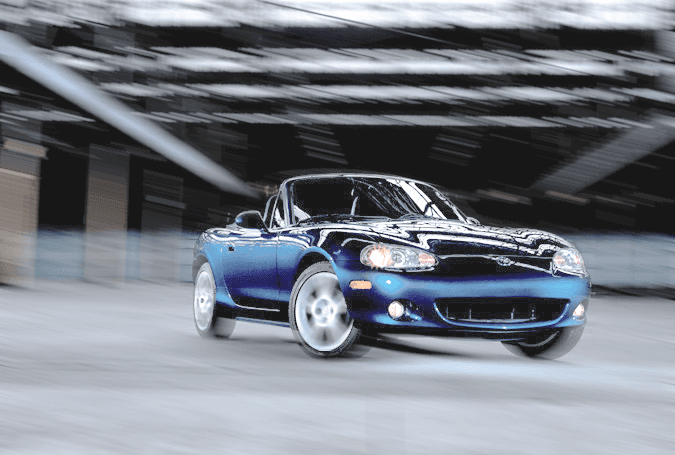
Motion + Spin Blur Effects
Load 'Car Silhouette' Selection
Select → Load Selection with Invert checked → selects everything except the car.
Layer → New Layer Via Copy
Copies the selection to a new layer named 'blurry bg'.
Filter → Blur → Motion Blur
Angle: -15°, Distance: 40 Pixels for the moving-background look.
Spin Blur the Wheels
Load wheel selection → Layer Via Copy → Filter → Blur → Spin Blur for rotating wheels.
Noble Desktop's Photoshop Bootcamp covers retouching, compositing, color correction, and pro editing.
Explore this comprehensive Photoshop tutorial which covers topics such as motion and spin blur effects, copying layers, and loading selections, providing detailed instructions on how to add a sense of motion to a static image.
Exercise Preview
Spinning the Wheels
Click back on the Background layer to highlight it.
Choose Select > Load Selection.
Set the following:
- Set Channel to front wheel.
- Make sure New Selection is selected.
- Click OK.
Go to Layer > New > Layer Via Copy.
Name the new layer front wheel.
Go to Filter > Blur Gallery > Spin Blur.
In the Options bar, make sure Preview is checked on.
A blur area with overlay controls and a preview of the blur will appear on the photo. Drag the rotation point (center of the blur area) to the center of the hubcap:
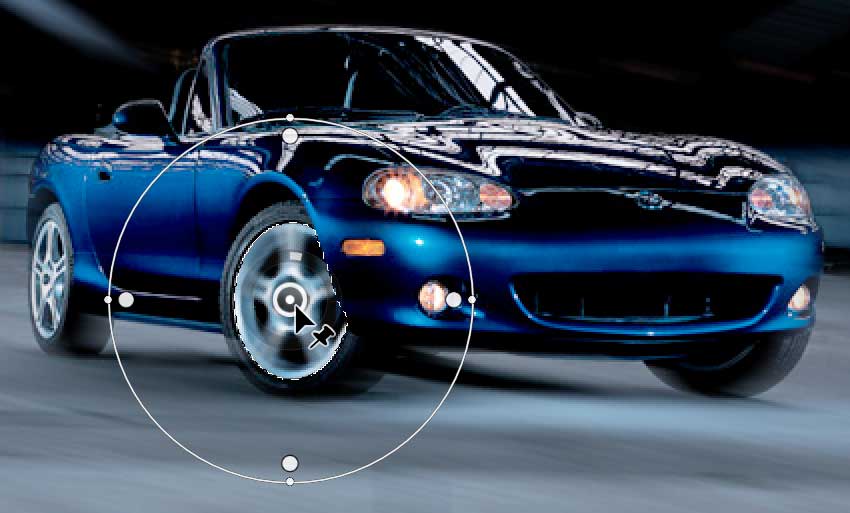
NOTE: We don’t need to do this for the current image, but you should know that the rotation point can also be moved off-center. To move it off-center hold Opt (Mac) or ALT (Windows) when dragging.
Over the next few steps we’ll adjust the shape of the blur area. Before we start, here’s how we want the final shape to look like:
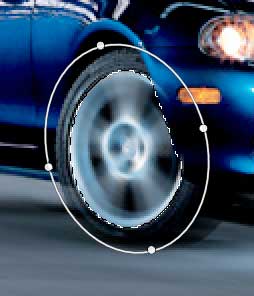
First let’s make the whole blur area smaller. Hover over the thin line of the circle (not any of the dots) so the cursor looks like this resize handle
 .
.Drag the line in towards the center of the blur area to make it slightly larger than the car’s wheel.
We need to better match the shape and angle of the wheel, so let’s make the blur area into an oval shape that is tilted slightly to the left. Hover over the small outer dot on the right of the blur area so the cursor looks like this resize handle
 .
.Drag this dot in towards the center to make the blur area slightly narrow.
Drag the top small outer dot away from the center to make the blur area a bit taller.
Tilt the blur area slightly to the left by dragging any of the small white outer dots counter-clockwise.
NOTE: You can also adjust how much of the selection gets blurred using the feather handles (large white dots inside the oval). The further away from the blur area’s edge they are, the less of the selection will get blurred. We want the whole hubcap to be blurred so there’s no need to adjust the feather handles.
To adjust the amount of the blur, hover anywhere inside the blur area to reveal a black/white circular slider that surrounds the center point. As shown below, drag the slider until you’re satisfied with that amount of blur.
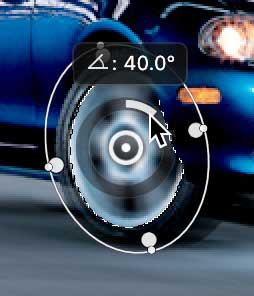
NOTE: You can also adjust the Blur Angle in the Blur Tools panel on the right.
In the Options bar at the top of the screen, click OK to apply the blur. Now we’re cruisin’!
Click back on the Background layer to highlight it.
Choose Select > Load Selection and:
- Set Channel to back wheel.
- Make sure New Selection is selected.
- Click OK.
Go to Layer > New > Layer Via Copy.
Name the new layer back wheel.
Once again, go to Filter > Blur Gallery > Spin Blur.
Adjust the blur area as needed, then change the Blur Angle to your liking. You do not need to make the circle as small as the tire (you won’t be able to). Just focus on getting a similar oval shape.
When you’re done, click OK in the Options bar at the top of the screen.
That’s it! You’ve taken a static image and used filters to give it an illusion of speed and motion. What a rush!