Using Channels to Make Selections
What This Tutorial Covers
Channel Inspection
Identify the highest-contrast channel.
Channel Duplication
Work on a copy to build a selection mask.
Levels & Curves
Push contrast to isolate the subject cleanly.
Noble Desktop's Graphic Design Certificate covers Photoshop alongside Illustrator and InDesign.
Master how to use Photoshop's Channels and Levels for detailed selections and color modifications in our thorough tutorial featuring a step-by-step exercise.
Exercise Preview

Selecting the Baby’s Suspender Straps
From the Photoshop Adv Class folder, open Baby.tif.
An Embedded Profile Mismatch dialog should appear. Because it will be used on the web, and its embedded color profile of sRGB is well suited for web design, leave Use the embedded profile (instead of the working space) selected and click OK.
Go to the Channels panel.
We need to select just the straps so we can change their color. Take a look at each of the three color channels by clicking them on the Channels panel or pressing:
- Cmd–3 (Mac) or CTRL–3 (Windows) to select the Red channel
- Cmd–4 (Mac) or CTRL–4 (Windows) to select the Green channel
- Cmd–5 (Mac) or CTRL–5 (Windows) to select the Blue channel
Notice that while most channels have decent contrast between the straps and shirt, the Red channel is the best. There is hardly any shirt detail, and the straps are very dark.
Select the Red channel (Cmd–3 (Mac) or CTRL–3 (Windows)).
From the Channels panel menu
 , choose Duplicate Channel.
Name the new alpha channel straps and click OK.
Double–click on the straps channel thumbnail.
Set Color Indicates to Selected Areas and click OK.
Make sure the straps channel is selected and visible
 . Be sure to hide all other channels.
There are a lot of things here that we don’t need. To get rid of them, Lasso
 a quick selection around just the two straps (make sure BOTH are selected). You don’t have to be perfect about the edge, just don’t get too much of the baby’s shirt.
Do a Select > Inverse (Cmd–Shift–I (Mac) or CTRL–Shift–I (Windows)).
Make sure the Background color is white.
Hit Cmd–Delete (Mac) or CTRL–Delete (Windows) to delete the background to white.
Do a Select > Deselect (Cmd–D (Mac) or CTRL–D (Windows)).
Do a Levels adjustment (Cmd–L (Mac) or CTRL–L (Windows)). Do NOT try to do an adjustment layer—they don’t work on channels!
- We need to add contrast so the straps will be fully black (selected) and the shirt will be fully white (not selected). Any grays will be only partially selected. Do the following so your adjustment looks as shown below:
- Pull the white and black points in to increase the contrast, pushing the blacks darker and the lights whiter.
- Adjust the midpoint, keeping an eye on both how dark things are and the edge transitions as well.
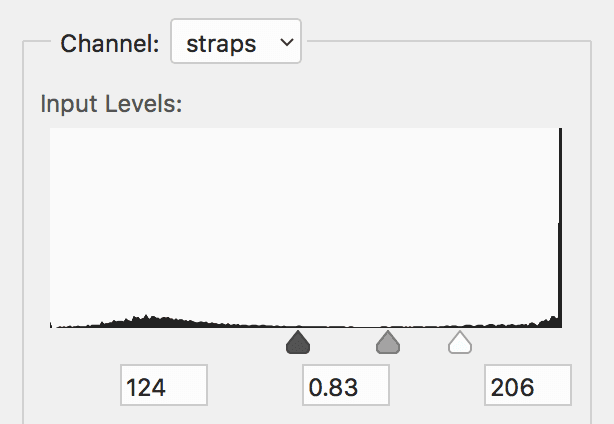
Click OK when done.
If there are any leftover parts to remove, paint over them with white.
Once you’re satisfied that you have a good alpha channel, Cmd–click (Mac) or CTRL–click (Windows) on the straps channel to load it as a selection.
Selecting the Woman’s Blouse
The straps were a pretty easy selection but when we select the blouse we’ll face some new challenges.
- We need to select just the blouse so we can change its color. To do this, look for a channel that has high contrast and well-defined edges. Take a look at each of the three color channels by clicking them on the Channels panel or pressing the following keystrokes. NOTE: If these keystrokes don’t work, select the Background layer, then try them again.
- Cmd–3 (Mac) or CTRL–3 (Windows) to select the Red channel
- Cmd–4 (Mac) or CTRL–4 (Windows) to select the Green channel
- Cmd–5 (Mac) or CTRL–5 (Windows) to select the Blue channel
The Red channel is definitely the best because the other channels lack enough contrast.
Select the Red channel (Cmd–3 (Mac) or CTRL–3 (Windows)).
From the Channels panel menu
, choose Duplicate Channel.Name it blouse and click OK.
Make sure the blouse channel is selected and visible
.Be sure to hide all other channels.
As shown below, to get rid of the things we don’t need, Lasso
a selection around all the baby features on the right—the shirt, eyes, etc.—so you have everything selected but the blouse.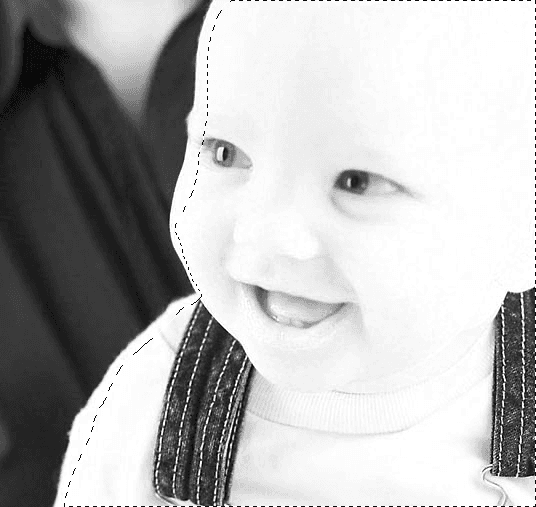
Make sure the Background color is white.
Hit Cmd–Delete (Mac) or CTRL–Delete (Windows) so the area on the right becomes solid white. The woman’s neck and blouse should be the only thing left over.
Do a Select > Deselect (Cmd–D (Mac) or CTRL–D (Windows)).
If there are any leftover bits along the edge that you missed, paint over them with white to remove them.
Notice how the neck isn’t white? That means it will be partially selected with the blouse (and therefore will change color when we colorize the blouse). We don’t want to change its color, so we’ll need to increase the contrast, making it white. However, if we do this now we may get a bad edge transition because we can not preview the change. Instead, we’ll do that in a few steps when we can preview it.
To load it as a selection, Cmd–click (Mac) or CTRL–click (Windows) on the blouse channel.
Changing the Color of the Woman’s Blouse
Click on the RGB composite channel.
Choose Layer > New Adjustment Layer > Hue/Saturation.
Name the layer change blouse color and click OK.
In the Properties panel, check Colorize and set the following:
Hue: 262 Saturation: 43 Lightness: 5 While watching the color of the skin around her neck, go to the Layers panel. Hide and show
the change blouse color layer so you can see how the color changes.Notice how the purple color bleeds into the skin around her neck? Let’s fix it now. Make sure the change blouse color layer mask is still selected.
Do a Levels adjustment by hitting Cmd–L (Mac) or CTRL–L (Windows).
As shown below, drag the black point to the right to hide the adjustment. Watch the color disappear from the neck area. Don’t pull the slider too far or you will remove too much color!
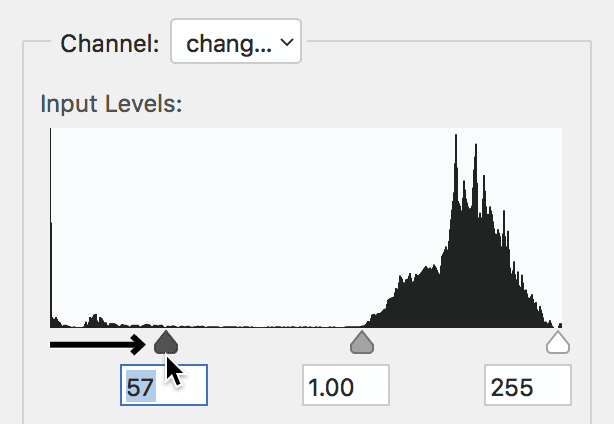
Click OK when done.