Layer Masking & Compositing
What This Tutorial Covers
Layer Masks
Hide and reveal pixels non-destructively.
Black & White Logic
Black hides, white reveals, gray = partial.
Refine Edges
Fine-tune mask edges for clean composites.
Noble Desktop's Graphic Design Certificate covers Photoshop alongside Illustrator and InDesign.
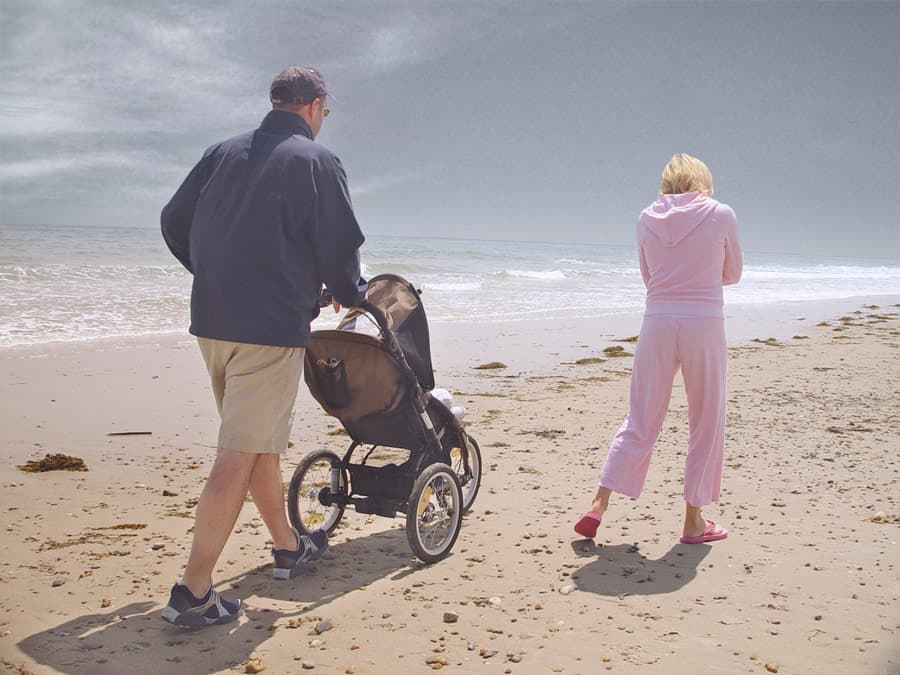
Our Photoshop tutorial guides you through the process of non-destructively combining images using layer masks, specifically focusing on techniques to replace the sky in a beach photo.
Exercise Preview
Adding the First Sky
Click on sky1.psd.
Using the Move tool
 , drag the sky onto BeachFamily.psd, BUT hold Shift when you let go. (Holding Shift centers the sky layer in the new file.)
Close the sky1.psd file.
In yourname-BeachFamily.psd, name the new layer sky1.
Creating the Layer Mask
Hide the sky1 layer.
We need to select the sky portion of the image. In the Layers panel, click on the Background layer to select it.
Choose the Magic Wand tool
 . (If you don’t see it, either click and hold on the Quick Selection tool
  and then choose it or hit Shift–W until it is selected.)
In the Options bar, set the Tolerance to 20.
Click in the sky close to the water’s edge. Only a portion of the sky will get selected, so hold Shift and click again in another part to select more. Do this a few times until you have selected all of it except the top corners.
To select the top left and right corners, choose the Lasso tool
 .
.- Hold Shift and drag around each corner (don’t worry about dragging outside the canvas). You should now have the entire sky selected.
- Show
 the sky1 layer.
 - In the Layers panel, click on the sky1 layer to select it. Then at the bottom click the Add layer mask button
 .
. Voilà! Now sky1 should only be visible where you wanted it… in the sky!
There is a bit of a gritty halo around the people and the edge where the sky meets the water. Let’s fix it.
- Zoom in to 200% and scroll over so you are looking at the back of the guy.
- Go to Select > Select and Mask.
- In the Properties panel on the right, click on the thumbnail to the right of View and double–click On Layers.
In the Global Refinements section:
- Give it a very small Feather (around 0.4 px).
- Give it a large Shift Edge (around 60%) to eliminate the white halo around the couple.
- To toggle between the changes and your original, check and uncheck Show Original.
- In the Output Settings section, make sure Output To is set to Layer Mask.
- When you’re satisfied with the result, click OK.
- Scroll over to the woman. Her selection needs a bit of work.
- Select the Brush tool
 and choose a small, soft brush.
 - Set the Foreground color to black, and paint over any extra blue that shouldn’t be around the woman. Now your selection should look pretty good!
In order for you to be able to modify the placement of the sky, as shown below, click the link icon
 to unlink the sky from its layer mask.
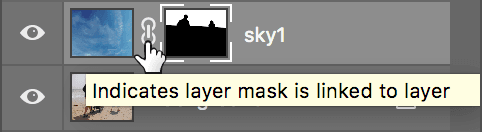
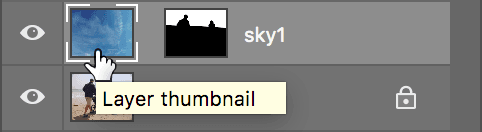
As shown below, click on sky1’s Layer thumbnail. (Do NOT select the Black & White Mask thumbnail on the right.)
Use the Move tool
to drag the sky to where you like it.
Viewing & Disabling Your Layer Mask
Let’s take a closer look at the layer mask you just created. In the Layers panel, hold Option (Mac) or ALT (Windows) and click sky1’s mask thumbnail.
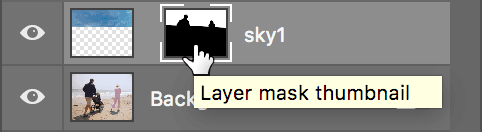
Now the document should be displaying just the grayscale mask. Note that the white areas are where the sky is visible. A layer mask is a grayscale image that hides or shows part of a layer.
- Where a layer mask is black, pixels on that layer are completely hidden.
- Where the mask is completely white, pixels on that layer are fully visible.
- Any place where a layer mask is a shade of gray, pixels on that layer are partially hidden (transparent). The darker the gray, the more transparent.
To see the image normally again, click sky1’s layer thumbnail (not the Black & White mask thumbnail).
To see the sky1 layer without the mask, you can temporarily disable it. In the Layers panel, hold Shift and click sky1’s mask thumbnail.
To turn it back on, just click on the mask again.
Trying Another Sky
If you’ve closed it, re-open sky2.psd.
Position yourname-BeachFamily.psd and sky2.psd on-screen so both are visible.
- While in sky2.psd, use the Move tool to drag the sky onto yourname-BeachFamily.psd, BUT hold Shift before you let go.
- Close sky2.psd.
In yourname-BeachFamily.psd, name the new layer sky2.
We’d like to use the same sky mask for both sky layers, so let’s group them together so we can reuse the mask.
Click on the sky1 layer, and Shift–click on the sky2 layer.
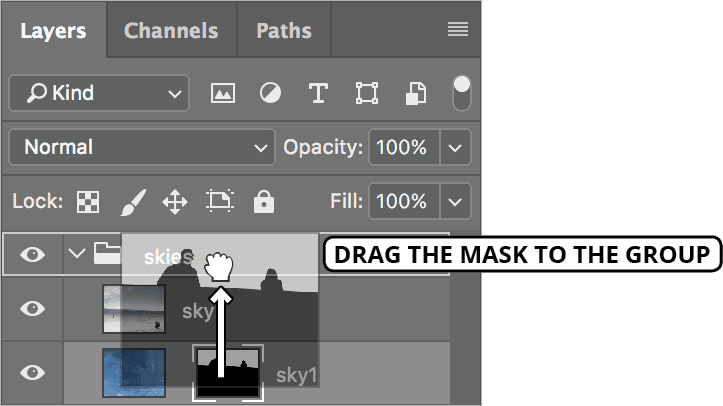
Go to Layer > Group Layers and name the new group skies.
Click the arrow next to the new group so you can see its contents.
Select sky1’s layer mask icon.
In the sky1 layer, drag the layer mask icon up to the group and let go. The mask will now be applied to both sky layers. Now you have another sky alternative!
In the Layers panel, click on the sky2 layer to select it. You can use the Move tool
to drag the sky around and move the clouds.Hide and then Show
the sky2 layer to see which sky you like better.NOTE: The colors and tones in the new skies aren’t a completely convincing match to the beach family image. We’ll return to yourname-BeachFamily.psd in the next exercise to correct this problem and improve the composited image.
Go to Window > Arrange > Consolidate All to Tabs.
Save the changes and leave the file open. We’ll use it again in the next exercise.