April 1, 2026Dan Rodney/4 min read

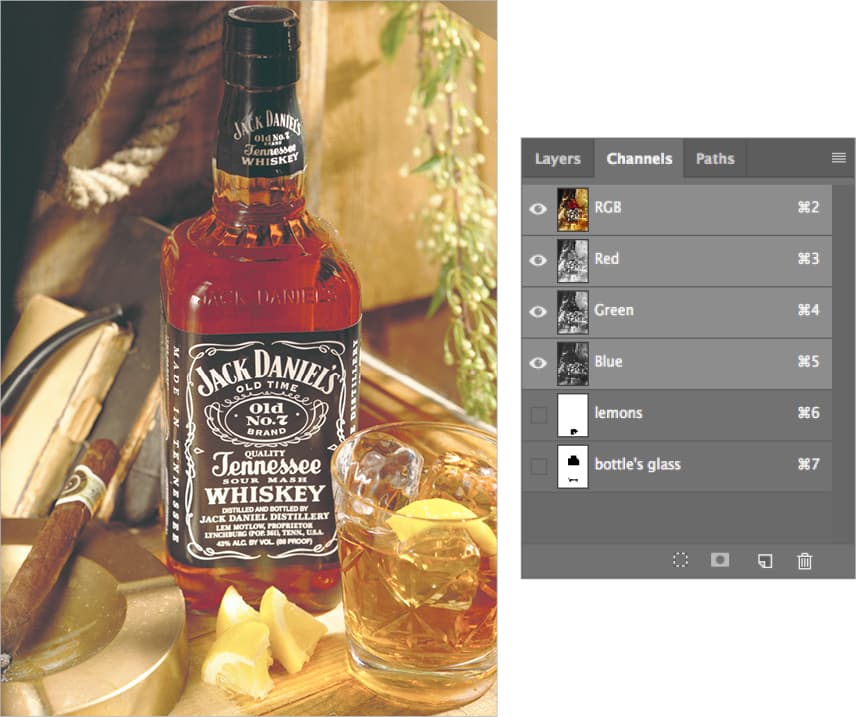
Product Shot: Selecting the Glass

Master Advanced Photoshop Selection Techniques for Product Photography

Core Photoshop Selection Methods

Channel-Based Selections

Create precise selections using color channels for complex organic shapes like fruit and reflective surfaces.

Path-Based Selections

Use the Pen tool to create vector paths for clean geometric selections with smooth curves and edges.

Combined Selection Workflow

Integrate multiple selection methods for professional product photography with complex layered objects.

Topics Covered in This Photoshop Tutorial:

Advanced Selection Techniques Using Channels, Precision Path-Based Selections for Complex Objects

Exercise Preview

product lemon and glass

Pre-Exercise Requirements

0/3

Exercise Overview

In this comprehensive exercise, you'll master two critical selection methods that professional designers rely on daily. We'll tackle the challenge of selecting organic shapes like lemons using channel-based techniques, then create precise selections for reflective glass surfaces. These skills are essential for high-end product photography and commercial retouching work. You'll save the lemon and bottle glass selections as reusable channels, while creating a path-based selection for the tumbler glass that maintains crisp, vector-quality edges.

Selection Workflow Overview

1

Tumbler Glass Path

Create vector path around geometric glass shape for clean selection boundary

2

Lemons Channel Selection

Paint custom channel mask for organic shapes covering bottle areas

3

Bottle Glass Isolation

Combine multiple selection methods to isolate complex bottle glass element

Selecting the Tumbler Glass Using a Path

We'll begin with path-based selection since glass objects with clean geometric edges are ideal candidates for the Pen tool's precision. This technique ensures smooth, scalable selections that remain crisp at any resolution.

  1. If it's not still open, re-open yourname-product-Adobe RGB.psd.

  2. Make sure no paths are selected by clicking in an empty area of the Paths panel.

  3. Select the Pen tool pen tool and carefully trace the contour of the tumbler glass at the bottom right. Work methodically around the rim and base, using as few anchor points as possible while maintaining smooth curves.

  4. In the Paths panel, double-click the work path and name it tumbler glass for future reference.

  5. Deselect the path by pressing Return (Mac) or Enter (Windows) to hide the path outline.

Path Naming Best Practice

Always name paths descriptively like 'tumbler glass' for easy identification in complex projects with multiple selection elements.

Path Creation Process

1

Clear Path Selection

Ensure no existing paths are active before starting new selection

2

Trace Glass Outline

Use Pen tool to create precise vector path around tumbler perimeter

3

Save and Deselect

Name path appropriately and deselect using Return or Enter key

Selecting the Lemons

Now we'll shift to channel-based selection, which excels at capturing organic, irregular shapes. Channels allow for nuanced selection painting and provide excellent control over soft edges and complex boundaries.

  1. Navigate to the Channels panel and click the Create new channel button new button at the bottom of the panel.

  2. Double-click the new channel thumbnail (not the name) to access its properties:
    • Name it lemons
    • Under Color Indicates: select Selected Areas for intuitive visual feedback.
    • Color: choose a bright lime green for easy visibility against the image.
    • Opacity: set to 50% to see both the channel and underlying image.
    • Click OK to confirm settings.
  3. With the lemons channel still active, click the eye icon eye hide show icon next to the composite RGB channel to overlay your selection work.

  4. Using a soft white brush, paint the selection focusing on the top half of the lemons near the bottle. The bottom portions are less critical, but pay special attention to areas where the lemons overlap the bottle—precision here will pay dividends in the final composite.

  5. When your lemon selection is complete, hide the lemons channel eye hide show icon to return to normal image view.

Channel Configuration Settings

Set channel to Selected Areas with lime green color at 50% opacity for optimal visibility while painting the selection mask.

Custom Channel Creation

1

Create New Channel

Add new alpha channel in Channels panel for lemon selection storage

2

Configure Channel Properties

Set Selected Areas mode with bright lime green color for visual clarity

3

Paint Selection Mask

Focus on upper lemon areas covering bottle, less precision needed for bottom areas

Selecting the Glass of the Bottle

This final section demonstrates advanced selection combination techniques—a hallmark of professional workflows. You'll subtract multiple selections to isolate just the bottle's glass portion, excluding the label, cap, and tumbler.

  1. Switch to the Paths panel and load the bottle path as an active selection by Cmd-clicking (Mac) or Ctrl-clicking (Windows) the path thumbnail.

  2. Click once on the label and cap path to select it.

  3. Access the Paths panel menu panel menu and choose Make Selection.

  4. Configure the Make Selection dialog with these professional settings:

    Feather Radius: 0
    Anti-aliased: Check it on
    Operation: Subtract from Selection
  5. Click OK to execute the subtraction.

  6. Return to the Paths panel and Cmd-Option-click (Mac) or Ctrl-Alt-click (Windows) the tumbler glass path thumbnail to subtract it from the current selection.

  7. Navigate back to the Channels panel to perform the final subtraction.

  8. Remove the lemons from your selection by Cmd-Option-clicking (Mac) or Ctrl-Alt-clicking (Windows) the lemons channel.

  9. Preserve this complex selection by going to Select > Save Selection to create a new channel.

  10. Name the new channel bottle's glass and click OK to save it permanently.

  11. Clear the active selection using Cmd-D (Mac) or Ctrl-D (Windows) to deselect the marching ants.

  12. Save your file and keep it open—these meticulously crafted selections will serve as the foundation for advanced compositing techniques in the next exercise.

Complex Selection Process

Bottle glass selection requires combining multiple paths and channels with precise subtraction operations for accurate results.

Multi-Step Selection Process

1

Load Bottle Path

Convert bottle path to active selection using Cmd-click or Ctrl-click on path thumbnail

2

Subtract Label and Cap

Remove unwanted areas using Make Selection with Subtract from Selection operation

3

Remove Tumbler Glass

Subtract tumbler glass path using Cmd-Opt-click or Ctrl-Alt-click modifier

4

Subtract Lemons Channel

Remove lemon areas from selection using same modifier key combination

5

Save Final Selection

Store completed bottle glass selection as new channel for future use

Key Takeaways

1Paths provide the most precise selections for geometric shapes like glassware with clean edges and smooth curves
2Custom channels with Selected Areas mode and colored overlays improve visibility when painting organic selections
3Complex product photography selections often require combining multiple selection methods for optimal results
4Proper naming conventions for paths and channels prevents confusion in multi-element selection workflows
5Subtraction operations using modifier keys allow precise removal of unwanted areas from existing selections
6Channel-based selections work best for organic shapes where color and tonal differences help define boundaries
7Save Selection command preserves complex selection work as reusable channels for non-destructive editing workflows
8Professional product photography requires isolating multiple overlapping elements through systematic selection processes

RELATED ARTICLES