Fashion Shot: Dodging/Burning Blemishes
Photoshop Essentials
Layers & Masks
Non-destructive editing with layer masks and adjustment layers.
Selections
Quick Select, lasso, pen, and Select Subject for precise isolation.
Color & Tone
Curves, Levels, and Hue/Saturation for pro-quality color work.
Smart Objects
Resize and transform without losing image quality.
Noble Desktop's Photoshop Bootcamp covers retouching, compositing, color correction, and pro editing.
Delve into the intricacies of Adobe Photoshop's Dodge and Burn tools, learning how to use them effectively for high-quality retouching and texture preservation.
Exercise Preview
Exercise Overview
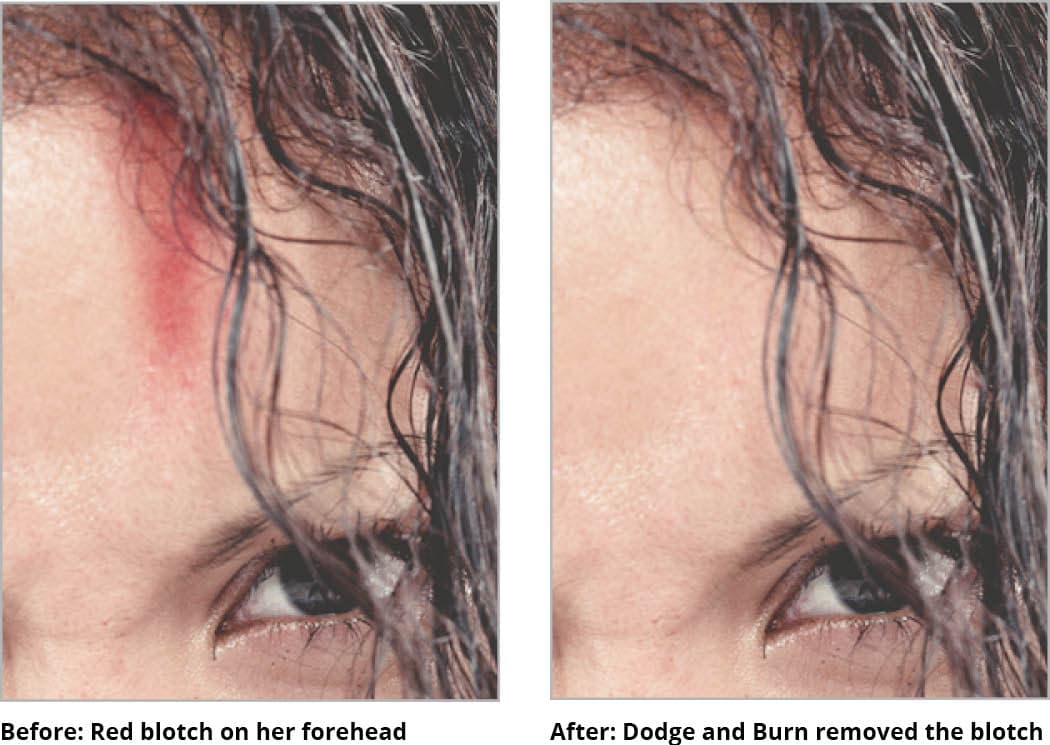
Instead of using the Clone Stamp or Healing Brush to fix certain blemishes, you can also use the Dodge  and Burn
  tools. This is a very effective retouching technique and, while difficult to do, it’s the best way to keep the original texture. Let’s see how to use this technique when cleaning up her forehead.
Dodging & Burning to Touch up Blemishes
If it’s not already open, go into the Photoshop Adv Class folder and open yourname-model.psd.
Select the Dodge tool
.In the Options bar at the top of the screen, set a very low Exposure. An Exposure of 2 or 3% should be good. That way you will have a lot of control and won’t do too much too quickly.
Open the Channels panel (Window > Channels).
If you find that there is a color cast somewhere in the image such as the red spot on the right side of her forehead, click through each of your channels to see where it is. It will appear darker or lighter, like the dark spot on the Green channel.
When you have looked at all the channels, click on the Green channel so it is selected.
As shown below, click the Eye
 next to the composite RGB channel.
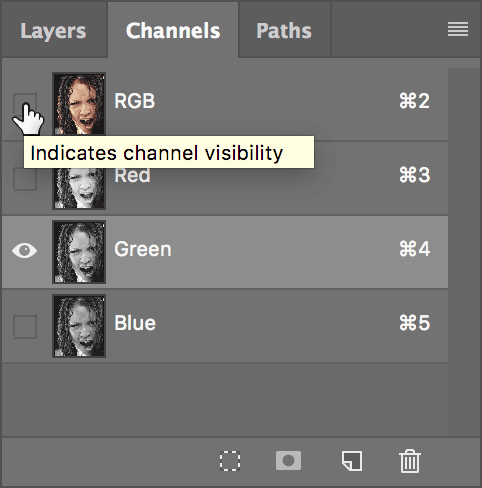
You can now do your dodging or burning while seeing the result. Remember to set a low Exposure for the Burn tool
before using it. Keep the following in mind:- Dodging lightens the Green channel, making it more green/less magenta.
- Burning darkens the Green channel, making it less green/more magenta.
Be sure to save the file and leave it open because you’ll continue to work with it in the next exercise.