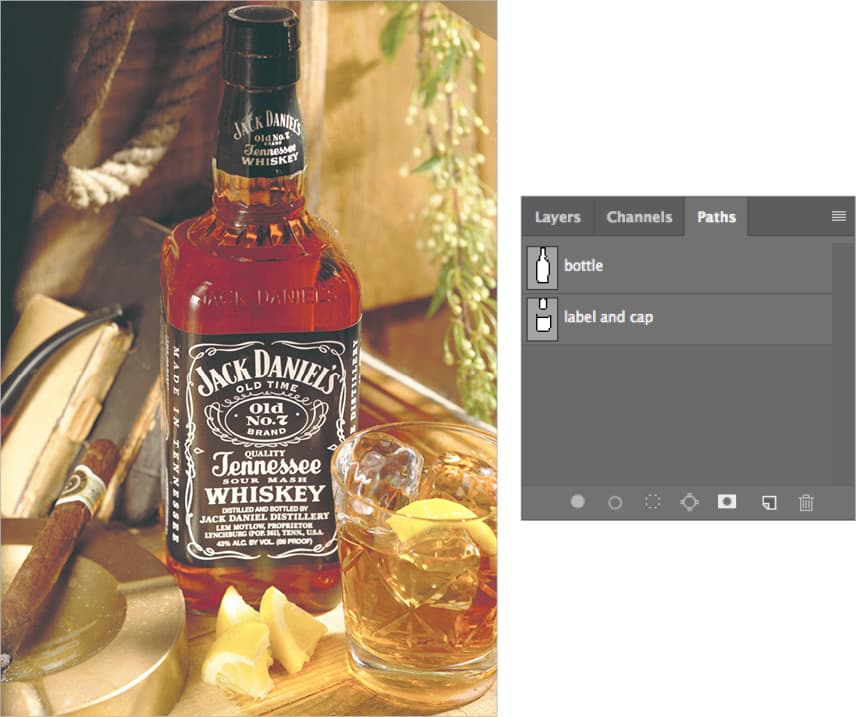
Product Shot: Selecting Bottle Parts
Select Bottle Parts with Pen Tool
Pen Tool in Path Mode
Options bar → set to Path; Combine Shapes selected.
Trace Carefully on the Bottom
Bottom edge defines the silhouette — slow down here.
Save the Path
In the Paths panel, double-click and name 'bottle' to save it.
Repeat for Label & Cap
Each part as its own named path — you'll combine them later for color correction.
Noble Desktop's Photoshop Bootcamp covers retouching, compositing, color correction, and pro editing.
Delve into an advanced Photoshop tutorial focused on techniques for making selections using paths, featuring step-by-step exercises to refine your skills in retouching product shots.
Exercise Preview
Selecting the Bottle Using a Path
From the Photoshop Adv Class folder, open product-Adobe RGB.psd. Notice how no color management message appeared? That’s because this image is in Adobe RGB. That is the same as our RGB workspace (we set that earlier). Because the image matches our workspace we don’t need to do anything else.
Do a File > Save As. Save it back into the same folder as a Photoshop file named yourname-product-Adobe RGB.psd. (Be sure to save it regularly from here on out.)
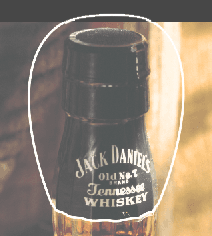
Before we can color correct this image, we have to create selections for the areas we need to address. We’ll make all the selections now, so that everything will already be set up when we’re ready to do the color correction. Select the Pen tool
 .
.In the Options bar, select Path and make sure Combine Shapes
 is selected.
- Draw a path around the bottle and keep the following in mind:
- Trace carefully on the bottom left where the cigar dish meets the bottle.
- At the bottom right where the tumbler glass covers a bit of the bottle, don’t worry about tracing around the edge of the tumbler glass. Just draw around where the bottle’s edge would be, going straight through the tumbler glass. (We’ll remove the tumbler glass later.)
- Go straight through the lemons too. We’ll remove them later as well.
Pen Tool Keystrokes
While drawing with the Pen tool
you can use keystrokes to get other tools. To temporarily get the:Direct Selection tool
 hold Command (Mac) or Control (Windows) (Lets you move points and direction handles.)
- Convert Point tool
 hold Option (Mac) or ALT (Windows) (Lets you individually adjust direction handles such as converting from a smooth curve to a corner.)
After drawing: in the Paths panel, double–click the Work Path and name it bottle.
Deselect the path by hitting Return (Mac) or Enter (Windows).
Selecting the Bottle’s Label & Cap
Draw a path around the bottle’s label. You don’t have to carefully trace the left and right edges of the bottle because you’ve already drawn them when you traced the bottle. Just trace carefully along the top and bottom of the label as shown below:
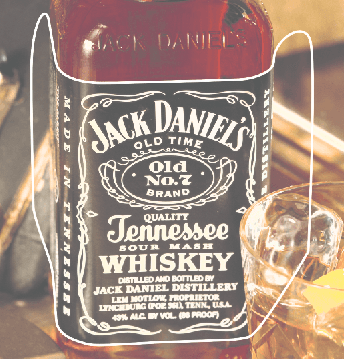
With the path you just drew for the label still visible, draw a path around the cap of the bottle. Make sure to keep the following in mind:
As shown below, you don’t have to retrace the outside edges of the bottle because you’ve already drawn them when you traced the bottle. Just trace carefully along the bottom of the label.
The path should end up being part of the same Work Path shown in the Paths panel. If a third path appears in the Paths panel as you start to draw, undo, reselect the path you were just working on (in the Paths panel) and then start tracing the cap.
When done drawing the path, in the Paths panel, double–click Work Path and name it label and cap.
Deselect the path by hitting Return (Mac) or Enter (Windows).
Be sure to save the file and just leave it open because you’ll continue to work with it in the next exercise.