Product Shot: Color Correction
Product Shot Color Correction
Load Saved Paths/Channels as Selections
Cmd/Ctrl-click path or channel thumbnails to load — saves time vs re-selecting.
Combine Selections
Cmd-Shift-click to add the tumbler glass; Cmd-Option-click to subtract.
Color Correct the Background
Use Curves on the background to darken and add contrast around the product.
Make the Text Pop
Separate adjustment layer for label text — boost saturation and contrast independently.
Noble Desktop's Photoshop Bootcamp covers retouching, compositing, color correction, and pro editing.
Master Photoshop with this in-depth tutorial that covers commercial-style color correction and loading selections while working on a real-world exercise to make your product images truly stand out.
Exercise Preview
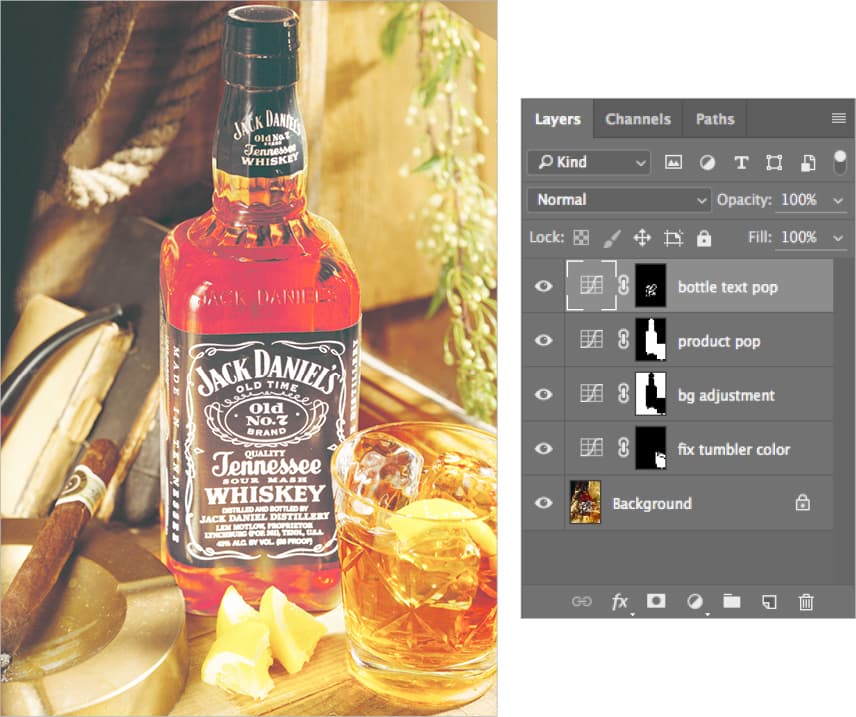
Adjusting the Background
Reminder: Be sure to regularly save your file as you progress through this exercise.
- From the Photoshop Adv Class folder, open yourname-product-Adobe RGB.psd. If you haven’t finished the previous exercises and need a completed file:
- Open up product-Tumbler Color Done.psd. In it, we’ve completed all the selections and color correction you would have done in the past exercises.
- Save it as yourname-product-Adobe RGB.psd, replacing your old file if asked.
In this file, we have several Paths and Alpha channels that we can use to create selections as needed. We can finally concentrate on color correcting this image.
Go to the Paths panel and Cmd (Mac) or CTRL (Windows) click the bottle path thumbnail to load it as a selection.
Hold Cmd–Shift (Mac) or CTRL–Shift (Windows) and click on the tumbler glass path to add it to the selection.
Go to the Channels panel.
Hold Cmd–Opt (Mac) or CTRL–ALT (Windows) and click on the lemons channel to subtract it from the selection.
Go to Select > Inverse (Cmd–Shift–I (Mac) or CTRL–Shift–I (Windows)).
In the Layers panel, select the topmost layer.
Click the New adjustment layer button
 and choose Curves.
Adjust the curve to slightly darken the background.
Name it bg adjustment.
Adjusting the Bottle & Tumbler
Reselect the bottle and tumbler by Cmd–clicking (Mac) or CTRL–clicking (Windows) the bg adjustment layer mask.
Invert the selection (Cmd–Shift–I (Mac) or CTRL–Shift–I (Windows)).
In the Layers panel, click the New adjustment layer button
and choose Curves.Adjust the curve to slightly lighten the image to make the product “pop”.
Name the new curves layer product pop.
Adjusting the Bottle’s Text
Go to the Channels panel and Cmd (Mac) or CTRL (Windows) click the bottle text channel to load it as a selection.
In the Layers panel, click the New adjustment layer button
and choose Curves.Adjust the curves to lighten the text to make it pop. You’ll mostly be adjusting the white point to brighten the text.
Name the new curves layer bottle text pop.
Be sure to save the file and just leave it open because you’ll continue to work with it in the next exercise.