Lifestyle Shot: Balancing Skin Tones
Photoshop Best Practices
Always use adjustment layers and Smart Objects.
Flatten only at export, not during editing.
filename-v1.psd, filename-v2.psd — never overwrite history.
Color decisions are only as good as the display you make them on.
Noble Desktop's Photoshop Bootcamp covers retouching, compositing, color correction, and pro editing.
Learn how to balance skin tones using Photoshop in this comprehensive tutorial, covering areas such as the right arm, hand, and feet with detailed, step-by-step instructions.
Exercise Preview

Balancing the Tone of the Right Arm
Be sure to regularly save your file as you progress through this exercise.
If you just completed exercise 2E, yourname-lifestyle.psd should still be open. If not, open it now.
If you didn’t complete the last few exercises and need a finished version of the file, you can open lifestyle_selections-done.psd. Save it back into the Photoshop Adv Class folder as yourname-lifestyle.psd.
Look at the skin tone of the right arm. Notice it has a bit of a yellow hue compared to the rest of the skin? We need to even it out.
With the Lasso tool
 , loosely select the whole area around the arm, leaving out the hand. Don’t worry about being precise; just don’t select the hand.
Go to the Channels panel.
Hold Cmd–Opt–Shift (Mac) or CTRL–ALT–Shift (Windows) and click on the skin channel. You should end up with just the arm selected.
Go to the Layers panel, and then click the New adjustment layer button
 and choose Curves.
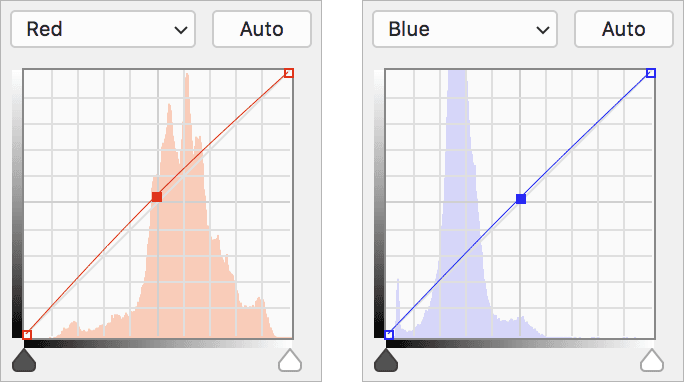
Name the new layer match arm.
In the Properties panel, add some Red and Blue as shown below:
Balancing the Tone of the Hand
Look at the skin tone of the hand. Notice that compared to the arm it has a slight bluish cast and is a bit dark? Let’s fix it.
At the bottom of the Tools panel, double–click the Quick Mask Mode button
 .
.In the dialog that appears, under Color Indicates select Selected Areas and choose a bright lime green color.
Click OK.
Choose a 150 px, heavily feathered brush.
Set the foreground color to black.
Paint over the hand from the wrist down. Be as sloppy as you want, so long as you cover all the flesh that you want to change.
Leave Quick Mask mode by clicking the Standard mode button
 at the bottom of the Tools panel.
Go to the Channels panel.
To load the intersection of this selection and the skin channel, hold Cmd–Opt–Shift (Mac) or CTRL–ALT–Shift (Windows) and click on the skin channel.
Loading Selections
While the keystrokes used in this exercise are the fastest way to make selections, if you forget them, you can also do the same thing if you go to Select > Load Selection.
Here you can choose what you want to load as a selection, and whether you want to create a new selection, add to, subtract from, or intersect with the current selection.
Now that the hand is selected, go to the Layers panel, then click New adjustment layer
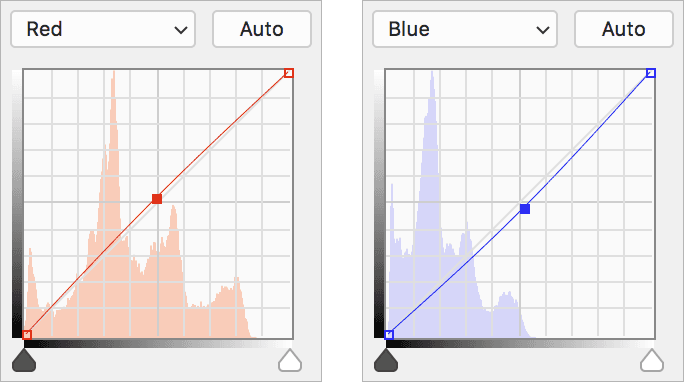
and choose Curves.Name the new layer match hand.
In the Properties panel, add some Red and reduce the Blue as shown below:

Lighten the overall RGB balance, as shown below:

Balancing the Tone of the Feet
The feet need help, too. Lasso
loosely around the foot area.Go to the Channels panel.
Hold Cmd–Opt–Shift (Mac) or CTRL–ALT–Shift (Windows) and click on the skin channel. Now just the feet should be selected.
In the Layers panel, click the New adjustment layer button
and choose Curves.Name the new layer match feet.
In the Properties panel, add some Red and reduce the Blue as shown below:
Lighten the overall RGB balance:

Be sure to save the file. You’ll continue to work with it in the next exercise.