Intro to Tweening
What This Tutorial Covers
Tween Frames
Photoshop auto-generates intermediate animation frames.
Tween Properties
Position, opacity, and effects can all tween.
Smooth Animation
Tweening produces fluid motion with minimal manual frames.
Noble Desktop's Graphic Design Certificate covers Photoshop alongside Illustrator and InDesign.
Explore the complexities of animating with Photoshop by learning how to create movement with position, fade elements in/out with opacity, and experiment with tweening in this comprehensive tutorial.
Exercise Preview

Moving an Object
In the Timeline panel, click the Create Frame Animation button. If instead there is a button that says Create Video Timeline, click the arrow
 to the right of Create Video Timeline and choose Create Frame Animation. Then click the Create Frame Animation button.
Click the Duplicates selected frames button
 .
.Select the first frame.
In the Layers panel, select the computer layer.
Sometimes, when you know how you want the image to end up, it’s easier to work backwards. The second frame looks the way we want it to look. Now we’re going to go back and change the first frame so that the computer will start off-screen, and move into its second frame position.
In the Layers panel, uncheck Propagate Frame 1 as shown below:
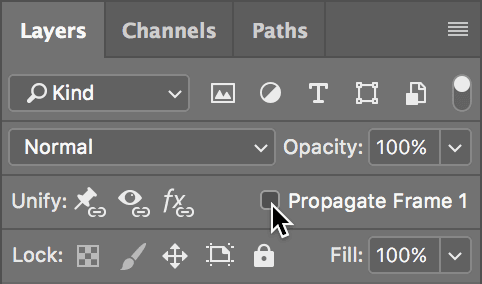
By unchecking this option, any changes we make to frame 1 won’t happen to the rest of our frames. In a later exercise, we will see a situation where having this option checked is useful.
In the Tools panel on the left side of the window, select the Move tool
 .
.Hold Shift and drag the image of the computer to the right until you can’t see it anymore. (Holding down the Shift key as you drag makes sure the image moves in a perfectly horizontal line.)
Frame 1 should now show just the text, and frame 2 should show the text and the computer monitor.
Tweening
Tweening is where Photoshop will create all of the in-be“tween” steps for us, so that the computer monitor will animate from right to left.
Select both frames by clicking on frame 1, then Shift–clicking on frame 2.
At the bottom of the Timeline panel, click the Tweens animation frames button
 .
.We want to set a few options in the Tween dialog that just appeared, so do not click OK until we tell you to.
Set Frames to Add to 4.
This creates four new frames between frames 1 and 2. So our animation will have six frames in total.
Under Layers choose All Layers.
We don’t need to specify which layer to animate because only the computer layer has any changes between frames 1 and 2. If there were other frames that had changes we did not want to tween, we would have to select the computer layer first, and choose Selected Layers from this menu.
Under Parameters leave everything checked.
The position is the only thing we changed, so the position is the only thing that will tween. If we had made other changes we did not want to tween, we would have to be more specific.
Click OK.
Select all the frames in the Timeline panel by clicking on frame 1 and Shift–clicking on frame 6.
Click 0 sec. at the bottom of any of the selected frames, and from the menu that appears, choose Other.
Set the Delay to .05 seconds. (That’s shorter than.5 seconds!)
Click OK.
This is going to play very quickly. We want to pause on the last frame to catch our breath.
- Select frame 6.
On frame 6, click the 0.05 at the bottom, and change it to 1.0 second.
At the bottom left of the Timeline panel, make sure looping is set to Forever.
Let’s test it! At the bottom of the Timeline panel, press the Play button
 to preview the animation.
Press the Stop button
 when you’re done.
More Hiding/Showing
The next couple of frames will involve hiding and showing layers to show different messages, something you may remember from the first exercise.
Select frame 6 and click the Duplicates selected frames button
to create frame 7.- With frame 7 selected, go into the Layers panel and:
- To the left of Looking for a creative job? click the eye
 to hide it.
 - To the left of bg-yellow click the eye to hide it.
- To the left of CreativeU is here to help click the empty box to show it.
- To the left of the suitcase folder click the empty box to show it.
We want this frame to last a little bit longer so the message can sink in.
- To the left of Looking for a creative job? click the eye
On frame 7, click on 1 sec. and select 2.0.
With frame 7 selected, click Duplicates selected frames
to create frame 8.- With frame 8 selected, go into the Layers panel and:
- Hide the 3 layers CreativeU is here to help, computer, and suitcase by clicking the eye to the left of them.
- Show the Creative Jobs folder by clicking the empty box to its left.
- Hide the 3 layers CreativeU is here to help, computer, and suitcase by clicking the eye
Changing the Opacity
The list of creative jobs is very faint and hard to see, because they’ve all been set to a lowered opacity. We’re going to use the layer opacity to highlight one job at a time.
In the Layers panel, expand the folder Creative Jobs by clicking the arrow
 to the left of it so you can see all the individual layers inside.
Because there are five jobs we want to highlight for this part of the animation, we’ll need five different frames in total.
In the Timeline panel, click the Duplicates selected frames button
4 times to create 4 new frames. (There should now be 12 frames altogether.)Select frame 8. We want this to highlight the first job on the list, Graphic Design.
In the Layers panel, select the Graphic Design layer.
Towards the top right of the Layers panel, change Opacity to 100%.
Select frame 9 in the Timeline panel.
In the Layers panel, select Web Design and set Opacity to 100%.
Repeat the previous steps to change the Opacity to 100% for the following layers on the specified frames:
- Frame 10: Digital Publishing
- Frame 11: Creative Direction
- Frame 12: Photography
The timing needs to be changed.
Select frames 8 through 12.
Click 2 sec. at the bottom of any of the frames and choose 0.5.
Press the Play button
at the bottom of the Timeline panel to test everything out.Press the Stop button
when you’re done.
Finishing up
We just need one more frame with our final message on it.
Select frame 12 and click the Duplicates selected frames button
.With frame 13 selected, in the Layers panel, hide the Creative Jobs folder by clicking the eye
to the left of it.Show the APPLY NOW folder and the bg-yellow layer by clicking the boxes to the left of them where the eye
should be.In the Timeline panel, click .5 sec. at the bottom of frame 13, and from the menu that appears choose Other.
Set the Delay to 3 seconds.
Click OK.
- Go to File > Export > Save for Web (Legacy).
- Choose View > Zoom In to make it a bit larger.
In the settings on the right, from the Preset menu, choose GIF 128 No Dither.
From the menu to the left of Colors, choose the Perceptual color palette. This option gives us the smallest file size so far.
Using the buttons below Animation, step through our animation to frame 7. Because this frame uses the most colors in our animation, it is the best frame to see changes we make to the compression settings.
Change Colors to 16. The image still looks the same. Let’s see if we can reduce the amount of colors even more.
Change Colors to 4.
Notice the color of the briefcase shifted to yellow. That’s not what we want.
Change Colors to 8. Looks good!
Next, let’s see if changing the color reduction algorithm makes any changes to our image or file size. As you switch, keep an eye on the size of the optimized file as well as the edges of the type. These algorithms select different colors for you, so some will preserve the crisp edges better. You should always test to see which one suits the needs of your project best.
From the menu to the left of Colors, choose the Selective color palette.
The briefcase shifted to yellow again and you’ll notice that the edges of the type are pixelated. It also makes the file unacceptably large.
Switch back to the Perceptual color palette. We found that the Perceptual and Adaptive color palettes render the text similarly at around the same file size.
Make sure that Transparency is checked on.
Click Save.
Name it yourname-CreativeU.gif and navigate into Class Files > Animated GIFs Class > CreativeU.
Click Save.
To preview the GIF, open any browser (Chrome, Safari, Firefox, etc.).
Press Cmd–O (Mac) or CTRL–O (Windows) and navigate to Class Files > Animated GIFs Class > CreativeU.
Double–click yourname-CreativeU.gif. You should see the new GIF playing!