April 1, 2026Dan Rodney/4 min read

Fashion Shot: Liquify Retouching

Master Photoshop Liquify for Professional Portrait Retouching

Core Liquify Tools for Portrait Retouching

Bloat Tool

Enlarges areas by pushing pixels outward from the center. Perfect for making smaller eyes appear larger and more symmetrical.

Pucker Tool

Contracts areas by pulling pixels inward toward the center. Ideal for reducing the size of oversized features.

Forward Warp Tool

Pushes pixels in the direction you drag. Essential for precise adjustments to lip curves and eye shapes.

Topics Covered in This Photoshop Tutorial:

Master the Liquify Filter's most versatile tools: Bloat, Pucker, and Forward Warp. Learn professional techniques for artistically retouching facial features with precision and restraint.

Manual Liquify vs Face-Aware Liquify

FeatureManual Liquify ToolsFace-Aware Liquify
Precision ControlIndividual eye adjustmentBoth eyes simultaneously
Lip ModificationsCustom curve adjustmentsLimited upper lip movement
Creative FlexibilityFull artistic controlPredefined adjustments
Best Use CaseAsymmetrical correctionsQuick overall adjustments
Recommended: Use manual tools for precise, asymmetrical facial corrections

Exercise Preview

model liquify before&after

Exercise Overview

Portrait retouching requires a delicate balance between enhancement and authenticity. In this exercise, we'll address subtle asymmetries in our model's features—specifically uneven eyes and lips—using manual liquify techniques that offer superior control over automated solutions.

While Photoshop's Face-Aware Liquify features (introduced in CC 2015.5 and refined through 2026) can handle broad adjustments efficiently, they often lack the nuanced control professional retouchers demand. For instance, Face-Aware tools modify both eyes simultaneously and move facial features in predetermined patterns. When you need surgical precision—like correcting one specific eye or adjusting a subtle lip asymmetry—manual liquify tools remain the gold standard. This exercise demonstrates why many professionals still prefer hands-on techniques for high-end portrait work.

Face-Aware Liquify Limitations

While Photoshop CC 2015.5 introduced Face-Aware Liquify features, they have specific limitations. They can adjust eye width and height but affect both eyes simultaneously, and can move the upper lip but not with the precision needed for correcting asymmetrical features like snarls.

Preparation Steps

1

File Setup

Open yourname-model.psd from the Photoshop Adv Class folder

2

Channel Selection

Ensure RGB composite channel is selected in the Channels panel

3

Access Liquify

Navigate to Filter > Liquify to open the retouching interface

Evening Out the Size of the Eyes

We'll start with the eyes, as they're typically the focal point of any portrait. The key is making subtle adjustments that enhance natural beauty without creating an artificial appearance.

  1. If it's not already open, navigate to the Photoshop Adv Class folder and open yourname-model.psd.
  2. In the Channels panel, confirm you're viewing the RGB composite channel with it properly selected. This ensures you're working with the full color information.
  3. Access Filter > Liquify to open the Liquify workspace.
  4. Select the Bloat tool bloat tool from the toolbar. This tool expands pixels outward from the center of your brush.
  5. Configure your brush settings strategically: Choose a Brush Size large enough to encompass most of the eye area, and set a conservative Brush Rate (around 20-30) to maintain control over the transformation speed.
  6. Apply gentle clicks to the smaller eye to gradually increase its size. Work incrementally—multiple small adjustments yield more natural results than aggressive single clicks.
  7. For more nuanced control, switch to the Forward Warp tool warp tool. This tool allows you to push pixels in any direction, perfect for opening the eye shape rather than simply enlarging it.
  8. Use short, deliberate drags on the upper or lower eyelid to refine the eye opening. Focus on matching the natural curve and openness of the larger eye.
  9. If the larger eye now appears disproportionate, employ the Pucker tool pucker tool to contract it slightly. This tool draws pixels inward, effectively reducing size.
  10. Utilize Edit > Undo or Edit > Step Backward liberally to refine your adjustments. Professional retouching is an iterative process.
  11. Evaluate your progress with this before-and-after technique:

    • Click the Restore All button to see the original state.
    • Press Cmd–Z (Mac) or Ctrl–Z (Windows) repeatedly to toggle between before and after views.
    • Ensure your final adjustments are applied before proceeding to the next step.

Eye Retouching Workflow

1

Bloat Tool Configuration

Select Bloat tool with brush size covering most of the eye and lower brush rate for controlled changes

2

Enlarge Smaller Eye

Click on the left eye as needed to increase its size and match the right eye

3

Shape Adjustment

Use Forward Warp tool to drag top or bottom of eye to open it up instead of just enlarging

4

Balance Correction

Apply Pucker tool to make the right eye smaller if needed for symmetry

Progress Monitoring Technique

Use the Restore All button followed by repeated Cmd-Z (Mac) or Ctrl-Z (Windows) to quickly flip between before and after views, allowing you to assess the effectiveness of your adjustments in real-time.

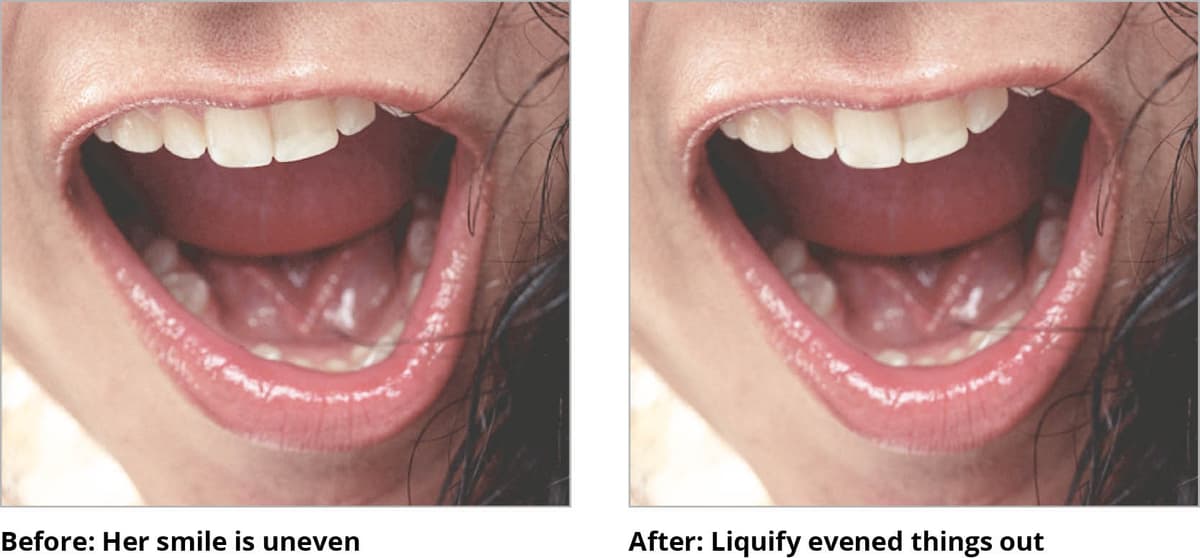
Evening Out Her Lips

Now we'll address the subtle asymmetry in the lip area. Natural lips are rarely perfectly symmetrical, but pronounced unevenness can be distracting in professional portraits.

  1. Select the Forward Warp tool warp tool, which offers the precision needed for lip retouching.
  2. Adjust the Brush Size to approximately half the width of the lip area. This size provides adequate coverage while maintaining control over the affected region.
  3. Focus on the right side of her upper lip, gently dragging upward to elevate the lip line. Match the natural curve of the left side to create visual harmony and reduce any harsh asymmetry.
  4. Apply the same technique to the right side of her lower lip, raising it to mirror the left side's natural curve and fullness.
  5. Click OK when you're satisfied with the adjustments. Remember: the goal is enhancement, not transformation.
  6. Save your file using Cmd–S (Mac) or Ctrl–S (Windows), then close the document.

Lip Symmetry Correction Process

1

Tool Selection

Choose Forward Warp tool and adjust brush size to cover a good portion of half a lip

2

Upper Lip Correction

Drag up on the right side of the top lip to raise it and match the left side curve, eliminating the snarl

3

Lower Lip Adjustment

Raise the right side of the bottom lip to create symmetry with the left side curve

4

Finalization

Click OK when satisfied with results, then save and close the file

Quality Control Checklist

0/5

Key Takeaways

1Manual Liquify tools provide superior precision for asymmetrical facial corrections compared to Face-Aware Liquify features
2The Bloat tool effectively enlarges smaller features like eyes by pushing pixels outward from the center point
3Forward Warp tool offers the most versatile control for reshaping specific areas like lip curves and eye contours
4Proper brush sizing is crucial - use brushes large enough to cover the target area but small enough for precision
5Lower brush rates prevent overly rapid changes, allowing for more controlled and natural-looking adjustments
6Regular before-and-after comparisons using Restore All and undo functions help monitor retouching progress
7Successful portrait retouching focuses on correcting asymmetries rather than completely altering facial features
8Professional workflow includes proper file setup with RGB composite channel selection before beginning Liquify adjustments

RELATED ARTICLES