Color Correction Techniques: Extreme Image
Photoshop Workflow
Open & Inspect
File → Open. Check resolution, color mode, and bit depth.
Build a Layer Stack
Stack adjustments and effects on separate layers — never edit pixels directly.
Apply Targeted Edits
Use masks to limit each layer to the part of the image that needs it.
Export for Output
File → Export → choose JPG/PNG/PSD based on the destination.
Noble Desktop's Photoshop Bootcamp covers retouching, compositing, color correction, and pro editing.
Learn advanced color correction techniques using Photoshop, with a step-by-step tutorial on restoring a severely faded and yellowed 1950s family photo to its original color and tone.
Exercise Preview

Sampling the Current Color from the Image
First, click on the Layer thumbnail (NOT the layer mask) to make sure that the layer mask is NOT highlighted.

In the Properties panel, double–click on the Set white point eyedropper
 to open the Color Picker.
Zoom in close on the white socks of the girl second from the right (if you don’t know how to zoom in with a dialog open, read the sidebar).
Zooming While in a Dialog
To scroll/zoom while in a dialog, you can:
- Use the View menu’s zoom options.
- Hold Cmd–Space (Mac) or CTRL–Space (Windows) and then click/drag the mouse to zoom in.
- Hold Cmd–Opt–Space (Mac) or CTRL–ALT–Space (Windows) and then click the mouse to zoom out.
- Use the scrollbars.
- Hold the Spacebar and drag the image to scroll.
Click on the brightest pixel on her socks that you can find. This picks up the sock’s bad color (which has an extreme color cast).
Be sure to take note of where you clicked, as we’ll need to click there again later on.
Correcting the Color
We now want to change this color into a pure white that is the right brightness. Let’s start with the color. As shown below, click on the S (Saturation) button.
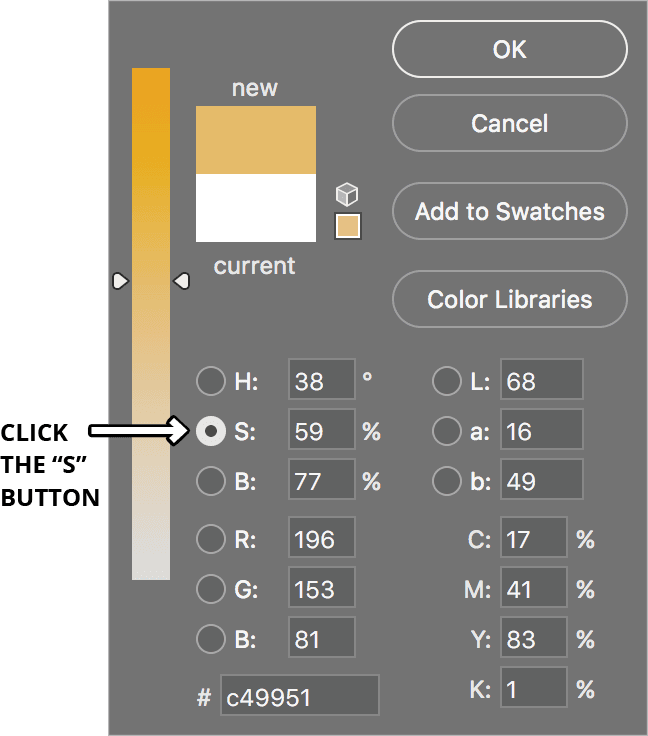
As indicated in the image below, drag the saturation slider all the way down until you have a neutral shade of gray. Do NOT click OK yet!
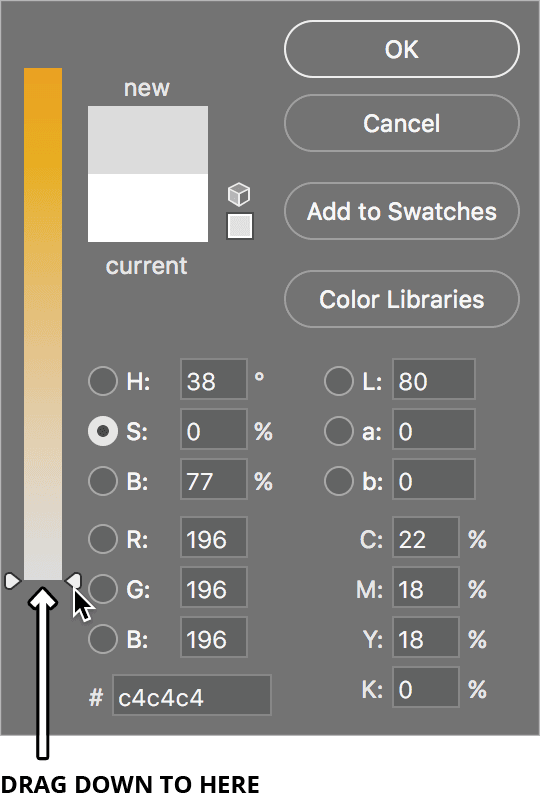
Click on the B (Brightness) button.
Drag the brightness slider to the shade of white you think her sock should be.
Click OK. If it asks you to save the new target color as a default, click No.
Changing the Image Using Your New Color
Do your best to click again on the same pixel you clicked on before to set it to the new white point. You’ll see a drastic change! This sets the pixel you clicked to the neutral color you just created in the color picker.
- Follow the same procedure to set the Black point:
- Double–click the Set black point eyedropper
 .
. - Find what should be close to a pure black (like the fence rail top right, or the dark area behind Grandma’s head).
- Adjust the saturation and brightness as appropriate and click OK.
- If it asks you to save the new target color as a default, click No.
- Click the same pixel you sampled earlier. You’ll see a drastic change!
Once you’ve set the white and black points, feel free to make additional adjustments to the RGB or individual color channel curves until you’re happy with the overall tones and color.
- Double–click the Set black point eyedropper
Save your file as yourname-1950sFamily.psd and close it.