April 1, 2026Dan Rodney/5 min read

Fashion Shot: Cloning vs. Healing

Master Photoshop retouching tools for professional results

Essential Retouching Tools

Clone Stamp Tool

Perfect for fixing areas near crisp edges like teeth and removing stray hairs completely. Provides precise control over source sampling.

Healing Brush Tool

Ideal for smooth areas like skin blemishes. Automatically blends textures and tones for natural-looking results.

Topics Covered in This Photoshop Tutorial:

The Clone Stamp Tool, the Healing Brush Tool

Exercise Preview

model clone before&after

Exercise Overview

Ever wonder why magazine covers and fashion campaigns feature impossibly flawless models? The secret isn't superior genetics or miracle skincare—it's professional Photoshop retouching. In this exercise, we'll master the essential techniques that industry professionals use daily: removing facial blemishes and correcting dental imperfections with surgical precision.

This hands-on tutorial will teach you the fundamental difference between the Clone Stamp and Healing Brush tools, when to use each for optimal results, and how to avoid common pitfalls that mark amateur retouching work. By the end, you'll understand why these tools remain the cornerstone of professional beauty retouching workflows, even with today's advanced AI-powered alternatives.

NOTE: Professional retouching requires patience and frequent saving. Throughout these exercises, save your work every 5-10 minutes—Photoshop crashes can destroy hours of meticulous work. Additionally, you'll build upon these files in subsequent exercises, making consistent saves crucial for workflow continuity.

The Reality Behind Perfect Model Photos

Professional model photos achieve flawless appearance through strategic Photoshop retouching, not genetics or diet. This tutorial demonstrates the industry-standard techniques used to fix facial blemishes and dental imperfections.

Save Your Work Regularly

Throughout this exercise, save frequently to prevent losing progress if Photoshop crashes. You'll also be reusing these images in later exercises, so consistent saving is essential.

Getting Started

  1. Download the class files. Refer to the Downloading the Class Files page at the beginning of the workbook for complete download and installation instructions.

  2. In Photoshop, navigate to Window > Workspace > Essentials (Default) to establish a consistent working environment.

  3. Reset your workspace by going to Window > Workspace > Reset Essentials. This ensures all panels are positioned correctly for optimal workflow.

  4. Open your source file by selecting File > Open.

  5. Navigate to your Desktop, enter the Class Files folder, then the Photoshop Adv Class folder, and open model.psd.

  6. Immediately create a working copy using File > Save As.

  7. Save the file back into the Photoshop Adv Class folder as a Photoshop file (.psd) with the filename yourname-model.psd. This naming convention helps maintain project organization in professional environments.

  8. In the Layers panel, ensure the Background layer is selected. Create a duplicate layer by pressing Cmd–J (Mac) or CTRL–J (Windows).

    NOTE: Working on a duplicate layer is fundamental to non-destructive editing—a professional standard that allows you to preserve original image data while making permanent pixel modifications. For extremely large files where memory is a concern, maintain a backup of the original and work directly on the Background layer, but always weigh this decision carefully against the flexibility of non-destructive workflows.

File Setup and Layer Management

1

Workspace Configuration

Set Window > Workspace > Essentials (Default) and reset it for optimal tool layout

2

File Management

Open model.psd from Class Files and save as yourname-model.psd to preserve original

3

Layer Duplication

Press Cmd-J (Mac) or Ctrl-J (Windows) to create a working copy of the Background layer

Non-Destructive Editing Best Practice

Always work on a duplicate layer when making permanent pixel changes. This preserves your original image and allows for easy corrections or revisions.

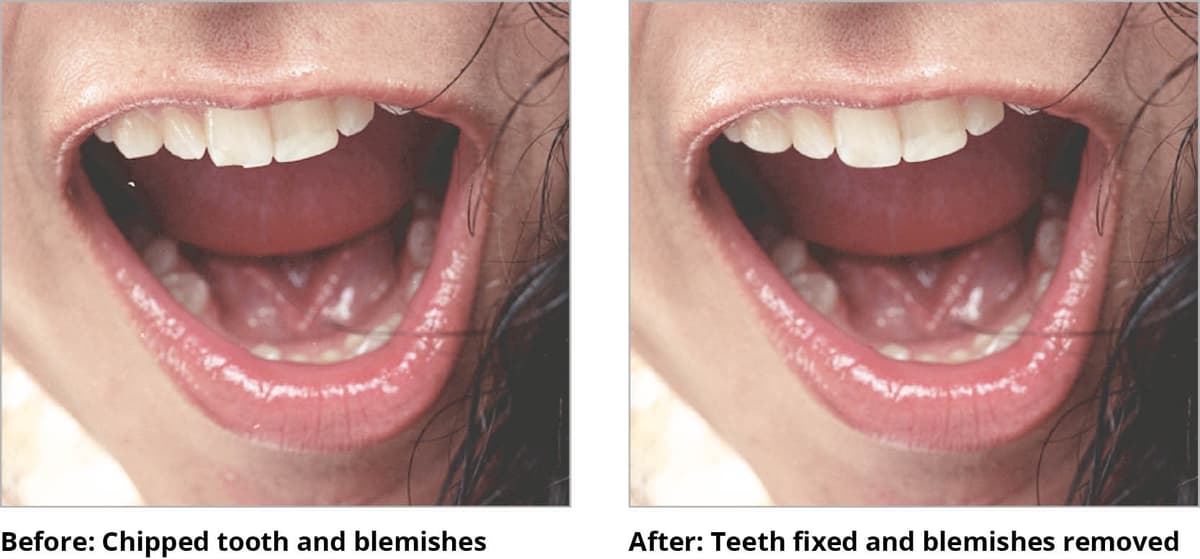
Fixing Teeth & Blemishes on Her Cheek & Nose

Now that your workspace is properly configured, we'll begin the actual retouching process. Understanding tool selection is critical—the wrong choice can create telltale signs of digital manipulation that immediately identify amateur work.

  1. Select the Clone Stamp tool clone stamp tool to repair the dental imperfections. Hold Option (Mac) or ALT (Windows) and click on an area of healthy tooth enamel to establish your source point, then carefully paint over the chipped areas to clone the pristine dental surface.

    NOTE: The Clone Stamp clone stamp tool excels in situations requiring precise edge control, making it superior to the Healing Brush healing brush tool near high-contrast boundaries. Using the Healing Brush here would cause unwanted blending between the dark interior of the mouth and the bright tooth surface, creating an unnatural gray transition that screams "retouched."

    Clone Stamp vs Healing Brush: When to Use Each

    FeatureClone Stamp ToolHealing Brush Tool
    Best forCrisp edges, teeth, hair removalSmooth skin areas, blemishes
    Blending behaviorExact replication of sourceAutomatic texture and tone blending
    Edge handlingMaintains sharp boundariesCan blur edges undesirably
    Control levelPrecise, predictable resultsIntelligent but less predictable
    Recommended: Use Clone Stamp near edges and crisp details, Healing Brush for smooth areas without boundaries
    Why Clone Stamp Works Better on Teeth

    The Clone Stamp tool prevents the Healing Brush from blending the dark mouth area into the tooth, maintaining the crisp edge between teeth and gums.

TIP: Brush Size & Hardness Keystrokes

Professional retouchers rely on rapid brush adjustments to maintain workflow momentum. Master these essential keyboard shortcuts for real-time brush modifications with any painting tool (Clone Stamp, Healing Brush, etc.):

Size: [ or ]
Hardness: Shift–[ or Shift–]
  • Switch to the Healing Brush tool healing brush tool to address blemishes on the cheek area. Focus exclusively on the cheeks for now—we'll tackle the nose separately using a more refined approach. Exercise caution near stray hair strands or facial contours, as the Healing Brush's blending algorithm can create unwanted artifacts by merging hair texture into skin, or softening important facial structure.

    When working near problematic edges, immediately switch back to the Clone Stamp clone stamp tool for precise control. This tool-switching technique is what separates professional results from amateur attempts.

    NOTE: The Healing Brush operates similarly to the Clone Stamp in terms of source point selection—hold Option (Mac) or ALT (Windows) and click on clean skin texture to establish your healing source, then paint over blemishes. The key difference lies in the tool's sophisticated blending algorithm, which automatically matches the luminosity and color of the surrounding area while preserving the source texture.

  • Apply the Healing Brush healing brush tool to the nose area. The nose presents an ideal canvas for the Healing Brush because it lacks the edge complications found around the mouth and hairline, allowing the tool's blending capabilities to work without interference.

    Work systematically across the nose surface, sampling from multiple source points to avoid creating repetitive texture patterns—a telltale sign of digital retouching that clients and art directors will immediately notice.

    TIP: The Healing Brush lacks real-time opacity control, but you can retroactively adjust any brush stroke's intensity using Edit > Fade Healing Brush immediately after application. The Fade dialog provides both opacity adjustment and live preview capabilities—offering more precise control than pre-setting opacity values. This technique allows you to perfect each healing stroke with surgical precision.

  • Essential Keyboard Shortcuts

    Brush Size Control

    Use [ to decrease brush size and ] to increase brush size. Works with all painting tools including Clone Stamp and Healing Brush.

    Brush Hardness Control

    Use Shift + [ to decrease hardness and Shift + ] to increase hardness. Adjust edge softness for natural blending results.

    Healing Brush Opacity Workaround

    Since the Healing Brush lacks opacity settings, use Edit > Fade Healing Brush immediately after each stroke to reduce opacity and preview the effect. This is more precise than guessing opacity beforehand.

    Removing Stray Hairs

    The final phase addresses one of the most common retouching challenges in portrait work: managing flyaway hairs that distract from the overall composition. This step requires strategic tool selection to maintain natural-looking results.

    1. Eliminate flyaway hairs using the Clone Stamp tool clone stamp tool. Sample from clean background areas and carefully paint over each stray hair strand. The Clone Stamp is essential here because the Healing Brush would attempt to blend hair pixels with surrounding skin tones, creating muddy, unnatural color transitions that compromise the image quality.

      Work with a soft-edged brush slightly larger than the hair strand width, and vary your source sampling points to maintain natural background texture variation. Pay particular attention to maintaining consistent lighting and color temperature across your cloned areas.

    2. Save your completed file and keep it open—this retouched image will serve as the foundation for advanced techniques in the following exercise, where we'll explore color correction and tonal refinement methods.

    Tool Selection for Hair Removal

    Always use Clone Stamp for removing flyaway hairs. The Healing Brush would blend the hair into the skin and create dark spots, while Clone Stamp completely removes the hair by stamping it out.

    Final Steps Checklist

    0/3

    Key Takeaways

    1Clone Stamp tool excels at fixing areas with crisp edges like teeth and completely removing unwanted elements like stray hairs
    2Healing Brush tool works best on smooth areas like skin blemishes, automatically blending textures and tones for natural results
    3Always work on a duplicate layer when making permanent pixel changes to preserve the original image
    4Use keyboard shortcuts [ and ] for brush size, Shift + [ and Shift + ] for brush hardness to work efficiently
    5The Healing Brush can create unwanted blending near edges, so switch to Clone Stamp in those areas
    6Use Edit > Fade Healing Brush immediately after each stroke to control opacity and preview effects
    7Professional model photography relies heavily on Photoshop retouching to achieve the flawless appearance
    8Regular saving throughout the editing process prevents loss of work and prepares files for future exercises

    RELATED ARTICLES