Converting to Black & White & Lens Correction
What This Tutorial Covers
B&W Adjustment
Custom tonal mix from color sliders.
Lens Profiles
Auto-correct distortion and chromatic aberration.
Manual Fixes
Fine-tune correction sliders for tricky lenses.
Noble Desktop's Graphic Design Certificate covers Photoshop alongside Illustrator and InDesign.
Learn how to manipulate images in Photoshop, including converting to black and white, selectively restoring color, and removing lens distortion.
Exercise Preview
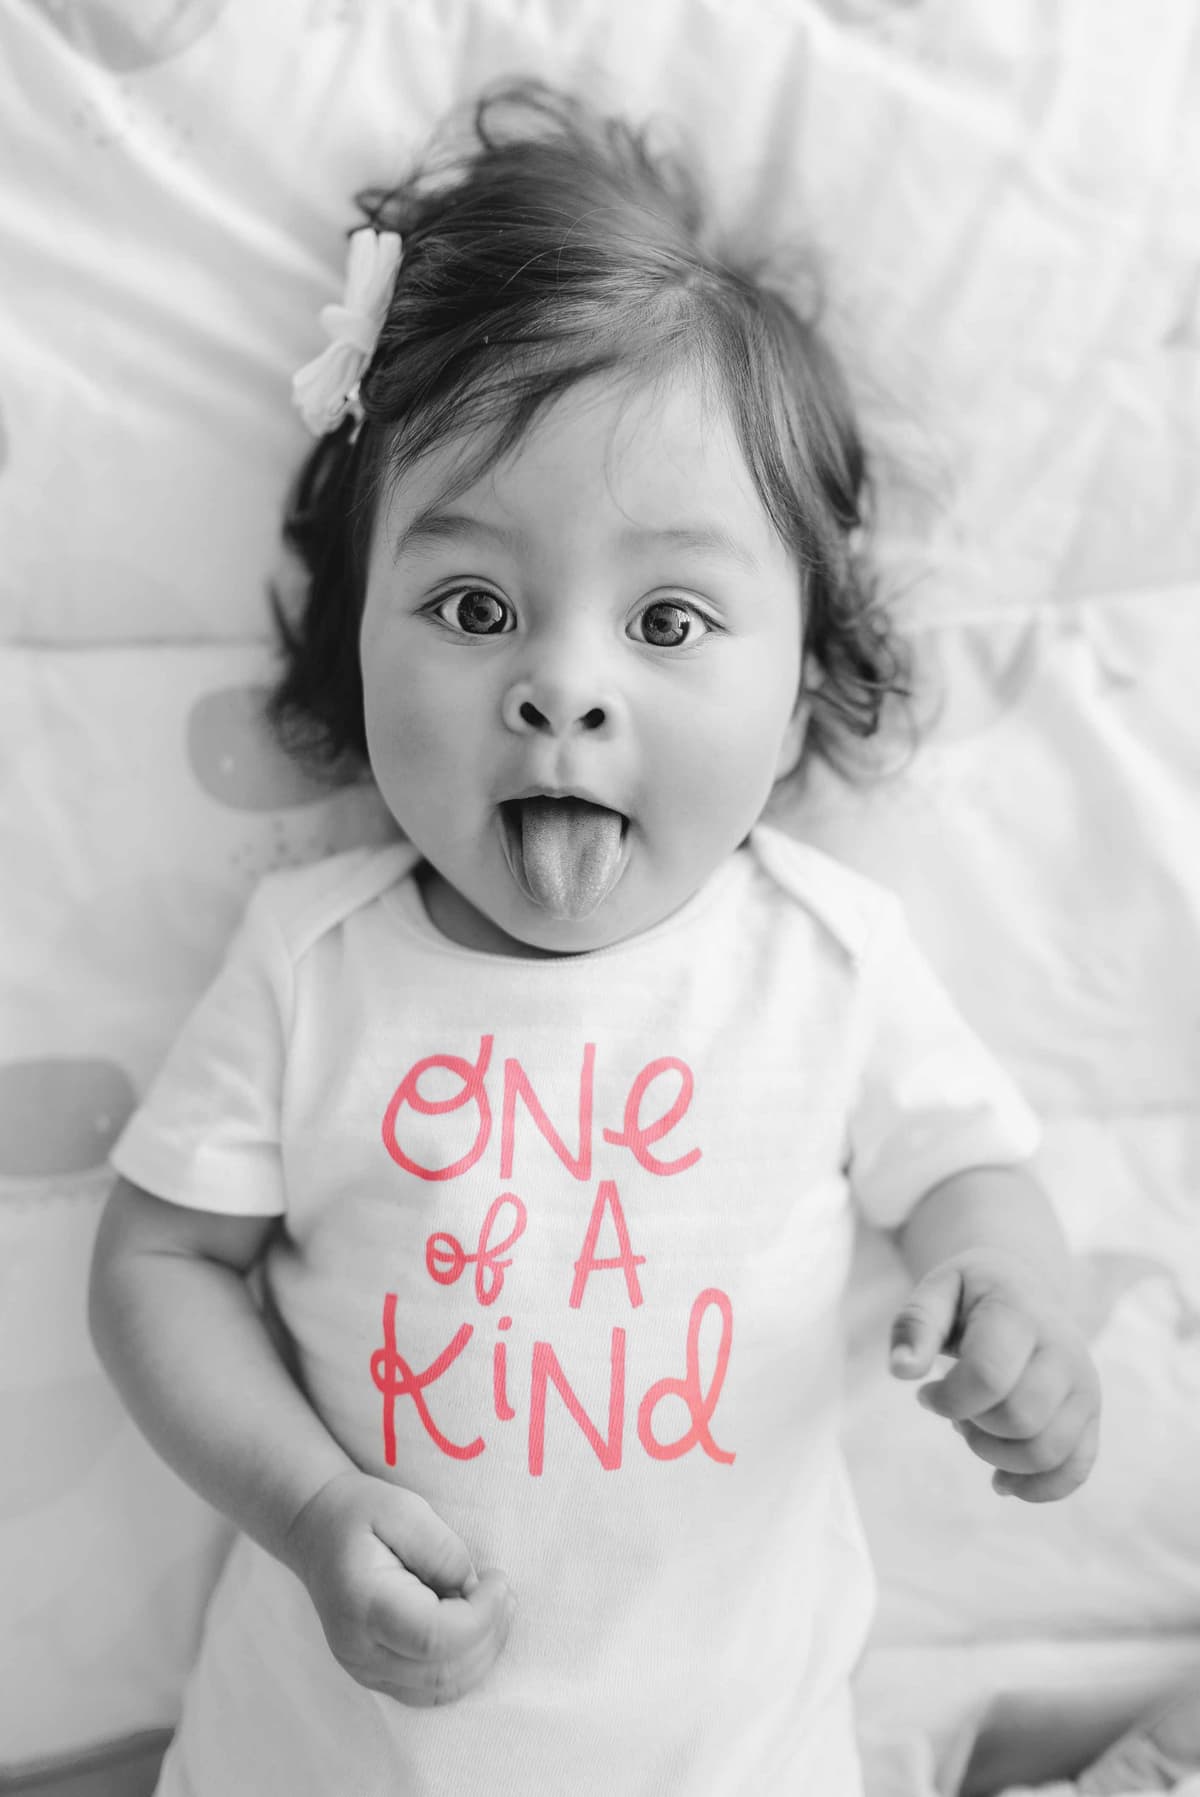
Photo by Juan Encalada on Unsplash
Converting to Black & White
From the Photoshop Class folder, open the 4A Baby.jpg file.
NOTE: Choosing Image > Mode > Grayscale would give us a black and white image, but then we can’t add color anywhere and we have less control over the conversion. It’s best to use an adjustment layer made specifically for this!
- Choose View > Fit on Screen (Cmd–0 (Mac) or CTRL–0 (Windows)).
At the bottom of the Layers panel, click the Create new fill or adjustment layer button
 and from the menu, choose Black & White.
- In the Properties panel, drag the Reds slider left and right to see how it affects the image.
At the top left of the Properties panel, click on the
 .
.- In the image, aim at the lettering on the shirt and drag left and right to see it get darker and lighter.
In the Properties panel, drag the Yellows slider left and right to see how it affects the image.
Before we continue, set:
- Reds: -42
- Yellows: 60
Bringing Back the Color in the Shirt Lettering
To make the shirt’s text really stand out, let’s restore its original color. We can do this by hiding (masking) the Black & White adjustment we just added (only in the area of the text).
- In the Layers panel select the Background layer.
- Choose Select > Color Range.
In the large image behind the Color Range window, click on the shirt text.
- Notice in the Color Range window, there’s a black and white preview of the selection. White means it will be selected. Black won’t be selected.
- Notice how much white there is outside the text, which is not good. There’s something we can do to make this selection a lot easier.
- Click Cancel.
- In the Tools panel on the left, choose the Rectangular Marquee tool
 .
. - Drag a box around the shirt text, keeping pretty close to the text (starting at the bottom left or right may make this easier).
Choose Select > Color Range.
Now as you work it will only look in the rectangle area we selected!
We’ll describe the process of what to do, but your exact results and amounts will vary depending on what you’re about to click on. So use our instructions as a guideline and adjust as needed.
In the large image behind the Color Range window:
- Click in the middle of the K in Kind.
- Change the Fuzziness to 100
- Hold Shift (to add) and click on the e in One where the lines meet.
- Change the Fuzziness to 80
- Hold Shift and click on the middle of the N in One where there’s some darkness in the preview.
- Now too much of the shirt’s background is selected, so reduce the Fuzziness to around 22
- Play with your results until you get something pretty good (it won’t be perfect). If you need to start over completely, hold Option (Mac) or ALT (Windows) and click the Reset button (the Cancel button turns into Reset with that keystroke).
- Once you’ve done the best you can, click OK.
- In the Layers panel, select Black & White 1 layer mask.
Go to Edit > Fill (or hit Hit Shift–Delete (Mac) or Shift–Backspace (Windows)).
- Set Contents to Black (because black hides on a layer mask)
- Click OK.
- Choose Select > Deselect.
- There’s probably a bit of a dark ring around the text’s color and some parts are probably in color that should not be. Let’s edit the mask.
- Choose Select > Select and Mask.
In the Properties panel on the right:
- Next to View click the thumbnail and choose On Layers.
- Increasing the Feather slightly (1 to 2 px) should help the edge quality which is a bit too sharp.
- Drag Shift Edge to the left, which should help the color to fill the letters (this works better when there’s some feather applied).
To remove any color outside the letters (on the shirt):
- In the Tools panel on the left, select the Brush tool
 .
. - In the Options bar at the top of the window, click on Add to selection
 .
. - Adjust your brush size as needed using the
[or]keys. - Adjust the brush hardness as needed by holding Shift and using the
[or]keys (or click the Brush thumbnail in the Options bar). - Paint over the areas to remove the color.
- In the Tools panel on the left, select the Brush tool
Once you’re happy with the results, click OK (at the bottom right of the window).
Editing the Contents of the Smart Object
- We want to go back and make some changes to the black and white conversion. In the Layers panel, double–click on the layer thumbnail for Black & White 1.
- A new window will open with the original 2 layers (with no lens correction applied).
- In the Layers panel, select the Black & White 1 layer.
In the Properties panel set the following:
- Reds: 5
- Blues: drag this slide to see how it changes parts of the image, then end on 70
Lastly, let’s make the color of the text more intense. In the Layers panel select the top layer (so the new one will be added above it).
- At the bottom of the Layers panel, click the Create new fill or adjustment layer button and from the menu, choose Vibrance.
- In the Properties panel set Vibrance to +80
- Do a File > Save.
Close the current image and should end up back in the final image with lens correction applied.