Batch Actions & the Image Processor
What This Tutorial Covers
Record Actions
Capture a sequence of edits for replay.
Batch Processing
Apply an action to a folder of files.
Image Processor
Resize and convert formats across many files.
Noble Desktop's Graphic Design Certificate covers Photoshop alongside Illustrator and InDesign.
Learn how to effectively utilize Photoshop's batch processing features through our detailed tutorial, which includes step-by-step instructions on creating actions, processing groups of images, and saving files in different formats.
Exercise Preview
Photos Copyright © Dan Rodney, danrodney.com
Making a Simple Action
Actions are easy to make because Photoshop just watches you while you work. It records your actions so they can be “played” back later on other files.
Open Photoshop Adv Class > Actions > koala 3.tif.
Open the Actions panel (Window > Actions).
At the bottom of the Actions panel, click the Create new set button
 .
.Name it yourname-actions and click OK.
At the bottom of the Actions panel, click the Create new action button
 .
.Name it Convert to Grayscale and click Record.
You will now be in record mode. You can tell because the Record button
 is already pressed at the bottom of the Actions panel.
Go to Image > Mode > Grayscale. If you get a warning about discarding color information, just click Discard.
At the bottom of the Actions panel, click the Stop button
 .
.Close the file without saving changes. We only wanted to record the action.
Using the Action
Open Photoshop Adv Class > Actions > koala 8.tif.
Go to the Actions panel (Window > Actions).
Choose the Convert to Grayscale action and at the panel’s bottom click Play
 .
.Wow, so fast! Now that we know it works we can do it on many files. Close the file without saving changes.
Running a Batch
Let’s run this action on an entire folder of images and save them to another folder while also renaming them!
- Go to File > Automate > Batch and don’t click OK until we say!
In the Play section on the far left:
- Change Set to yourname-actions if it isn’t already.
- Make sure Action is set to Convert to Grayscale.
- Next to Source, choose Folder if it isn’t already selected.
- Click the Choose button and browse to the Photoshop Adv Class folder.
- Select the Actions folder and click Choose (Mac) or OK (Windows).
- Make sure Include All Subfolders is Unchecked.
- Make sure Suppress Color Profile Warnings is checked.
- Next to Destination, choose Folder.
- Click Choose and browse to Photoshop Adv Class > Actions > Grayscale and click Choose (Mac) or OK (Windows).
- Under File Naming:
- From the menu on the right of the first line, choose document name.
- On the left field of the next line, type in -gray (that’s dash-gray). This is custom text so it won’t be in the menu.
- In the menu on the right of the third line, choose extension.
When the Example reads myfile-gray.gif (as shown below), click OK.

Viewing Files in Adobe Bridge
Let’s check out the files we just made by browsing them in Adobe Bridge.
Launch Adobe Bridge using one of these two ways:
- Directly launch Bridge.
- In any Creative Cloud program (such as Photoshop), choose File > Browse in Bridge.
To make sure we’re looking at the same thing:
- Go to Window > Workspace > Essentials.
- Then go to Window > Workspace > Reset Workspace.
At the top left of the window, you should see a Favorites and a Folders tab.
You should already be viewing the Favorites tab, so in the list of favorites click on Desktop.
The icons are fairly small. To make it easier to read longer names, let’s make the icons bigger. At the bottom right of the window, drag the zoom slider (illustrated below) a little to the right.

In the Content section of the window (should be the largest middle section), find the Class Files folder and double–click it to open it.
Double–click the Photoshop Adv Class folder.
Double–click the Actions folder (you may have to scroll to find it).
Double–click the Grayscale folder.
You’ll now see all the grayscale images you made! Double–click one of them to open it in Photoshop.
When you are satisfied, close the file.
Using Image Processor to Save Thumbnails
- Make sure you are back in Photoshop.
- Close any files you may have open.
- Go to File > Scripts > Image Processor.
- At the top, under Select the images to process, click the Select Folder button.
- Browse to the Photoshop Adv Class > Actions folder.
- Click Open (Mac) or OK (Windows).
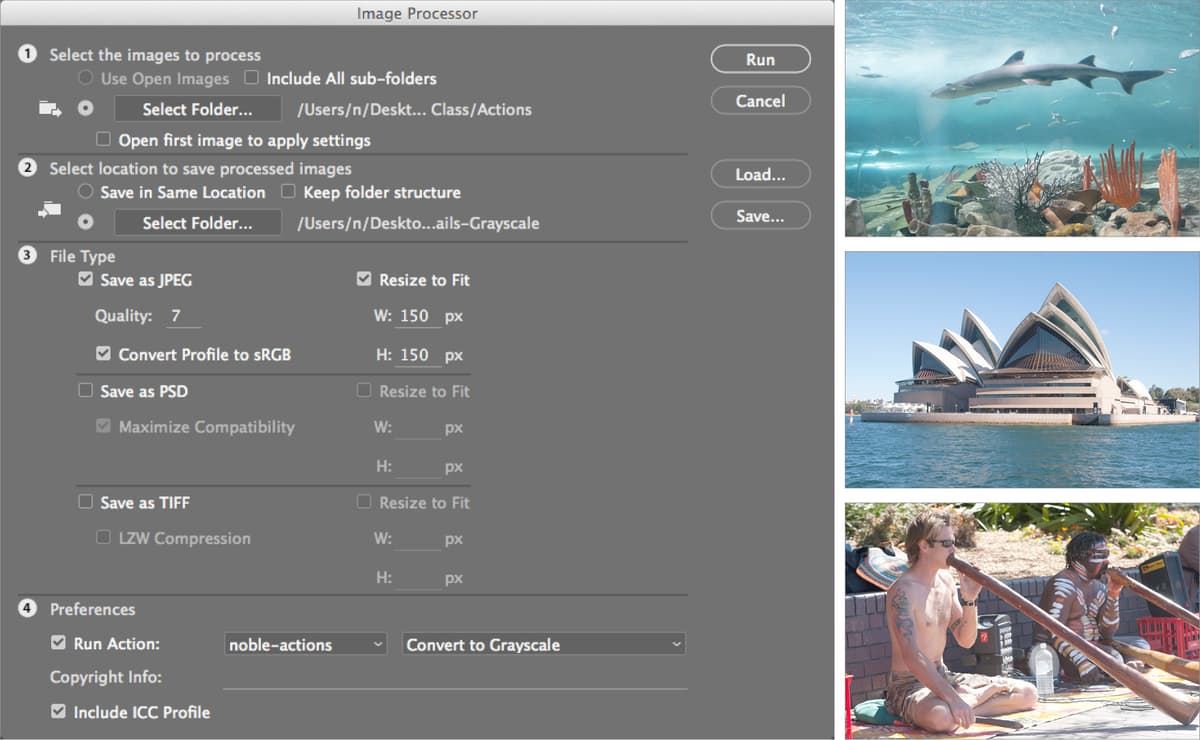
- Next, under Select location to save processed images, choose Select Folder, then click the Select Folder button.
- Browse to Photoshop Adv Class > Actions > Thumbnails-Color and click Open (Mac) or OK (Windows).
Under File Type:
- Check on Save as JPEG.
- Set Quality to 7.
- Check on Convert Profile to sRGB.
- Check on Resize to Fit.
- Set W to 150px.
- Set H to 150px.
- Make sure Save as PSD is Unchecked.
- Make sure Save as TIFF is Unchecked.
- At the bottom, make sure Run Action is Unchecked.
Click Run. Watch it rip!
Let’s take a look at what was just created for us. Go to File > Browse in Bridge.
At the top of the window, click on the Actions folder, as shown below:
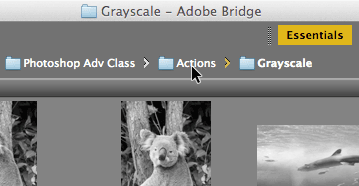
Double–click the Thumbnails-Color folder.
Double–click the JPEG folder, and you’ll see all your thumbnail files.
- Click on the first one and press the spacebar to view a slideshow.
- Use the Arrow keys to navigate through the files.
- When done, press Escape to end the slideshow.
Batch Processing Grayscale Thumbnails
What if we wanted to also make grayscale thumbnails in addition to the color ones we just made? With the image processor we can make thumbnails and perform an action at the same time.
- Switch back into Photoshop.
- Go to File > Scripts > Image Processor.
- Most things should already be set, but under Select location to save processed images, click Select Folder.
- Browse to the Photoshop Adv Class > Actions > Thumbnails-Grayscale folder and click Open (Mac) or OK (Windows).
- In the Preferences section at the bottom, check on Run Action.
- From the menu on the left, choose yourname-actions.
- From the menu on the right, choose Convert to Grayscale.
- Click Run.
- Let’s take a look at what was just created for us. Go to File > Browse in Bridge.
At the top of the window, click on the Actions folder as shown below:

Double–click the Thumbnails-Grayscale folder.
Double–click the JPEG folder. You’ll see all your new grayscale thumbnail files!
Deleting the Action
We don’t need our actions anymore, so let’s delete them.
Switch back into Photoshop.
Open the Actions panel (Window > Actions).
Click on yourname-actions.
At the bottom of the Actions panel, press the Delete button
 , then click OK.