Adjustment Layers & Masks
What This Tutorial Covers
Adjustment Layers
Non-destructive color and tone changes.
Layer Masks
Hide and reveal areas without erasing pixels.
Localized Edits
Combine adjustments with masks for targeted fixes.
Noble Desktop's Graphic Design Certificate covers Photoshop alongside Illustrator and InDesign.
Refine your Photoshop skills with this comprehensive tutorial covering advanced topics like curves practice, masking out unwanted adjustments, and organizing layers into groups.
Exercise Preview

Photo by Dan Rodney
Adjusting Overall Colors & the Blue Channel
From the Photoshop Class folder, open the file na pali coast.tif.
Go to View > Fit on Screen (Cmd–0 (Mac) or CTRL–0 (Windows)).
At the bottom of the Layers panel, click on Create new fill or adjustment layer
 , and from the menu, choose Curves.
You will see the curves open in the Properties panel, as shown below. You may need to resize the window to see all these options.
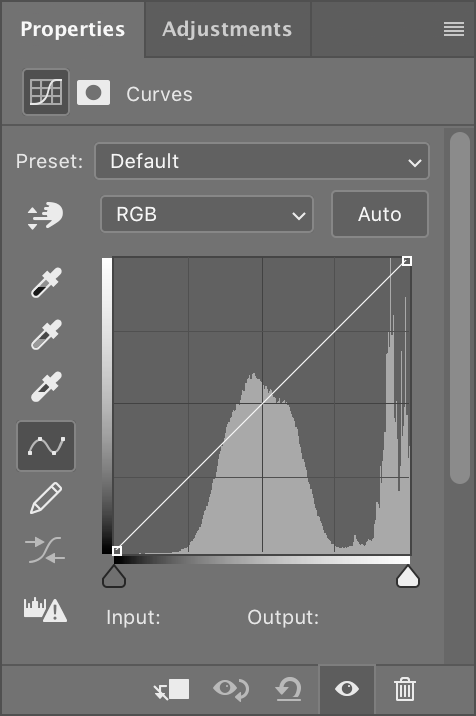
Now we are ready to do some color correction. Let’s start by properly setting our white and black points, then adjusting the contrast. Look at the histogram and notice in the bottom-left corner that it has no peaks. This means there are no pixels that are black or very dark gray.
As shown below, to fix this, hold Option (Mac) or ALT (Windows) while you drag the Black point slider
 to the right.
The image will turn white, but as you get close to the beginning of the histogram’s “hill, ” some small pixels will start to appear in various colors. When you see a few of the colored pixels appear, stop dragging. Those pixels have now been set to black.
The photo looks a little cool and bluish. At the top of the Properties panel, where it now says RGB, choose Blue as shown below.

Click in the center of the curve and drag down a bit to take out some of the blue.
NOTE: This screenshot and the next, were made with Photoshop’s lightest interface (instead of the default medium dark) so you can see the change better. Interface brightness can be changed by going into the Photoshop menu (Mac) or Edit menu (Windows), choosing Preferences > Interface, and clicking on a Color Theme.
In the Layers panel, double–click on Curves 1 and rename it contrast & color.
The sky is still too bright, but the rest looks good. At the bottom of the Layers panel, click on Create new fill or adjustment layer
and choose Curves.Looking at just the sky for reference, make the following adjustment:
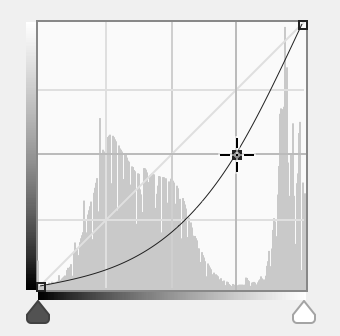
Make sure that the sky looks good, and don’t worry about the land. We’ll be hiding (masking out) any unwanted areas in a moment.
In the Layers panel, double–click Curves 1 and rename it sky.
Masking Out Unwanted Adjustments
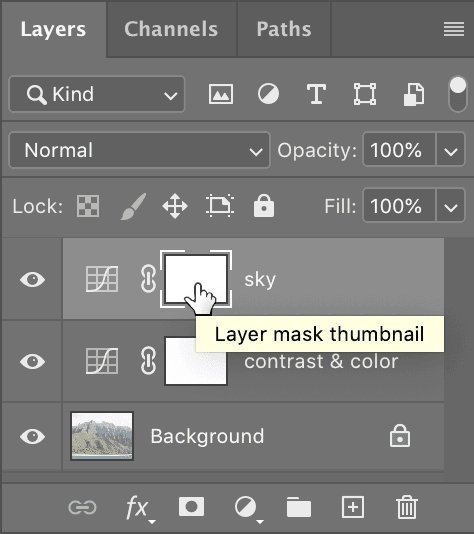
In the sky layer, click the layer mask thumbnail so it is highlighted, as shown below. You will see that it is highlighted when brackets appear around the empty white box. We are going to edit this layer mask.
Choose the Gradient tool
 .
.At the left of the Options bar, click the arrow
 next to the gradient preview to open the gradient panel, and double–click the third thumbnail on the left in the top row, which is the Black, White gradient.
- Also in the Options bar, choose:
- Linear Gradient

- Mode: Normal
- Opacity: 100%
- Dither and Transparency should be checked.
- Linear Gradient
Starting one third of the way up from the bottom (around the brown dirt), drag up to the top of the mountain range.
The black on the mask has hidden the darkening effect of this adjustment layer at the bottom, and the mask’s white has made it visible at the top. There may be parts we want to darken or lighten. Choose the Brush tool
 .
.In the Tools panel, click the Default Colors icon
 .
.In the Options bar, choose a huge brush (at least 250 px) with 0% hardness.
Also in the Options bar, lower the Opacity to 20%.
Painting white with a 20% Opacity on the mask will slowly reveal the darker sky curves adjustment. Paint anywhere that looks a little bright to darken it a bit.
Likewise, press X to swap the Foreground and Background colors so you have black. Now paint anywhere that looks too dark to mask that layer and brighten it up.
Organizing Layers into Groups
We want to see what the image looks like without our adjustments to get a sense of what we’ve done, but before doing that, let’s do one more thing to jazz up this photo. We want that Hawaiian foliage to really pop out!
At the bottom of the Layers panel, click on Create new fill or adjustment layer
, and from the menu, choose Hue/Saturation.In the Properties panel, move the Saturation slider to the right to somewhere between 10–20. Experiment with what you think looks best. We want to add color but not make it look fake.
We’d like to compare the final image to the original. A nice way to do this (and keep the file organized) is to put the layers into a Layer Group. In the Layers panel, make sure the top layer is still selected.
Hold Shift and click on the contrast & color layer. All three adjustment layers should now be selected.
Go into Layer > Group Layers (Cmd–G (Mac) or CTRL–G (Windows)).
In the Layers panel, you should now see a folder. Double–click the folder’s name and change it to my adjustments.
Click the arrow
 to the left of the my adjustments layer group to expand it and see that your layers are inside.
Click the eye
 beside the my adjustments layer group a few times to hide and show all the layers it contains. This lets you see a before and after. Pow!
When you see the background layer without the effect of the adjustment layers, it’s clear that the original layer is unchanged. Adjustment layers allow flexibility of editing, and they preserve the original image!
File > Save As as yourname-na pali coast.psd, setting Format (Mac) or Save as type (Windows) to Photoshop to maintain layer editability.