April 1, 2026Dan Rodney/5 min read

Using the Adjustment Brush Tool

Master Precise Photo Editing with Professional Techniques

Core Lightroom Adjustment Brush Features

Precision Editing

Apply targeted adjustments to specific areas of your photo without affecting the entire image. Perfect for enhancing or correcting localized issues.

Non-Destructive Workflow

All changes are reversible and don't modify your original image file. Experiment freely with confidence in your editing process.

Auto Mask Technology

Intelligent edge detection helps you paint within boundaries automatically, reducing the need for precise brush control on complex subjects.

Topics Covered in This Lightroom Tutorial:

The Adjustment Brush Tool, Adjusting Exposure & Saturation, Viewing Masks, Deleting Adjustment Brush Masks

Exercise Preview

lightroom preview4C

What You'll Accomplish in This Exercise

1

Darken the Sky

Use the Adjustment Brush with exposure settings to selectively darken an overexposed sky while preserving building and tree details

2

Desaturate Flowers

Apply saturation adjustments to tone down bright purple flowers using targeted brush strokes

3

Manage Masks

Learn to view, modify, and delete adjustment masks to refine your editing results

Exercise Overview

In this exercise, you'll master the Adjustment Brush tool—one of Lightroom's most powerful precision editing instruments. This tool enables you to apply targeted corrections to specific areas of your image without affecting the entire photograph. You'll learn to selectively darken an overexposed sky and desaturate vibrant flowers, demonstrating how professional photographers achieve balanced, compelling compositions through selective adjustments rather than global corrections.

Pre-Exercise Setup Checklist

0/4

The Adjustment Brush Tool

  1. If you have not imported the photos that were imported in Exercise 2E:
    • Go into the Library module.
    • At the bottom left of the screen, click Import.
    • In the dialog box that appears, on the left under Source, navigate to Desktop > Class Files > Lightroom Class and select the Develop folder.
    • At the top, above the photos, make sure Add is selected (highlighted).
    • On the bottom right, click Import.
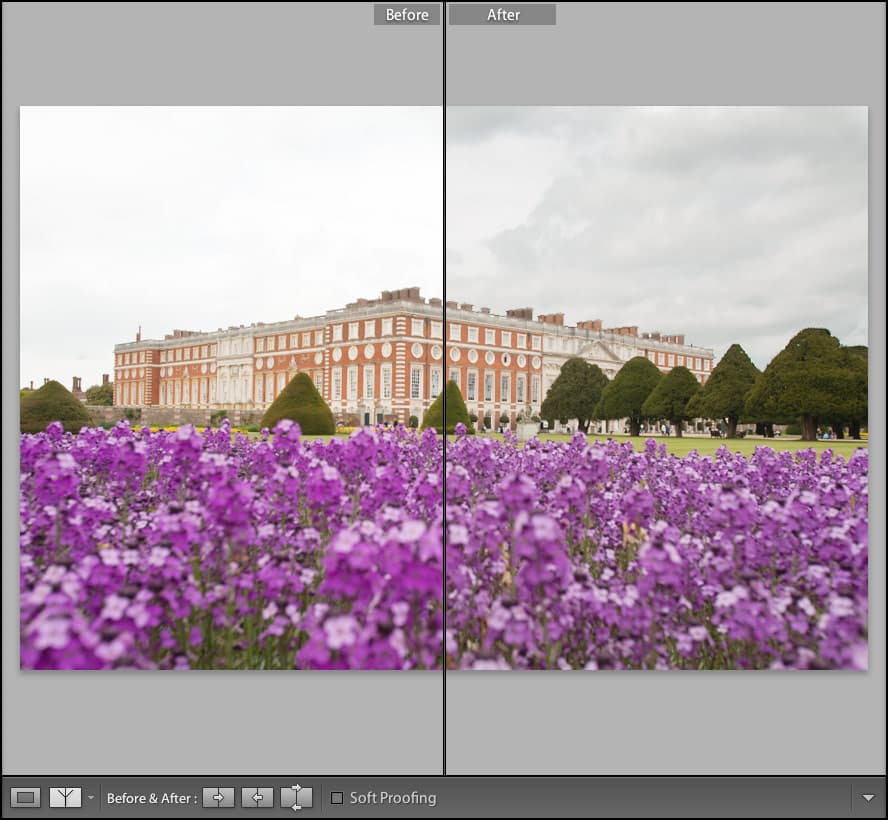
  2. In the Library module, select the Hampton Court Palace & violets photo (_CAS4948).

  3. Press D to go into the Develop module.

  4. In the Navigator panel, click on FIT if it is not already highlighted.

  5. Under the Histogram panel, click the Adjustment Brush tool adjustment brush.

  6. In the panel that appears:
    • From the Effect menu, select Exposure if it's not already selected.
    • Drag the Exposure slider to around − 1.00.
    • In the Brush section under Flow, check Auto Mask.
  7. Press the right bracket key ] a few times to increase the brush size.

    NOTE: The left bracket key [ will decrease the brush size. These keyboard shortcuts are essential for maintaining workflow efficiency during detailed editing sessions.

  8. Brush the entire sky (try to avoid brushing the buildings and trees, though it won't cause much damage due to Auto Mask protection).

  9. When finished, click the Adjustment Brush tool adjustment brush again to deselect it.

  10. Click the Adjustment Brush tool adjustment brush to select it again.

  11. On the photo, locate the circle gray circle, which corresponds to the sky's mask. These mask pins are visual anchors that allow you to return to and modify specific adjustments at any time.

  12. Click on this circle gray circle to reveal the mask.

    NOTE: A black dot will appear inside the circle black dot circle to show it's activated

  13. Hover over that circle for a few moments, and the mask will be indicated by the color red (appears pink/light red). This visualization helps you verify the exact areas affected by your adjustment.

  14. Next to Exposure, drag the slider to − 3.00. Notice how this dramatic change affects only the masked sky area, leaving the rest of the image untouched.

  15. If you've missed some spots, use the Adjustment Brush tool adjustment brush to brush them now.

    If you've accidentally brushed too much, press Opt (Mac) or ALT (Windows) and brush over those areas to subtract from the mask. This erase function is crucial for precision work around complex edges.

  16. Notice that some buildings and trees have a slight halo where the sky meets them. This common issue occurs when adjustments are too aggressive near high-contrast edges. We need to tone down the exposure.

  17. In the right side panel, set the Exposure to − 1.60. This demonstrates the non-destructive nature of Lightroom's adjustments—you can always refine your edits.

  18. Click the Adjustment Brush tool adjustment brush to deselect it.

  19. At the bottom of the screen, click the Before & After icon before after yy button to examine your work. This comparison view is essential for evaluating the effectiveness of your adjustments.

  20. At the bottom of the screen, click the Loupe View icon loupe view.

Now that you've mastered selective exposure adjustments, let's explore how the Adjustment Brush can control color saturation with surgical precision.

Essential Keyboard Shortcuts

Use the right bracket key ] to increase brush size and left bracket key [ to decrease it. Press O to toggle mask visibility while brushing for better precision.

Brush Controls: Auto Mask vs Manual

FeatureAuto Mask OnAuto Mask Off
Edge DetectionAutomatic boundary detectionManual brush control
PrecisionHigh accuracy on defined edgesUser-dependent accuracy
SpeedFaster for complex subjectsFaster for simple areas
Best ForSky, water, uniform areasCreative effects, soft transitions
Recommended: Enable Auto Mask when working near high-contrast edges like sky-to-building transitions

Adjusting Saturation Via Adjustment Brush

Let's decrease the saturation of the bright purple flowers to create a more balanced composition where no single element overwhelms the viewer's attention.

  1. Click the Adjustment Brush tool adjustment brush.

  2. In the panel that appears, from the Effect menu, select Saturation. This preset automatically configures the tool for color intensity adjustments.

  3. Below that, drag the Saturation slider left to − 20. This moderate reduction will tone down the flowers without making them appear lifeless.

  4. Press O to show the red mask color as you brush. This overlay mode allows you to see exactly where you're applying the effect in real-time.

  5. Brush some of the flowers. Focus on the most vibrant blooms first to gauge the effect's impact.

  6. Press the O key again to hide the mask and to see the flowers desaturated. This toggle technique helps you evaluate your work without visual distraction.

  7. Press O again to reveal the mask.

  8. Brush the rest of the flowers to achieve consistent saturation across all the blooms.

  9. Press O to see the changes. Notice how the reduced saturation creates better visual balance between the architectural elements and natural features.

Understanding how to remove adjustments is just as important as knowing how to apply them. Let's explore mask deletion techniques.

Exposure Adjustment Values Used

Initial Sky Exposure
1
Maximum Sky Exposure
3
Final Sky Exposure
1.6
Flower Saturation Reduction
20
Mask Correction Technique

Hold Option (Mac) or Alt (Windows) while brushing to subtract from your mask. This eraser mode helps fix overspray and refine mask edges without starting over.

Deleting Adjustment Brush Masks

  1. To get rid of one of the adjustment masks that you brushed onto the photo, click on the circle corresponding to the sky's reduced exposure to select its mask. The selected mask pin will display the black dot indicator.

  2. Press Delete on your keyboard to delete it. Notice how the sky immediately returns to its original exposure value.

  3. Delete all the remaining masks:
    • Click on the circle gray circle on the flowers.
    • Make sure it now has a black dot black dot circle inside it.
    • Press Delete to delete it.

    We've now reverted to the original photo, demonstrating the completely non-destructive nature of Lightroom's editing workflow.

    As you've discovered in this exercise, the Adjustment Brush tool is indispensable for professional photo editing. It enables precise, reversible adjustments that would be impossible to achieve with global corrections alone. This selective editing capability is what separates amateur snapshots from polished, professional images. Master this tool, and you'll have the power to guide your viewer's eye exactly where you want it to go while maintaining complete creative control over every pixel in your composition.

Non-Destructive Editing Benefits

Pros
Complete reversibility - delete any adjustment at any time
Ability to modify existing masks without losing other adjustments
Original image file remains untouched and unmodified
Experiment freely with different adjustment combinations
Easy comparison between before and after states
Cons
Multiple masks can increase file processing time
Complex mask combinations may become difficult to track
Requires understanding of mask management for efficient workflow

Mask Management Workflow

Step 1

Create Adjustment

Apply brush with desired effect settings

Step 2

Refine Mask

Add or subtract areas using Option/Alt modifier

Step 3

Adjust Settings

Fine-tune effect strength on existing mask

Step 4

Delete if Needed

Select mask circle and press Delete key

Key Takeaways

1The Adjustment Brush tool enables precise, localized edits without affecting the entire image, making it essential for professional photo retouching
2Auto Mask feature provides intelligent edge detection that helps maintain clean boundaries between adjusted and unmodified areas
3Keyboard shortcuts like bracket keys for brush sizing and O key for mask visibility significantly improve editing efficiency and precision
4All Adjustment Brush modifications are completely reversible and non-destructive, allowing unlimited experimentation without risk to original images
5The Option/Alt key transforms the brush into an eraser mode, enabling precise mask refinement and correction of overspray areas
6Multiple adjustment masks can be applied to a single image, each with independent settings for exposure, saturation, and other parameters
7Mask visualization using the red overlay helps ensure accurate application and allows for real-time adjustment while brushing
8Professional workflows benefit from the Before & After comparison feature to evaluate the impact of selective adjustments on overall image quality

RELATED ARTICLES