April 1, 2026Dan Rodney/6 min read

Transferring Catalogs Between Computers

Master Lightroom Catalog Transfer Between Computing Devices

Tutorial Scenario

This exercise simulates transferring vacation photos edited on a laptop back to your desktop computer while preserving all edits and adjustments.

Topics Covered in This Lightroom Tutorial:

Importing & Exporting Photos As a Catalog, Generating Smart Previews After Importing Photos

Core Learning Objectives

Catalog Management

Learn to import and export photos as complete catalogs between different computers or storage devices.

Smart Previews

Generate lightweight RAW file previews that preserve your edits and enable offline editing capabilities.

Workflow Transfer

Master the complete process of moving edited photo collections while maintaining all development settings.

Exercise Preview

lightroom preview4K

Exercise Overview

Picture this scenario: you've just returned from a photography assignment or vacation where you captured and edited stunning images on your laptop. Now you're back at your studio or home office, staring at your desktop workstation, wondering how to seamlessly transfer those edited masterpieces. This is one of the most common workflow challenges photographers face, and mastering catalog transfers is essential for maintaining creative momentum across multiple devices.

In this comprehensive exercise, we'll demonstrate the professional approach to transferring complete Lightroom catalogs—including all your edits, metadata, and organizational structure—from one computer to another. This workflow isn't just about moving files; it's about preserving your creative decisions and maintaining workflow continuity in today's multi-device photography environment.

Workflow Overview

1

Prepare Source Photos

Import vacation photos and apply black and white preset to simulate edited photos on laptop

2

Export Complete Catalog

Package photos, edits, and previews into transferable catalog format

3

Transfer and Import

Move catalog to destination computer and import all photos with preserved edits

Importing New Photos

Let's begin by setting up our scenario with some sample images that we'll later treat as our "vacation edits." This initial import will simulate the photos you'd typically work with while traveling.

  1. Ensure you're working in the Library module—this is your command center for all import and organizational tasks.

  2. At the bottom of the left panel, click Import to launch Lightroom's import dialog.

  3. Under Source, navigate to Desktop > Class Files > Lightroom Class and select the 20121231 Oklahoma Trip folder.

  4. At the top, above the photos, make sure Add is selected (highlighted). This option links to files in their current location rather than copying them, which is often the most efficient approach for local storage.

  5. Here's a critical learning opportunity: in the previous exercise, you learned to add Smart Previews during import. However, photographers often forget this step in real-world scenarios. To demonstrate the post-import solution, uncheck Build Smart Previews in the File Handling panel on the right.

  6. On the bottom right, click the Import button to begin the import process.

  7. In the Catalog panel on the left, Previous Import should automatically display your newly imported images. Press Cmd–A (Mac) or CTRL−A (Windows) to select all the photos for batch processing.

  8. While still in the Library module, locate and open the Quick Develop panel on the right side if it's not already visible. This panel is perfect for applying consistent edits across multiple images.

  9. In the Saved Preset dropdown, select Lightroom B&W Presets > B&W Look 1 to create a cohesive artistic treatment across your entire collection.

    The conversion process may take several moments, particularly with larger image files. Monitor the progress indicator at the top left of the Library module. If any images fail to convert—a rare but possible occurrence with complex RAW files—simply reselect those photos and reapply the preset.

Smart Preview Options

Smart Previews can be generated during import or added later via Library > Previews > Build Smart Previews. They create lightweight RAW files that remember your edits.

Import Configuration Steps

0/4

Exporting a Catalog

Now we reach the crucial phase: these newly processed black and white images represent your completed vacation work. To transfer them professionally to another system while preserving all edits and metadata, we need to export them as a complete catalog package. This approach ensures nothing gets lost in translation between systems.

  1. In the left sidebar, expand the Folders panel if it's currently collapsed—this panel is your gateway to folder-level operations.

  2. CTRL–click (Mac) or Right–click (Windows) the 20121231 Oklahoma Trip folder to access contextual menu options.

  3. Select Export this Folder as a Catalog—this powerful feature packages everything needed for seamless transfer.

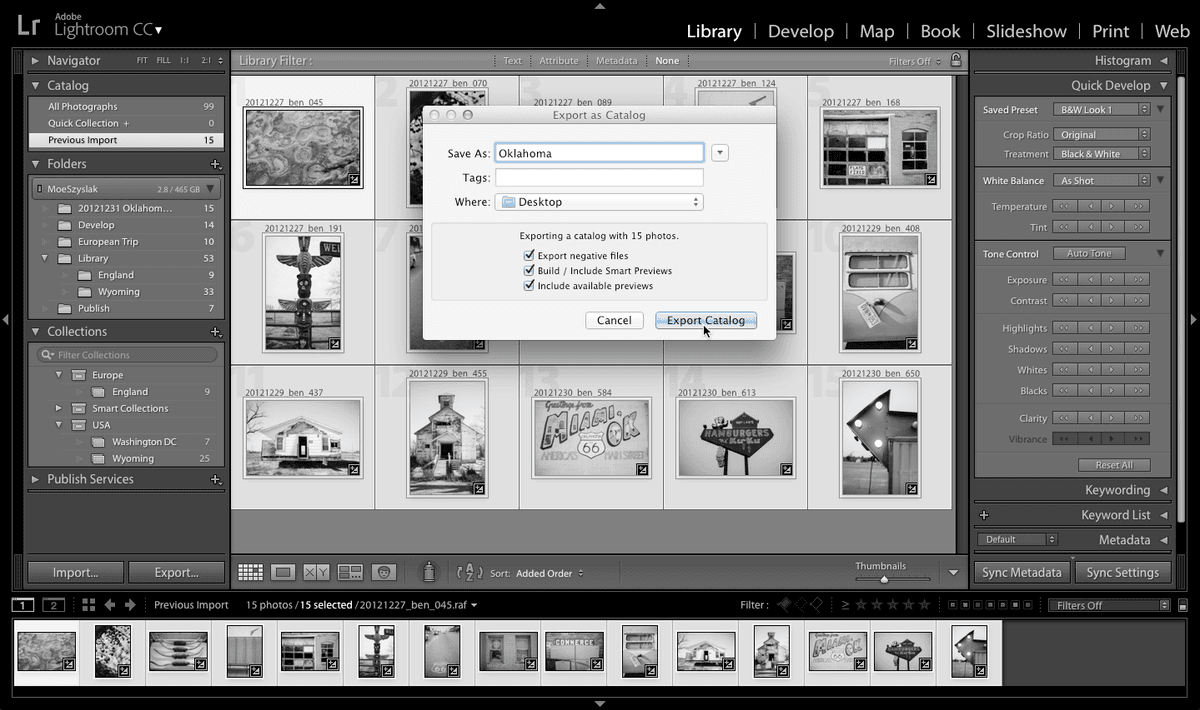
  4. In the Export as Catalog dialog box, navigate to the Desktop for easy access.

    Professional Note: In real-world scenarios, you'd typically export to an external SSD or high-speed USB drive for transfer between systems. Modern photographers often use portable SSDs like Samsung T7 or SanDisk Extreme Pro for reliable, fast transfers. For this exercise, we're using the Desktop to simplify the process.

  5. Name the catalog Oklahoma—choose descriptive names in professional work to maintain organization across projects.

  6. At the bottom of the dialog, verify that Export negative files is checked. This critical setting determines whether your original image files travel with the catalog.

    Strategic Consideration: Check this box when photos reside on your laptop's internal drive and need to move with the catalog. Uncheck it if you're working with photos stored on a portable drive that will physically move between systems. This decision impacts storage requirements and transfer times significantly.

  7. Enable the Build / Include Smart Previews option to ensure Lightroom creates these essential lightweight proxy files. Smart Previews are game-changers for modern workflows—they allow full editing capability even when original files aren't accessible, perfect for laptop work or cloud synchronization.

    Alternative Method: If you forget to generate Smart Previews during export, you can create them later by selecting photos and navigating to Library > Previews > Build Smart Previews. However, building them during export is more efficient.

  8. Confirm that Include available previews is checked. This setting transfers existing 1:1 previews, eliminating the need to regenerate them on the destination system—a significant time-saver with large catalogs.

  9. Click Export Catalog (Mac) or Save (Windows) to begin the export process. Depending on your image count and file sizes, this may take several minutes to complete.

Export Negative Files Decision Matrix

FeatureCheck Export Negative FilesUncheck Export Negative Files
Best ForPhotos stored on computer hard drivePhotos stored on external drive
What Gets ExportedImage files plus catalog dataOnly catalog and edit data
Use CaseFull transfer between computersShared external drive workflow
Recommended: For this exercise, check Export negative files since photos are stored locally on the computer hard drive.

Catalog Export Process

1

Access Export Function

Right-click the folder in Folders panel and select Export this Folder as a Catalog

2

Configure Export Settings

Choose destination, enable Export negative files, and Build Smart Previews options

3

Include Preview Data

Check Include available previews to transfer existing 1:1 previews and avoid regeneration

Importing a Catalog

The final phase simulates the real-world scenario of importing a catalog on your destination computer. Since we're working on a single system for this tutorial, we'll temporarily remove the images from our current catalog to authentically replicate the import experience you'd have on a fresh system.

  1. Allow the export process to complete entirely before proceeding—interrupting could corrupt the catalog export.

  2. In the Folders panel, CTRL–click (Mac) or Right–click (Windows) the 20121231 Oklahoma Trip folder and select Remove to simulate working on a different computer.

  3. Click Remove again to confirm deletion of these photos from our current library—this won't delete the actual files, only the catalog references.

  4. Navigate to File > Import from Another Catalog to access Lightroom's catalog import functionality.

  5. In the Import from Lightroom Catalog dialog, navigate to the Desktop where you exported the catalog.

  6. Double–click the Oklahoma folder to reveal its contents. You'll discover a complete ecosystem of files:

    • Oklahoma catalog file (Oklahoma or Oklahoma.lrcat depending on your system)—the database containing all your edits and metadata
    • 20121231 Oklahoma Trip folder containing the actual image files—your creative raw materials
    • Oklahoma Previews.lrdata folder or file—cached preview images for faster browsing and grid view performance
    • Oklahoma Smart Previews.lrdata folder or file—the intelligent proxy files that enable editing without original files present
  7. Double–click Oklahoma or Oklahoma.lrcat to initiate the catalog import process.

  8. When the import options dialog appears (there may be a brief delay as Lightroom analyzes the catalog), ensure All Folders is checked to import the complete folder structure.

  9. From the File Handling menu, select Add new photos to catalog without moving—this maintains the exported folder structure and file locations.

  10. Click Import to complete the process and watch as your fully edited photos, complete with all adjustments and organizational structure, seamlessly integrate into your catalog.

    Success! Your developed images now exist in their new home with all edits preserved. This workflow is the foundation of professional multi-device photography management in 2026's interconnected creative environment.

Exercise Simulation Note

This tutorial removes photos from the current catalog to simulate the import process. In real scenarios, you would be importing to a different computer that doesn't have these photos.

Exported Catalog Components

Catalog Database File

Main catalog file containing all metadata, edits, and organizational data for your photos.

Photo Folder Structure

Original image files organized in the same folder structure as your source catalog.

Preview Data Files

Both standard previews and Smart Previews for faster browsing and offline editing capabilities.

Catalog Import Process

1

Remove Existing Photos

Delete photos from current catalog to simulate clean destination computer

2

Access Import Function

Go to File > Import from Another Catalog to begin import process

3

Select Catalog File

Navigate to exported folder and double-click the catalog file to import

4

Configure Import Options

Select All Folders and Add new photos without moving to preserve file locations

Key Takeaways

1Lightroom catalog export packages photos, edits, metadata, and previews into a transferable format for moving between computers
2Smart Previews can be generated during import or added later through Library menu, creating lightweight files that preserve edit information
3Export negative files option should be checked when photos are stored locally, unchecked when using shared external drives
4Including available previews during export prevents the need to regenerate 1:1 previews on the destination computer
5The Add import option preserves original file locations while adding photos to the catalog without moving physical files
6Exported catalogs contain four key components: catalog database, photo folders, standard previews, and Smart Preview data
7Black and white presets can be applied to multiple selected photos simultaneously through the Quick Develop panel
8Catalog import process maintains all original edits and development settings from the source computer

RELATED ARTICLES