April 1, 2026Dan Rodney/7 min read

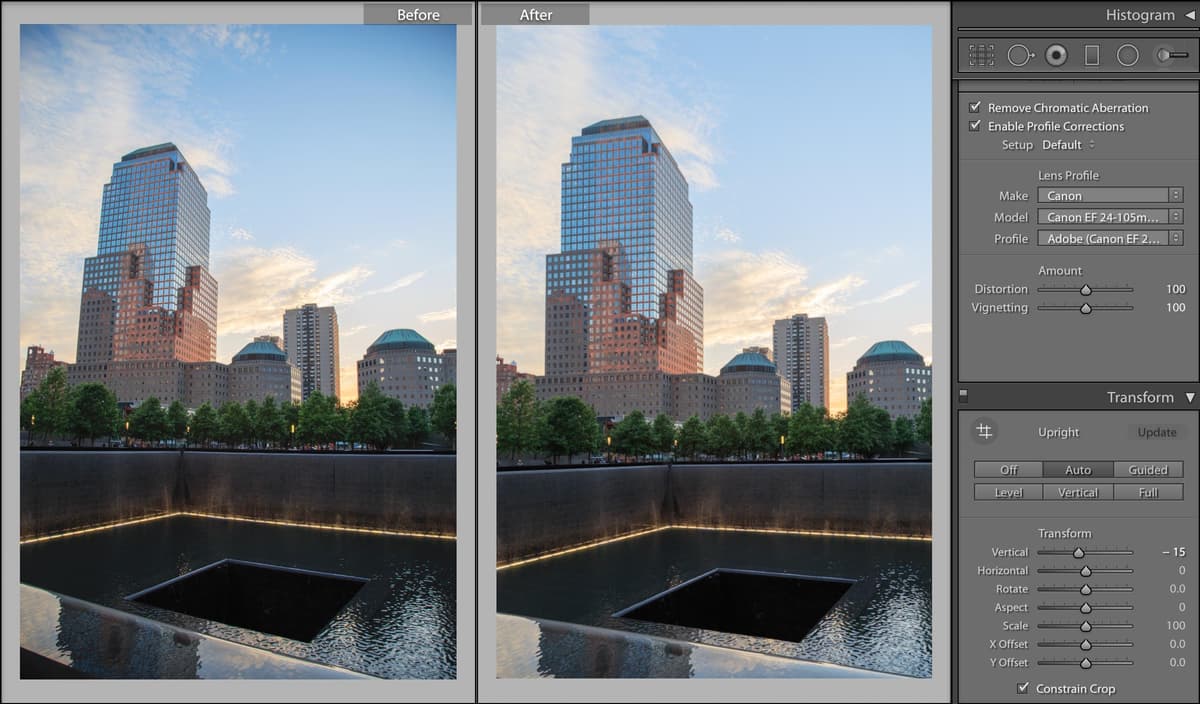
Correcting Lens Distortions & Adding Effects

Master Professional Photo Enhancement with Lightroom Corrections

What You'll Master in This Tutorial

Lens Profile Corrections

Automatically correct wide-angle distortion using Lightroom's built-in camera and lens profiles for professional results.

Transform Adjustments

Straighten vertical lines in architectural photography and fix perspective issues caused by wide-angle lenses.

Vignette Effects

Add dramatic post-crop vignetting to draw viewer attention to the center of your photographs.

Topics Covered in This Lightroom Tutorial:

Professional Lens Corrections Using Built-in Profiles, Strategic Vignette Application for Visual Impact

Exercise Preview

lightroom preview3F

Exercise Overview

In this comprehensive exercise, you'll master the art of correcting lens distortion—a common challenge when photographing architectural subjects with wide-angle lenses. Wide-angle photography often introduces perspective distortion that can make buildings appear to lean backward dramatically, compromising the professional quality of your images. You'll also discover how to strategically apply vignetting as a creative tool to guide viewer attention and enhance the visual narrative of your photographs. These techniques remain fundamental skills for architectural and landscape photographers in 2026, especially as client expectations for technical precision continue to rise.

Wide-Angle Photography Challenges

Wide-angle lenses commonly create two main issues when photographing tall buildings: barrel distortion that makes straight lines appear curved, and natural vignetting that darkens the corners of your image.

Lens Corrections Using a Built-In Profile

  1. If you have not imported the photos that were imported in Exercise 2E:
    • Navigate to the Library module.
    • At the bottom left of the screen, click Import.
    • In the dialog box that appears, on the left under Source, navigate to Desktop > Class Files > Lightroom Class and select the Develop folder.
    • At the top, above the photos, make sure Add is selected (highlighted).
    • On the bottom right, click Import.
  2. Navigate to the Library module to begin our lens correction workflow.

  3. Click on the last photo (NYC 9/11 Memorial: _CAS4132). This architectural image demonstrates the classic challenges of wide-angle lens distortion.

  4. Press D to enter the Develop module, where we'll perform our precision corrections.

  5. In the Navigator panel on the left, click on FIT to optimize your viewing perspective for detailed editing work.

  6. This memorial photograph was captured with a wide-angle lens that introduced characteristic distortion, causing the vertical lines of the buildings to converge unnaturally. The lens also created vignetting—a darkening effect in the corners that, while sometimes desirable, detracts from this particular composition. Let's systematically address both issues. Expand the Lens Corrections panel on the right, collapsing other panels as needed to streamline your workspace.

  7. At the top of the Lens Corrections panel, click on the Profile tab to access Lightroom's sophisticated automatic correction tools.

  8. Check the box next to Enable Profile Corrections.

    Lightroom intelligently analyzes the photo's embedded metadata to identify your specific camera and lens combination, then applies Adobe's extensive database of optical profiles to automatically compensate for known distortion characteristics. This process has become increasingly refined over the years, with Adobe continuously expanding their lens profile database to include the latest equipment from major manufacturers.

  9. Check the box next to Remove Chromatic Aberration. This correction eliminates color fringing—subtle but distracting colored halos that appear along high-contrast edges due to the lens's inability to focus all wavelengths of light at exactly the same point. While you'd need to zoom to 1:1 magnification to fully appreciate this adjustment, it's particularly noticeable along the left edges of the tall building and other architectural elements where sharp contrast meets the sky.

  10. Below the Lens Corrections panel, locate the Transform panel—Lightroom's powerful perspective correction toolset. Towards the bottom of the Transform panel, ensure Constrain Crop is unchecked. This allows us to see the full extent of our corrections before deciding how to handle the resulting empty areas.

  11. In the Transform panel, click the Level button to test Lightroom's horizontal alignment correction.

    This option analyzes and straightens horizontal lines in the photograph. While Level corrections prove invaluable for seascapes or landscapes with tilted horizons, they're not the optimal solution for this architectural composition where vertical perspective is our primary concern.

  12. Still in the Transform panel, click the Auto button to engage Lightroom's comprehensive automatic perspective correction.

    Notice the dramatic improvement! The building's lines appear significantly straighter and more natural. Auto represents Lightroom's balanced approach to perspective correction, addressing both horizontal and vertical distortion while attempting to preserve the image's overall proportions. However, let's explore additional options to determine the best approach for this specific image.

  13. Click the Vertical button to apply more aggressive vertical perspective correction.

    This option prioritizes making every vertical line in the photograph perfectly perpendicular to the horizon. While this creates the most architecturally accurate result, notice the white triangular areas that appear in the lower corners—these represent areas where the perspective correction has stretched the image beyond its original boundaries.

  14. In the Transform panel, enable Constrain Crop. This feature automatically crops out the white areas created by perspective correction, but observe how it also removes substantial portions of our original composition, potentially compromising the image's impact.

  15. The aggressive cropping has eliminated too much of the memorial's base—crucial compositional elements that provide context and emotional grounding. Let's compare our correction options using Lightroom's non-destructive history system. In the History panel, click on the Upright Perspective entry that displays Auto on the right side.

  16. Study the correction carefully, then click on the topmost Constrain Crop entry to compare both approaches. Consider which maintains better compositional integrity while still achieving professional-level perspective correction.

  17. For this image, the Auto correction provides the optimal balance between technical accuracy and compositional preservation, avoiding the excessive cropping that would diminish the memorial's visual impact. In the History panel, select the Upright Perspective entry with Auto on the right to proceed with this approach.

  18. Lightroom's automatic corrections provide an excellent foundation, but professional results often require fine-tuning. In the Transform panel, enable Constrain Crop to maintain clean image borders.

  19. To refine the vertical perspective further, drag the Vertical slider in the Transform panel left to approximately -15. This manual adjustment allows us to reduce remaining vertical distortion while maintaining complete control over the correction intensity.

    Excellent! The combination of automatic profiling and manual fine-tuning has transformed this architectural photograph into a technically precise, professionally corrected image that maintains its emotional impact.

Essential Lens Correction Workflow

1

Enable Profile Corrections

Lightroom reads your photo's metadata to identify the camera and lens, then applies automatic corrections for known distortion patterns.

2

Remove Chromatic Aberration

Eliminate color fringing along high-contrast edges that occurs when different wavelengths of light focus at slightly different points.

3

Apply Transform Corrections

Use Auto, Level, or Vertical options to correct perspective distortion and straighten architectural lines.

4

Fine-tune Manual Adjustments

Adjust the Vertical slider manually to achieve the perfect balance between correction and image composition.

Transform Options Comparison

FeatureAuto CorrectionVertical Correction
Line StraighteningBalanced approachAll vertical lines
Image CroppingMinimal crop lossSignificant bottom crop
White TrianglesSmall cornersLarge lower corners
Best Use CaseGeneral architectureExtreme distortion
Recommended: Auto correction provides the best balance for most architectural photography, preserving more of the original composition while effectively straightening lines.
Constrain Crop Strategy

Use Constrain Crop strategically - enable it after making corrections to automatically remove white areas, but be prepared to sacrifice some image area for cleaner edges.

Adding a Vignette

Now that we've mastered technical lens corrections, let's explore the creative application of vignetting. A vignette serves as a classical photographic technique that subtly darkens the image periphery, naturally drawing the viewer's eye toward the center of the composition. When applied thoughtfully, vignetting can enhance the narrative focus and create a more intimate viewing experience—particularly valuable in architectural and portrait photography.

  1. Press G to return to Grid View, where we'll select our next image for vignette application.

  2. Click on the church façade photo (20111008_swny_030). This architectural subject will demonstrate how vignetting can enhance the dramatic impact of religious and historical architecture.

  3. Press D to enter the Develop module, transitioning from our lens correction work to creative enhancement techniques.

  4. Expand the Effects panel on the right side of your workspace. This panel houses Lightroom's creative enhancement tools, including sophisticated vignetting controls that go far beyond simple corner darkening.

  5. Under the Post-Crop Vignetting section, drag the Amount slider left to -40. Notice how this subtle darkening immediately enhances the façade's architectural details by creating a natural frame that emphasizes the central subject. The negative value creates a traditional dark vignette, while positive values would create a bright vignette—useful for different creative applications.

  6. In the top-left corner of the Effects panel, repeatedly click the Switch switch icon to toggle the effect on and off. This comparison technique helps you evaluate the vignette's contribution to the overall composition and ensure it enhances rather than distracts from your subject.

  7. At the bottom of the screen, click the Before & After icon before after yy button to display a comprehensive side-by-side comparison of your enhancement work.

    NOTE: You can cycle through different comparison views by clicking the Before & After icon multiple times until you find the most revealing perspective, such as the top-bottom split view compare top bottom button, which can be particularly effective for evaluating tonal adjustments across the entire composition.

  8. In the Navigator panel, click on FILL to optimize your view for final evaluation.

    Outstanding work! You've successfully combined technical lens corrections with creative vignetting to transform raw captures into polished, professional-quality images that meet contemporary standards for architectural photography.

A vignette is a classical dramatic effect that draws the viewer's eye to the center of a photo.
This timeless technique has been used by photographers for decades to create focal emphasis and add artistic drama to images.

Post-Crop Vignetting Process

1

Access Effects Panel

Navigate to the Effects panel in the Develop module to find Post-Crop Vignetting controls.

2

Adjust Amount Slider

Drag the Amount slider to the left for darkening effect. Start with -40 as a baseline and adjust to taste.

3

Toggle to Compare

Use the switch in the Effects panel to turn the effect on and off, comparing the before and after results.

Before and After Comparison

Always use the Before and After view to evaluate your adjustments. Click the icon multiple times to cycle through different comparison layouts for the clearest view of your changes.

Key Takeaways

1Enable Profile Corrections to automatically fix lens distortion using Lightroom's built-in camera and lens profiles
2Remove Chromatic Aberration to eliminate color fringing along high-contrast edges in your photographs
3Use Transform Auto correction for the best balance between line straightening and image preservation in architectural photography
4Constrain Crop automatically removes white triangular areas but may sacrifice important parts of your composition
5Manual Vertical slider adjustments around -15 can fine-tune perspective correction beyond automatic settings
6Post-Crop Vignetting with Amount set to -40 creates effective dramatic emphasis toward the center of images
7Always compare before and after results using Lightroom's comparison views to evaluate the effectiveness of your corrections
8Wide-angle lens distortion and vignetting are common issues that can be systematically corrected using these professional techniques

RELATED ARTICLES