April 1, 2026Dan Rodney/4 min read

Removing Dust Spots from Photos

Master Professional Photo Editing with Precision Tools

What You'll Master

Spot Removal Tool

Learn to effectively use Lightroom's Spot Removal tool for dust and imperfection correction. Master the essential techniques for professional photo cleanup.

Visualize Spots Mode

Discover how to use the Visualize Spots overlay to identify all image imperfections. This advanced feature makes dust spots clearly visible for precise editing.

Topics Covered in This Lightroom Tutorial:

The Spot Removal Tool

Exercise Preview

lightroom preview2F

Common Photography Challenge

Dust spots on camera sensors are one of the most frequent issues photographers face, especially when changing lenses frequently or shooting in dusty environments.

Exercise Overview

In this exercise, you'll master one of the most essential skills in digital photography post-processing: removing dust spots and sensor imperfections using Lightroom's powerful Spot Removal tool. This technique is crucial for maintaining professional image quality, as even the most carefully maintained camera equipment inevitably accumulates dust particles on the sensor over time.

Preparation Steps

1

Import Required Files

Navigate to Desktop > Class Files > Lightroom Class and import the Develop folder containing the practice images

2

Select Practice Image

Choose the U.S. Capitol dome photo (_CAS2423) which contains multiple dust spots for practice

3

Enter Develop Module

Press D to switch to Develop module where all photo editing tools are available

Spot Removal

  1. If you haven't already imported the photos from Exercise 2E, you'll need to bring them into your catalog first:
    • Navigate to the Library module.
    • At the bottom left of the screen, click Import.
    • In the dialog box that appears, on the left under Source, navigate to Desktop > Class Files > Lightroom Class and select the Develop folder.
    • At the top, above the photos, make sure Add is selected (highlighted).
    • On the bottom right, click Import.
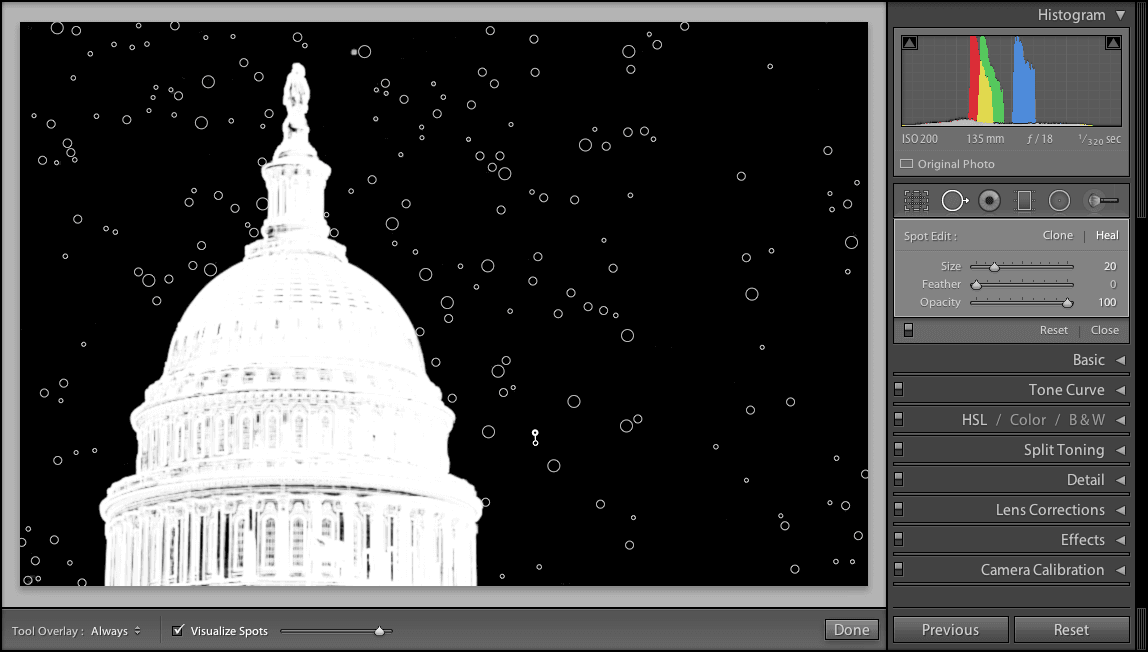
  2. In the Library module, locate and select the photo of the U.S. Capitol dome (_CAS2423). This image serves as an excellent example because architectural photography often reveals dust spots against uniform sky backgrounds.

  3. Press D to seamlessly transition into the Develop module, where all the magic happens.

  4. Take a moment to examine the image closely—notice all those dust spots scattered across the sky? This is an incredibly common issue that affects both amateur and professional photographers. Dust particles inevitably accumulate on your camera's sensor filter during normal use, lens changes, and environmental exposure. The good news is that Lightroom makes removing these imperfections both quick and precise.

  5. In the right-side panel, click the Spot Removal tool spot removal tool. This tool is your first line of defense against sensor dust and other small imperfections that can compromise image quality.

  6. Here's where things get interesting: In the Toolbar below the photo, enable Visualize Spots. This game-changing feature creates a high-contrast overlay that reveals every imperfection in your photograph, including spots you might never have noticed otherwise. It's like having X-ray vision for dust particles and blemishes.

  7. To the right of the Visualize Spots option, you'll find a crucial slider. Experiment by dragging this slider left and right—watch how dramatically it changes the number of visible spots. This slider controls the sensitivity of the visualization, allowing you to focus on the most prominent issues first. Position the slider around this sweet spot for optimal detection:

    spot removal visualize spots slider

  8. Now, hover your cursor over one of the dust spots to begin the removal process.

  9. Before clicking, you'll want to size your tool appropriately. Press the left bracket [ to make the Spot Removal tool smaller, and the right bracket ] to make it bigger. Proper sizing is critical for clean, natural-looking results.

    NOTE: If your mouse has a scroll wheel, you can also use it to resize the Spot Removal tool—many photographers find this more intuitive than keyboard shortcuts.

  10. Carefully resize the Spot Removal target circle so it precisely matches the size of the dust spot. The tool should cover the entire imperfection without extending significantly beyond it, ensuring optimal blending with surrounding pixels.

  11. Click directly on the dust spot to remove it. Lightroom's intelligent algorithms will automatically sample nearby clean pixels to seamlessly replace the imperfection. Watch as the spot disappears like magic.

  12. Now comes the systematic work: Repeat the previous steps for each remaining dust spot, methodically cleaning your image. Adjust the size of the Spot Removal tool spot removal tool as needed for different sized imperfections, and don't hesitate to zoom in for precision work on smaller spots or zoom out to assess your overall progress.

    NOTE: Mistakes happen to everyone—if you're not satisfied with a removal, simply select the correction circle and hit Delete on your keyboard to start over.

  13. When you've addressed all the visible spots, click the Spot Removal tool spot removal tool again to deactivate it and return to normal view. The transformation should be dramatic—your image now has that clean, professional quality that separates amateur snapshots from polished work.

  14. Press G to return to the Library module and admire your newly perfected image alongside your other work.

Tool Sizing Shortcuts

Use left bracket [ to make the Spot Removal tool smaller and right bracket ] to make it bigger. Mouse scroll wheel also works for quick resizing.

Spot Removal Process

1

Activate Spot Removal Tool

Click the Spot Removal tool in the right side panel to begin dust spot correction process

2

Enable Visualize Spots

Check on Visualize Spots in the Toolbar to create an overlay that clearly shows all image imperfections

3

Adjust Sensitivity Slider

Use the slider next to Visualize Spots to control how many spots are visible and find the optimal detection level

4

Size and Remove Spots

Resize the tool to match each dust spot size, then click directly on spots to remove them automatically

Quality Control Checklist

0/4
Professional Results

The transformation from dust-spotted to clean image demonstrates the power of systematic spot removal. This technique is essential for delivering professional-quality photographs.

Key Takeaways

1Dust spots on camera sensors are a common photography problem that can be effectively corrected in Lightroom
2The Spot Removal tool provides precise control for removing dust spots and other image imperfections
3Visualize Spots mode creates an overlay that makes all imperfections clearly visible for thorough correction
4The sensitivity slider controls how many spots are detected, allowing you to adjust based on your image needs
5Tool sizing can be controlled with bracket keys or mouse scroll wheel for precise spot targeting
6Matching the tool size to the dust spot size ensures clean removal without affecting surrounding image areas
7Mistakes can be easily corrected by selecting the circle and pressing Delete on the keyboard
8Systematic spot removal transforms images from amateur to professional quality appearance

RELATED ARTICLES