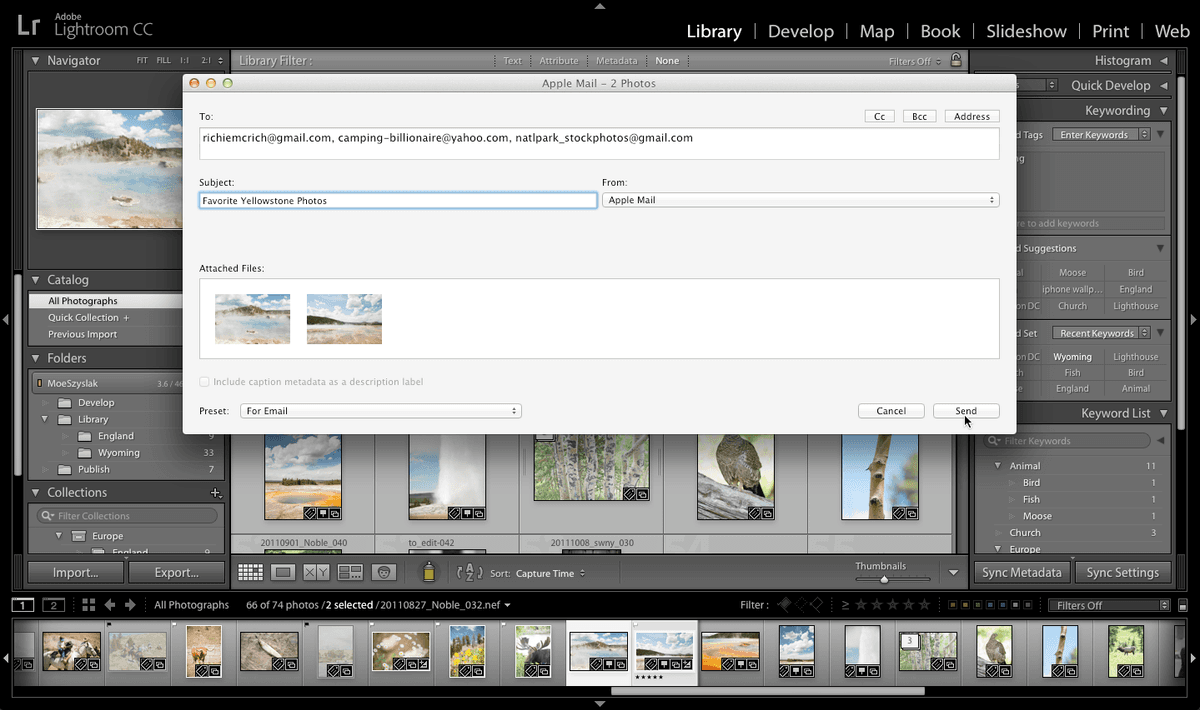
April 1, 2026Dan Rodney/6 min read

Emailing Photos: Free Lightroom Tutorial

Master Photo Sharing Through Adobe Lightroom Email Integration

What You'll Master Today

Desktop Integration

Connect Lightroom with your existing email clients like Apple Mail or Windows Mail. Access your address book seamlessly.

Online Email Setup

Configure web-based email services including Gmail, Yahoo, AOL, and Hotmail directly within Lightroom.

Export Optimization

Learn the built-in email presets that automatically optimize photo sizes and quality for email delivery.

Topics Covered in This Lightroom Tutorial:

Using a Desktop Email Client, Using an Online Email Client

Exercise Preview

lightroom preview4H

Exercise Overview

In this exercise, you'll master one of Lightroom's most practical features: sending professionally processed images directly from your catalog to clients, colleagues, or collaborators. This streamlined workflow eliminates the need to export, resize, and manually attach files—saving valuable time while ensuring consistent image quality for email delivery.

Before You Begin

Ensure you're working in Lightroom's Library module and have access to the sample Yellowstone photos referenced in this tutorial.

Emailing Photos

  1. Ensure you're working in the Library module, where all export functions are accessible.

  2. In the Catalog panel on the left, click All Photographs to view your complete image library.

  3. Select the first Yellowstone photo (20110827_YourName_032) by clicking on it once.

  4. Shift–click the adjacent Yellowstone photo (20110827_YourName_033) to select both images simultaneously. This technique works for selecting any contiguous range of photos.

  5. Navigate to File > Export, or for faster access, click the Export button located at the bottom of the left panel stack. This button provides quick access to all export functions without navigating through menus.

  6. In the Export dialog that appears, locate the Export To dropdown menu at the top and select Email. This changes the entire export workflow to optimize images specifically for email transmission.

  7. Expand the Lightroom Presets folder in the left sidebar if it's not already visible. These presets contain professionally optimized settings for various output scenarios.

  8. Click For Email from the preset list. Notice how all settings on the right automatically adjust to email-appropriate specifications—typically reducing file size while maintaining visual quality suitable for screen viewing.

  9. Click the Export button to proceed with the email process.

  10. The next step depends on your system configuration. If you have a desktop email client (such as Apple Mail, Outlook, or Thunderbird) properly configured, or if you've previously set up Lightroom's email functionality, a compose window with standard email fields (To, From, Subject, Message) will appear automatically.

    However, if this is your first time using Lightroom's email feature and no desktop email client is configured, a New Account dialog will prompt you to set up email credentials. Click Cancel for now—we'll walk through the complete setup process in the following sections.

Now let's explore both email setup options, starting with desktop clients and then covering web-based email services.

Quick Email Export Process

1

Navigate and Select

Access Library module, click All Photographs, and select your target images using standard selection techniques

2

Access Export Function

Use File > Export menu or click the Export button in the left panel to open export dialog

3

Choose Email Export

Select Email from Export To menu and apply the For Email preset for optimal settings

4

Complete Export

Click Export to process images and launch your email composition interface

First-Time Setup

If you see a New Account dialog instead of email fields, this indicates you need to configure your email client settings. Don't worry - we'll cover both desktop and online setup methods.

Using a Desktop Email Client

Lightroom integrates seamlessly with most desktop email applications installed on your system, including Apple Mail, Microsoft Outlook, Windows Mail, and Thunderbird. This integration offers significant advantages: direct access to your existing address books, familiar interface consistency, and the ability to leverage your established email signatures and templates.

If you prefer working with web-based email providers like Gmail, Yahoo, or Outlook.com, you can skip ahead to the next section, Using an Online Email Client, where we'll cover cloud-based email integration.

  1. From the dropdown menu below From, select your preferred Desktop Email Client (Apple Mail, Outlook, Windows Mail, etc.) if it isn't already selected by default.

  2. In the To field, enter the recipient's email address. Pro tip: If your desktop client is properly integrated, you can often access your address book directly from this field.

  3. In the Subject field, enter Favorite Yellowstone Photos or customize this to match your professional communication style.

  4. Click Send to initiate the export and email composition process.

  5. Lightroom will now process your selected images, applying the email preset specifications. This typically takes 30-60 seconds depending on your system performance and the number of images being processed.

  6. Once processing completes, your default email application will launch with a pre-composed message containing your optimized images as attachments. Verify that the To and Subject fields populated correctly.

  7. To add a personalized message, position your cursor before the first attached image and type your communication. Consider including context about the images, shooting conditions, or any specific details relevant to your recipient.

  8. Click Send in your email client to deliver the images. Your professionally processed photographs are now en route to your recipient with optimal file sizes for email delivery.

For those who prefer or require web-based email solutions, the following section demonstrates how to configure Lightroom with online email services.

Desktop vs Online Email Options

FeatureDesktop Email ClientOnline Email Provider
Address Book AccessFull integration availableManual entry required
Setup ComplexityMinimal if already configuredRequires credential input
ReliabilityDepends on local setupRequires internet connection
CompatibilityApple Mail, Windows MailGmail, Yahoo, AOL, Hotmail
Recommended: Choose desktop clients for existing setups with address book needs, or online providers for universal access

Desktop Email Workflow

0/5

Using an Online Email Client

Lightroom's online email integration supports major web-based email services, making it ideal for photographers who work across multiple devices or prefer cloud-based workflows. This method is particularly valuable for remote work scenarios or when your primary email access is web-based.

  1. From the From dropdown menu, select Go to Email Account Manager to access Lightroom's email configuration panel.

  2. Click the Add button located in the bottom-left corner to begin setting up a new email account.

  3. In the New Account dialog, enter a descriptive name in the Account Name field. Choose something memorable like "Gmail Primary" or "Business Yahoo" to distinguish between multiple accounts.

  4. From the Service Provider dropdown menu, select your email service. Lightroom supports all major providers with optimized configurations.

  5. Click OK to proceed to the detailed configuration screen.

  6. For major providers (Gmail, Yahoo!, AOL, or Outlook.com), Lightroom automatically populates the Outgoing Server Settings with the correct SMTP configuration. This includes server addresses, port numbers, and security protocols required for reliable email delivery.

    If you select Other as your service provider, you'll need to manually enter the SMTP server details. Contact your email provider's support documentation or IT department for these technical specifications, which typically include server address, port number, and encryption requirements.

  7. In the Credential Settings section, enter your complete Email Address and Password. Note: For services with two-factor authentication enabled (recommended for security), you may need to generate an application-specific password rather than using your regular login credentials.

  8. Click the Validate button to test the connection. Lightroom will attempt to authenticate with your email provider using the provided credentials. If validation fails, double-check your email address, password, and ensure any required app-specific passwords are correctly configured.

  9. Once validation succeeds, click Done to save the account configuration and return to the email composition interface.

  10. You should now see the familiar email composition window with all standard fields available (To, From, Subject, Message, etc.).

  11. Confirm that the dropdown menu below From shows your newly configured email account as the selected sender.

  12. Enter the recipient's address in the To field. For professional communications, consider using the CC or BCC fields if multiple stakeholders need visibility.

  13. In the Subject field, enter Favorite Yellowstone Photos or customize this to reflect your professional communication standards and the specific context of your image delivery.

  14. Use the Message text box to craft a professional communication. Include relevant context such as shooting details, intended usage rights, or follow-up instructions as appropriate for your client relationship.

  15. Review the Attached Files section, which displays thumbnails of your processed images. This preview confirms that Lightroom has properly applied the email optimization settings before transmission.

  16. Click Send to deliver your professionally processed images directly through Lightroom's integrated email system. Your optimized photographs will be transmitted with consistent quality and appropriate file sizes for reliable email delivery.

Online Email Account Configuration

1

Access Account Manager

Choose Go to Email Account Manager from the From menu to begin setup process

2

Create New Account Entry

Click Add button and provide a recognizable Account Name for your email service

3

Select Service Provider

Choose from Yahoo, Gmail, AOL, Hotmail, or Other for custom server settings

4

Enter Credentials

Input your email address and password, then validate the connection

5

Complete Setup

Once validated, click Done to return to the email composition interface

Supported Email Providers

Major Providers

Gmail, Yahoo, AOL, and Hotmail include automatic server configuration. Settings populate without manual input required.

Custom Providers

Other email services require manual server settings input. Contact your provider for SMTP configuration details.

Validation Success

The Validate button confirms your credentials work correctly. If validation fails, double-check your email address and password before proceeding.

Final Email Composition Steps

0/5

Key Takeaways

1Lightroom's email export feature integrates with both desktop email clients and online email services for flexible photo sharing workflows
2The built-in For Email preset automatically optimizes image size and quality settings specifically for email delivery
3Desktop email clients like Apple Mail and Windows Mail provide address book integration but require existing local configuration
4Online email providers including Gmail, Yahoo, AOL, and Hotmail can be configured directly within Lightroom using the Email Account Manager
5Major email providers feature automatic server configuration, while custom providers require manual SMTP settings from your service provider
6The validation process ensures your email credentials work correctly before attempting to send photos
7Lightroom processes and composes emails in the background, then opens your configured email program for final message customization
8Multiple photos can be selected and exported simultaneously using standard selection techniques like Shift-click for adjacent images

RELATED ARTICLES