Editing Video
What This Tutorial Covers
Video Support
Apply Lightroom edits to video clips.
Limited Tools
Subset of photo edits work on video.
Trim & Export
Set in/out points and export edited clips.
Noble Desktop's Graphic Design Certificate covers Photoshop alongside the broader Adobe toolkit that complements Lightroom in any photography workflow.
Dive into the world of video editing with this comprehensive tutorial covering video basics, trimming, color correction, and exporting in Lightroom.
Exercise Preview
Trimming a Video
We will shorten the video to include only the portion from when the two boys start running up until an orange-gloved boy runs across the foreground (a few seconds after the hat is thrown).
At the end of the play bar, click the gear icon
 to see a thumbnail preview of the video in the play bar.
Use the Current Time Indicator
 to scrub through the thumbnail previews.
Let’s set a new starting point. Drag the Current Time Indicator
to the first 00:07 frame.NOTE: This video is approximately 24 frames per second. While you don’t have to be super precise (as Lightroom does not have fine tuned video controls), dragging slowly will help. You can also use the arrows on the sides of the play button to advance or go back one frame at a time.
To the left of the thumbnail, click the grabber handle
 and drag the shade to the right to meet the Current Time Indicator.
To set a new ending point, do the following:
- Drag the Current Time Indicator to 00:14 (a couple seconds after the boy throws his hat) and notice the happy boy in orange gloves.
- Slowly drag until the orange-gloved boy disappears from the frame to the left. This should be around six frames BEFORE the 00:16 mark.
To the right of the thumbnail, click the grabber handle
and drag the shade to the left to meet the Current Time Indicator.Press play to play the 8-second long video clip that you just specified.
Press G to return to Grid View.
Notice that the Poster Frame of the video clip displayed in Grid view doesn’t show what’s going on in the video. Let’s select a better Poster Frame.
In Grid view, double–click the video to open it in Loupe view (or press E).
Use the Current Time Indicator
to navigate to 00:09 (where the brown-haired boy is running across the frame).NOTE: Feel free to slowly scrub through the 00:09 frames and inspect them until you’ve selected a favorite.
Click the box
 to the bottom right of the thumbnail and select Set Poster Frame.
Press G to return to Grid View to see the new Poster Frame applied.
Editing Video Styles
Keep the second video
_DSC5595.MOV selected and press E to enter Loupe View.Let’s see what kind of adjustments we can make to the video. Expand the Quick Develop panel on the right if it isn’t already.
Next to Exposure, click the single left arrow button
 a few times to darken the video by 1⁄3 of a stop.
NOTE: Clicking the double left arrow button
 will darken the video by a full stop.
Next to Exposure, click the single right arrow button
 a few times to lighten the video by 1⁄3 of a stop.
NOTE: Clicking the double right arrow button
 will lighten the video by a full stop.
Next to Vibrance, click the single left arrow button
a few times to desaturate the colors of the video.Next to Vibrance, click the single right arrow button
a few times to make the colors in the video pop more.Click the Reset All button to go back to the original. We are going to adjust the look of the video using one of the presets.
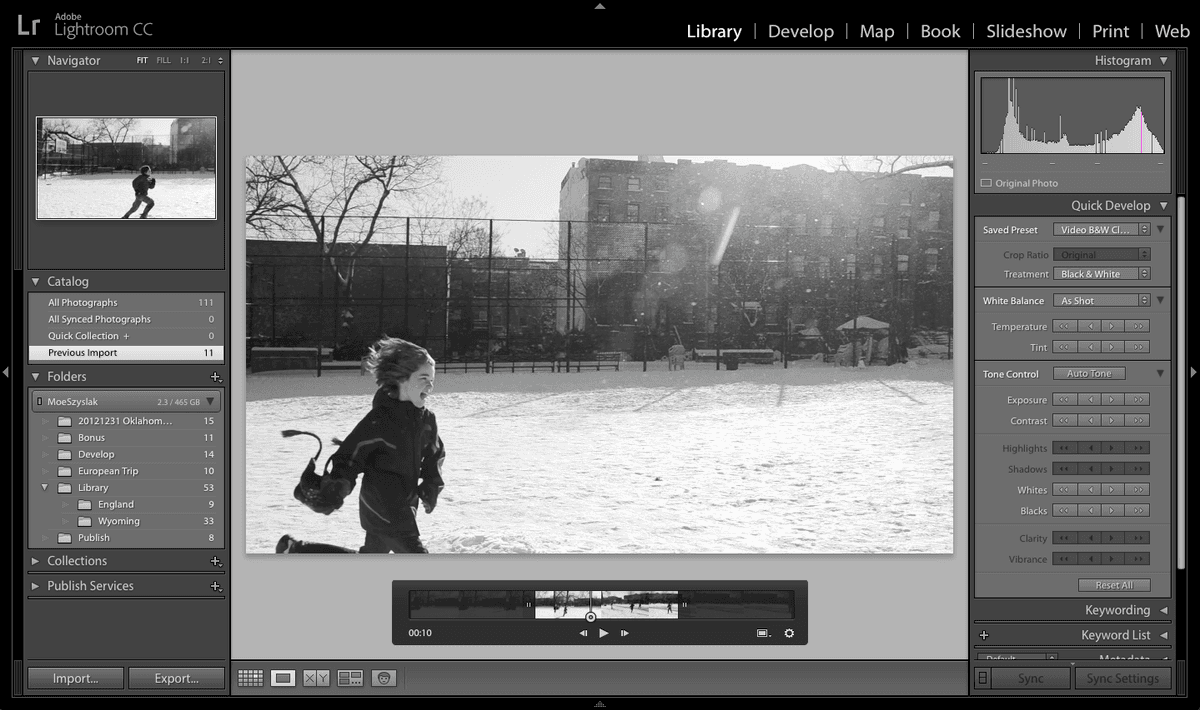
At the top of the Quick Develop panel on the right, from the Saved Preset menu select Lightroom Video Presets > Video B&W Classic.
Notice the video was made into black and white.
Click the Reset All button. We want more control over the adjustments we want to make.
Press D to switch to the Develop module. As you can see, video is not supported in this module, but there is a workaround.
Press G to go back to Grid View.
With the video
_DSC5595.MOV still selected, press E to re-enter Loupe View.Drag the Current Time Indicator to any 00:13 frame.
Now we can see the exposure issues better.
At the bottom of the thumbnail, click the box
and select Capture Frame.Press the G key to go back to Grid View.
In the Catalog panel, click All Photographs.
Notice that the Frame that you just captured appears as a JPEG (
_DSC5595-1.jpg) in Grid View to the right of the video. (If Lightroom isn’t displaying file extensions, hover over the thumbnail to see a tooltip with this info.)We can edit this image in the Develop module and then apply the same settings to the entire video. Select the photo
_DSC5595-1.jpg and hit the D key.- In the Basic panel on the right, make the following adjustments (move the slider or type the number in the text box to the right of the slider):
- Temp: Change to + 20 to warm it up a little bit.
- Exposure: Change to + 0.90.
- Contrast: Change to + 16.
- Whites: Reduce to − 23 so there’s a little more richness in the light.
- Vibrance: Change to + 33.
- Click the Before & After icon
 at the bottom of the screen to view the differences.
 - Take the Whites down a tiny bit more to − 45.
Let’s apply the changes we’ve made to this Frame to the whole video. Press the G key to go back to Grid View.
Cmd–click (Mac) or CTRL–click (Windows)
_DSC5595.MOV to select both the video and the JPEG.At the bottom of the right panel, click the Sync Settings button.
In the Synchronize Settings dialog, click the Check None button.
- Check the following settings:
- White Balance
- Under Basic Tone, check Exposure, Contrast, and White Clipping.
- Under Color, check Vibrance.
- Process Version.
Click the Synchronize button.
Notice how the settings from the JPEG were applied to the video. Sweet!
Press Cmd–D (Mac) or CTRL–D (Windows) to deselect all photos and videos.
The three dots at the top right of the video image indicate that it’s still processing. It may take a few minutes.
When the updates are done processing, select the video (
_DSC5595.MOV) and press E.Press the spacebar to play the video to see that the warmth and exposure changes we applied to the photo are now applied to the video.