Lists: The Data Model & Linking the UI to Code
What This Tutorial Covers
Model Classes
Represent list data with Swift structs and classes.
IBOutlet & IBAction
Connect storyboard elements to your code.
Update Cycle
Reflect data changes back to the UI.
Noble Desktop's Full-Stack Web Development Certificate teaches programming fundamentals that transfer across mobile, web, and desktop development.
Discover how to refine your iOS development skills with this comprehensive tutorial that covers everything from cleaning up view controller files to linking UI elements to their corresponding code.
Cleaning up the View Controller & Table View Cell Files
We don’t need all the code Xcode provided us. Let’s clean up each file now so we can then devote our entire focus to creating connections.
If the Project navigator is hidden, show
 it now. Then select ListsVC.swift.
Delete the comment inside viewDidLoad.
Uncomment and clean up the prepare function, and make the commented MARK code easier to find. Leave the import line alone. The class should look like:
class ListsVC: UIViewController {

   override func viewDidLoad() {
      super.viewDidLoad()
   }

// MARK:—Navigation————————————override func prepare(for segue: UIStoryboardSegue, sender: Any?) {

   }

}
NOTE: MARK comments help you section off your code. To make the Navigation section easier to find, we added dashes. Feel free to add as many as you want.
In the Project navigator, switch to ListItemsVC.swift.
Inside the ListItemsVC class, delete everything except the actual code in the viewDidLoad function, so your class appears as follows:
class ListItemsVC: UIViewController {

   override func viewDidLoad() {
      super.viewDidLoad()
   }

}
NOTE: We do not need to prepare for a segue in this file because it corresponds to the final UI screen in the flow of navigation.
In the Project navigator, switch to ListTitleTVCell.swift.
Inside the class, delete the awakeFromNib function.
Delete the comment inside the setSelected function as shown:
class ListTitleTVCell: UITableViewCell {

   override func setSelected(_ selected: Bool, animated: Bool) {
      super.setSelected(selected, animated: animated)
   }

}
The setSelected function specifies what happens when an object (in this case the Table View Cell) is selected. In a later exercise, we’ll write code that changes the color when this row is selected.
In the Project navigator, switch to ListItemTVCell.swift.
Clean up this Table View Cell code in the exact same way we did for the first table cell. If you need guidance, look at the code listed a couple steps earlier.
Connecting the First UI Screen to Its Respective Files
The process for linking UI elements to the code will be similar to the previous apps you’ve created, with the exception that there are multiple files that need outlet or action connections. Let’s first link up the visuals associated with our first View Controller and its corresponding Table View Cell file.
In the Project navigator, switch to Main.storyboard so we can link up our UI elements here with the code files we just trimmed down.
Select the entire Root View Controller in the middle by clicking on its white top bar (it probably says Lists). Its View Controller icon
 should now be selected.
Select the Adjust Editor Options icon
 and choose the Assistant option.
Because we assigned the ListsVC class for this View Controller in the last exercise, the corresponding file ListsVC.swift should appear to the right of the Storyboard.
Let’s hide everything except the Editor. Click the Hide or show the Navigator
and Utilities  buttons, as well as the Hide Document Outline button
  .
.We have quite a few objects to connect to our code, so it’s possible you may make a mistake during the process. Take a moment to read the following sidebar so you know how to delete an outlet or action connection.
Just in Case: How to Delete a Storyboard Connection
In the Swift file where you dragged the object, look at the far left of the connection code. You should see this icon
 , which indicates an active connection. You need to remove it, or the app will not work as expected!
In the example below, we accidentally dragged from a constraint to the code. If you do something like misspelling a name, creating the wrong type of connection, or dragging to the wrong file, go to the Storyboard. Click on the object you dragged, then CTRL–click or Right–click on it:

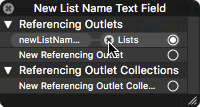
A menu will appear. Under the Referencing Outlets heading, you should see the name of your outlet followed by the name of the file where you dragged it. To the left of the file name, click the X to remove it:
Dismiss the pop-up by clicking the X at its top left.
- Back in the code, the connection icon should now be inactive
 . That means your connection is gone, so you can delete the line now.
Let’s first link the text field to the code. In the Storyboard, make sure the Lists View Controller’s Add new list text field is visible. Then hold the Control key (or the Right mouse button) and drag from the text field to the Swift file under this line:
class ListsVC: UIViewController {In the prompt that appears, set the following:
Name: newListNameTextField (Remember to pay attention to case!) Type: UITextField Storage: Weak To apply the connection, click Connect (or press Return).
We’ve got our first outlet in the file where it’s needed! Because the label is for inputting the name of a new list, we named it very descriptively, as is the best practice. If we ever forget what this does, the name will help us remember.
We need to connect the Table View as well because we’re going to summon it at a certain point. Hold Control and drag from the Table View to the Swift code, releasing once you see the blue line under the following:
@IBOutlet weak var newListNameTextField: UITextField!In the prompt that appears, set Name to listsTableView and click Connect.
Whenever the user clicks the Plus (+) button to add a new list name to the app, it’ll need to execute some logic. That means we’ll need to create an action for it.
In the Storyboard, hold the Control key and drag from the Plus button to the Swift file underneath the viewDidLoad method’s final curly brace (}).
In the prompt that appears, set the following:
Connection: Action (don’t forget this setting!) Name: addListButtonTapped Type: Any Press Return. We’re done with this file, so feel free to tidy up the spacing if you haven’t already. (Feel free to do this in the other files as you go.)
We can switch to the file where its outlet will belong, go to the Storyboard and click directly on the List Name label (not its yellow background!) to select it.
To switch files without reshowing the Project navigator, go to the very top of the ListsVC.swift file. To the right of the word Automatic, click on the file name and from the menu, select ListTitleTVCell.swift as shown below:

In the Storyboard, hold the Control key and drag from the List Name label to the Swift file underneath this line of code:
class ListTitleTVCell: UITableViewCell {In the prompt, set Name to listTitleLabel and press Return.
This label isn’t the only thing in our table cell that we want to be changeable. If you look in the project’s Assets folder, you’ll see two cell background files (for different states). To change the image, we’ll need a new outlet.
In the Storyboard, hold the Control key and drag from the image view with a yellow background to the Swift file underneath this line:
@IBOutlet weak var listTitleLabel: UILabel!In the prompt, set Name to backgroundImageView and press Return.
Connecting the Second UI Screen to Its Respective Files
In the Storyboard on the left, scroll so you can see the third and final UI screen.
Click on its white top bar. Its View Controller icon
should now be selected.ListsItemsVC.swift should appear to its right! Remember that this is because we set its class in the previous exercise.
Under the ListItemsVC class name, create the following two outlets:
Item to Drag Name of Outlet Add new item text field newItemNameTextField Table View itemsTableView Control–drag from the Plus (+) button to the Swift file underneath the viewDidLoad’s final curly brace.
Set an Action connection named addItemButtonTapped with a Type of Any. Then click Connect. We’re done with this file, and only have one more to go!
Back in the Storyboard, click on the yellow-bordered Check button to select it.
Go to the very top of the ListItemsVC.swift file. To the right of the word Automatic, click on the file name and from the menu, select ListItemTVCell.swift.
Under the ListItemTVCell class name, create the following two outlets:
Item to Drag Name of Outlet Check button checkButton Item Name label itemNameLabel In order to change the Check button’s image, we’ll need to create an action. Control–drag from the Check button to the Swift code underneath the itemNameLabel outlet.
Set an Action connection named checkButtonTapped with a Type of Any. Then press Return. We’re ready to get coding!
Creating List & List Item Classes in the Data Model
At the top right of Xcode, click the Hide or show the Navigator button
.Then click the Show the Standard editor icon
 .
.Let’s keep Main.storyboard here in the Editor just in case we want to see how the classes we create will get used in the UI.
We can start modeling our data, press Cmd–T to open a new tab. Then in the Project navigator that is now showing, click on Data Model.swift.
Change the import line as shown:
import UIKitLet’s first model a list item (such as “feed the goats” on a farmer’s to-do list). In addition to the title, the user is going to need to check a list item as either completed or not completed using the Check button we added in the previous exercise. Model these attributes as shown below:
import UIKit

class ListItem {
   var title: String
   var checked: Bool
}
We can create an instance of this class (and get rid of that pesky red error), add the following initializer:
var checked: Bool

init(itemTitle: String, checked: Bool = false) {
   title = itemTitle
   self.checked = checked
}
This sets the checked parameter to false by default, ensuring that the user will need to check off the item (setting it to true) after it’s been created.
Let’s take a moment to think about the user experience. It’s quite likely an impatient or novice user will press the Plus (+) button that adds a new list item while the text field is still blank. We don’t want to add empty list items, so we need to make our initializer fallible. After the init keyword, add a question mark (?) as shown:
init?(itemTitle: String, checked: Bool = false) {Fallible initializers can return nil in case the information we provide to the object is not validated correctly. To ensure it will do this, add the following line:
init?(itemTitle: String, checked: Bool = false) {
   if itemTitle == "" { return nil }
   title = itemTitle
   self.checked = checked
}
If the item title that’s passed to the initializer is empty, the initializer will return nil, preventing it from creating a new object.
On to the next class—one that models the list itself! The list will need a name (such as “To-Do”), as well as one or more list items (like “feed the goats”). We’ll store the list items in an array. Below the ListItem class, add the new class as follows:
class ListItem {Code Omitted To Save Space
}

class List {
   var title: String
   var items = [ListItem]()
}
Once again, you will see that pesky red error that reminds us this class doesn’t have any initializers. We’ll get to that soon.
The array that contains objects of the ListItem class is currently empty, as there is nothing inside those lonely parentheses. To make sure that items can get added to the array once the user clicks the button, add the following didSet property observer:
var items = [ListItem]() { didSet { items.sort() } }We’re sorting the list using the predefined sort method. But what criteria should it use? Xcode doesn’t know what we want, so you’ll see a new red error. To get rid of it, make it sort alphabetically by adding the following closure shown in bold:
var items = [ListItem]() { didSet { items.sort() { $0.title < $1.title } } }Let’s break that down:
Whenever a new item is inserted, this closure will compare two items. If the title of the first item ($0) is inferior to (<) the title of the second item ($1), then it will go first. (Remember that arrays start counting at 0!)
The alphabet is sorted from A–Z, so a letter closer to the top of the alphabet (such as “g”) will get sorted above a letter that comes after it (such as “p”). If our farmer were to add “feed the pigs” to her to-do list, it would get sorted underneath the “feed the goats” item.
Let’s initialize this puppy! Because the user might accidentally add a blank list, we’ll need another fallible initializer. Create it as shown below:
var items = [ListItem]() { didSet { items.sort() { $0.title < $1.title } } }

init?(listTitle: String, items: [ListItem] = [ListItem]()) {
   if listTitle == "" { return nil }
   title = listTitle
   self.items = items
}
In the first line, we are initializing the object with a set of items. By default, it will create an empty array of the ListItem class when we create a new list from the UI. (The default value of
[ListItem]() means an empty array.)The app as a whole stores a list of lists (which then have a list of list items). Let’s model our “list of lists” by creating an array that anything in the app can access. To do so, create a global variable outside of our two classes:
class List {Code Omitted To Save Space
}

var lists = [List]() { didSet { lists.sort() { $0.title < $1.title } } }
This code looks pretty familiar! When we created our “list of list items” earlier, we added a property observer that sorts by alphabetical order. This line does exactly the same thing to create our list of the List class.
Save the file and keep Xcode open so that we can continue with this project in the next exercise.