April 1, 2026Dan Rodney/4 min read

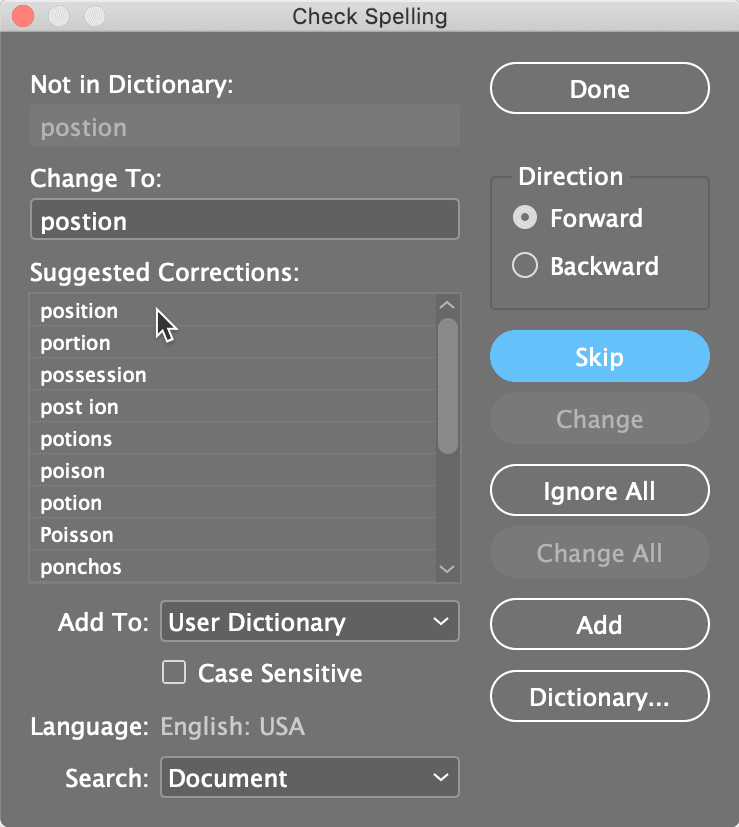
Leaders Magazine: Searches & Spell Check

Master InDesign Spell Check and Typography Corrections

Tutorial Focus

This tutorial combines essential proofreading skills with typography best practices to ensure your InDesign layouts maintain professional standards.

Topics Covered in This InDesign Tutorial:

Spell Checking, Find/change

Key Skills You'll Master

Spell Checking

Learn to use InDesign's built-in spell check feature to catch and correct errors across documents or individual text frames.

Typography Cleanup

Use Find/Change to eliminate common typography errors like double spaces and improper hyphen usage.

Exercise Preview

spell check

Exercise Overview

Even the most stunning designs lose credibility when riddled with spelling errors and typographic inconsistencies. Professional publishers understand that content quality and visual excellence must go hand-in-hand. In this exercise, you'll master InDesign's comprehensive spell check capabilities and leverage the powerful Find/Change feature to eliminate common typography mistakes that mark amateur work. These tools are essential for maintaining the professional standards expected in today's competitive publishing landscape.

Design Quality Impact

Great designs are not as good when they contain spelling mistakes. Professional layouts require both visual appeal and editorial accuracy.

Spell Checking

InDesign's spell checking goes far beyond basic word processors, offering sophisticated controls for professional publishing workflows. Let's explore how to use these features effectively.

  1. If yourname-leaders.indd is not already open, re-open it from your working files.
  2. Navigate to the bottom of the right-hand page (page 21) and zoom in on the author bio text frame for better visibility.
  3. Click to place your text cursor anywhere within the text frame to establish your starting point.
  4. Access the spell checker through Edit > Spelling > Check Spelling.
  5. When the spell check dialog opens, locate the Search dropdown menu at the bottom and set it to Story. In InDesign terminology, a "story" encompasses either a single text frame or a series of threaded text frames—this setting ensures you're only checking the current author bio, not the entire document.
  6. Click Start to begin the spell checking process.
  7. InDesign's spell checker is thorough but not infallible—it may flag proper nouns, industry-specific acronyms, or even correctly pluralized words as errors. This is where your editorial judgment becomes crucial:

    For correctly spelled words: Click Ignore All to skip all instances of this word, or Skip to ignore just this occurrence.

    For genuine misspellings: You have two correction options:
    • Select an appropriate suggestion from the list and click Change to apply it.
    • If the correct spelling isn't suggested, manually type the proper spelling in the field and click Change.
  8. To expand your practice and ensure document-wide consistency, change the Search menu to Document at the bottom of the Check Spelling panel.
  9. This comprehensive setting will spell check every text element in your entire file, ensuring nothing slips through the cracks.

InDesign Spell Check Process

1

Navigate and Position

Open yourname-leaders.indd, zoom in on the author bio text frame on page 21, and place your text cursor in the frame.

2

Access Spell Check

Go to Edit > Spelling > Check Spelling to open the spell checking interface.

3

Configure Search Scope

Set the Search menu to 'Story' to check only the current text frame, or 'Document' to check all text in the file.

4

Review and Correct

For each flagged word, either select a suggested spelling and click Change, or type the correct spelling manually.

Spell Check Scope Options

FeatureStoryDocument
CoverageSingle text frame or threaded framesAll text in entire file
Best Use CaseFocused editing of specific contentComprehensive document review
Time RequiredQuick, targeted checkFull document review
Recommended: Use Story for quick edits, Document for final review
Judgment Required

InDesign may flag proper nouns, acronyms, or plurals as errors. Always use your professional judgment to determine whether a word truly needs correction.

Using Find/Change to Fix Common Typography Errors

Beyond spell checking, professional typography requires attention to spacing, punctuation, and typographic conventions. InDesign's Find/Change feature is your secret weapon for batch-correcting common mistakes that can undermine your design's credibility.

  1. A frequent amateur mistake is using double spaces between sentences—a holdover from typewriter days that has no place in modern typography. To eliminate this error efficiently, navigate to Edit > Find/Change.
  2. Ensure the Text tab is selected at the top of the panel.
  3. Verify that Direction remains set to its default Forward setting.
  4. Set the Search dropdown menu to Document for comprehensive coverage.
  5. In the Find what field, clear any existing content and press the Spacebar twice to input two consecutive spaces.
  6. In the Change to field, clear any content and press the Spacebar once to specify the correct single space.
  7. Click Find Next to locate the first instance of double spacing.
  8. Once InDesign highlights an occurrence, click Change to preview the correction and verify it's working as expected.
  9. With confidence in the operation, click Change All to fix every instance throughout your document.
  10. InDesign will display a confirmation dialog showing how many replacements were made. Click OK to acknowledge the changes.

    Another common typography error involves using hyphens with spaces instead of proper em dashes. Professional typography uses em dashes without surrounding spaces for better visual flow and readability.

  11. Clear both the Find what and Change to fields in the Find/Change panel to prepare for the next operation.
  12. Configure the search parameters as follows:

    Find what: Enter one space, then a hyphen (-), followed by another space. This targets the incorrect spacing pattern.
    Change to: Click the find change spec char arrow special characters menu and select Hyphens and Dashes > Em Dash. Ensure no spaces precede or follow the em dash—this creates the clean, professional appearance that distinguishes quality typography.
  13. Click Find Next to locate the first hyphen-with-spaces instance, then click Change All to correct every occurrence.
  14. Acknowledge the completion dialog with OK, then close the Find/Change panel to return to your layout.
  15. Congratulations! You've successfully elevated the typography quality of your Leaders Magazine project. These seemingly small corrections make a significant difference in professional presentation. Save your refined work to preserve these important improvements.

Key Takeaways

1InDesign's spell check feature can be scoped to individual stories or entire documents, providing flexibility for different editing needs
2Professional judgment is essential when reviewing spell check suggestions, as proper nouns and technical terms may be incorrectly flagged
3The Find/Change feature is powerful for correcting systematic typography errors across large documents
4Double spaces between sentences are considered unprofessional in modern design and should be replaced with single spaces
5Em dashes should be used without surrounding spaces, unlike hyphens which may have spaces in certain contexts
6Setting search scope to 'Document' ensures comprehensive correction of typography errors throughout the entire file
7The Find/Change panel's specialized menus provide access to proper typographic characters like em dashes
8Combining spell checking with typography cleanup creates a complete editorial review process for professional layouts

RELATED ARTICLES