Drawing Bézier Curves
Illustrator vs Photoshop
Illustrator
Vector — scale infinitely, perfect for logos, icons, illustration.
Photoshop
Raster — fixed resolution, perfect for photos and pixel art.
Vectors Print Crisp
Logos and icons stay sharp at any size.
Round-Trip
Place .ai into Photoshop or vice versa — both apps coexist.
Noble Desktop's Illustrator Bootcamp teaches the Pen tool, vector drawing, and pro illustration.
Master the art of drawing Bezier curves and improve your InDesign skills with this comprehensive tutorial that covers the Pen tool, segments, anchor points, and more.
Exercise Preview
Exercise Overview
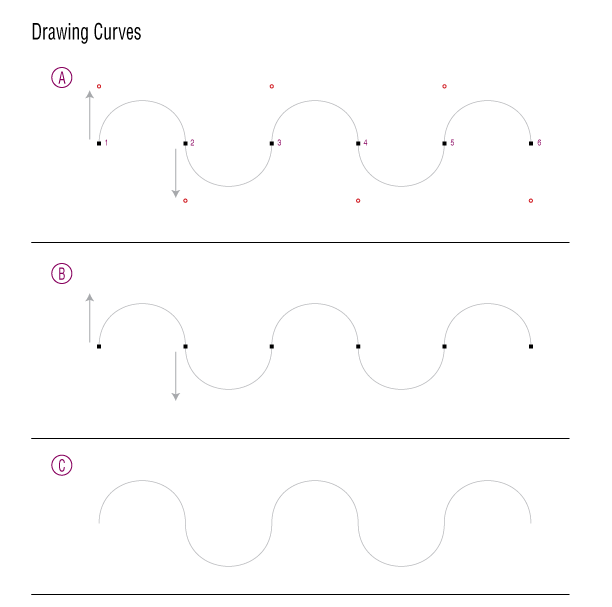
In this exercise we show you how to draw Bézier curves. Knowing how to draw them will allow you to draw paths to put text along, make interestingly shaped graphic boxes, and much more. Drawing Bézier curves may seem hard in the beginning, but with practice, they become easier to draw.
From the InDesign Class folder, open the file Bezier.indd.
(If you get a message about modified links, click Update Links. The exercise file was created on a different computer, but InDesign will automatically find the files for you in their expected folder.)
If the template graphic doesn’t look great, you may be viewing it in a low-resolution preview mode. Choose View > Display Performance > High Quality Display to make it look better.
Choose the Pen tool
 .
.This file is a template for you to trace so you get practice drawing Bézier curves. Here are some tips to keep in mind as you draw:
In part A, you will drag from the numbered black points to the red circle. This must be done in ONE motion, NOT a click and then click–drag.
If you mess up, just undo it.
When done drawing one line, do any one of the following to deselect the line before continuing on to draw the next line:
- Choose Edit > Deselect All.
- Switch to the Selection tool
 and click off the line to deselect it.
 - Hold Command (Mac) or Control (Windows) (a shortcut to get the Direct Selection tool) and click off the line to deselect it.
Each section removes some of the “training wheels” so you get a chance to get better at judging how far to drag, and in what direction.
For additional tips on drawing Bézier curves, please refer to the Quick Reference for Drawing Paths reference in the back of the book.