Tracking Changes
InCopy Workflow Basics
Editorial Separation
Editors write in InCopy while designers lay out in InDesign — at the same time.
Assignments
InDesign exports specific frames as InCopy assignments.
Check In/Out
Lock prevents simultaneous edits to the same content.
Live Updates
Changes flow back to InDesign automatically.
Noble Desktop's Graphic Design Certificate covers InDesign — the layout app that pairs with InCopy for editorial workflows.
Learn how to effectively track, review, and manage text changes using InCopy's "Track Changes" feature, including how to enable tracking, show or hide changes, and accept or reject modifications.
How It Works
You can track changes such as deleting, adding, or moving text. However, InCopy does not track formatting changes such as applying a style sheet. Once you have a body of text and want to start tracking changes, you must turn on Track Changes by doing the following:
First, make sure the Track Changes toolbar is showing at the top of the screen by going to Window > Track Changes.
Then at the top of the screen, click the Enable Track Changes button
 .
.
Showing/Hiding Changes
Changes are highlighted in a color. Typically, you only want to see changes if you are reviewing them (so you can accept or reject the change). When typing normally, the tracked changes can be visually confusing, so you’ll probably want to hide them. To hide or show tracked changes, click the Show Changes button  at the top of the screen. (Make sure you are in Galley or Story view to see the changes.)
Accepting & Rejecting Changes
When you are viewing the changes, here’s how to accept or reject a change.
Place the text cursor anywhere in a change (which is highlighted in a color).
In the toolbar at the top of the screen, use these buttons to accept or reject changes:
Accept Change  :
:Accepts the change you are currently in Reject Change  :
:Rejects the change you are currently in Accept All Changes  :
:Accepts all changes Reject All Changes  :
:Rejects all changes Once you’ve accepted or rejected a change, the colored highlight disappears.
NOTE: To navigate between the changes without having to find them yourself, use the Next Change
 or Previous Change
  buttons in the toolbar at the top of the screen.
The Change Info Panel
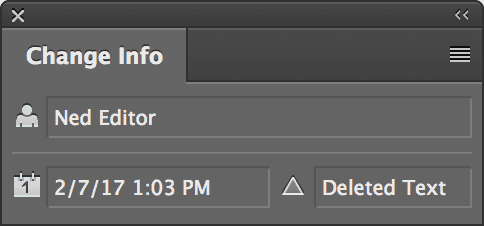
You can see additional information about a change such as:
- Who made the change.
- When the change was made.
- What the change was (added text, deleted text, moved text).
To see this info, open the Change Info panel by going into Window > Change Info.