Setting Preferences
Illustrator Vector Workflow
Set Up Document
Pixels for digital, points/inches for print. Add bleed if printing.
Build Shapes
Combine basic shapes with Pathfinder before reaching for the Pen tool.
Apply Color & Effects
Swatches panel for repeatable color; Effects for shadows, glows.
Export
SVG for web, PDF for print, PNG for raster handoff.
Noble Desktop's Illustrator Bootcamp teaches the Pen tool, vector drawing, and pro illustration.
Get started with this comprehensive guide on setting up Adobe Illustrator for optimal use, which includes preference adjustments, workspace configuration, and understanding the use of critical features.
Setting Preferences
Download the class files. Refer to the Downloading the Class Files page at the beginning of the workbook on how to download and install the class files.
Launch Adobe Illustrator.
NOTE: This book has been tested with Illustrator 2020. If you’re using an older or newer version, most things should still work the same or similarly.
Go into the Illustrator menu (Mac) or the Edit menu (Windows) and choose Preferences > Selection & Anchor Display.
Increase the size to match the settings below:
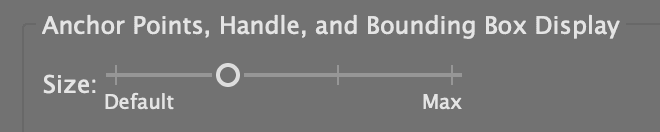
NOTE: This changes the size of anchor points and handles. Enlarging them makes finding and selecting them easier. This preference will remain for future files.
Click OK.
Go to the View menu. If Smart Guides is checked, choose it to uncheck it.