Patterns
What This Tutorial Covers
Pattern Creation
Define repeating tiles for fills.
Pattern Library
Reusable patterns saved to the Swatches panel.
Pattern Editing
Modify patterns non-destructively.
Noble Desktop's Graphic Design Certificate covers Illustrator alongside Photoshop and InDesign.
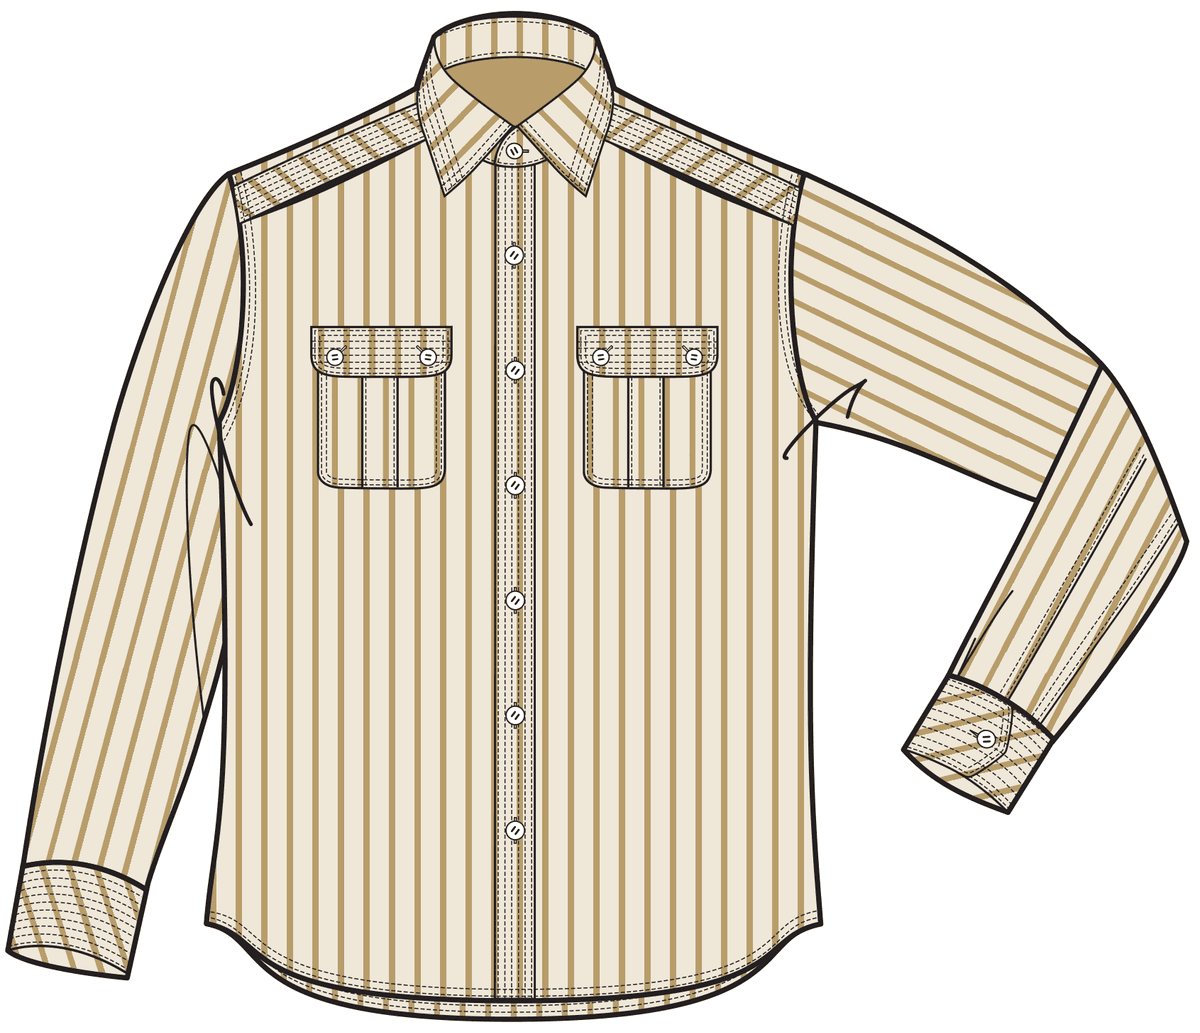
Learn how to create and manipulate patterns in Illustrator to create a realistic striped shirt illustration in this comprehensive tutorial, perfect for those looking to enhance their skills in the fashion industry.
Exercise Preview
Working with Layers
In the Illustrator Class folder, open the shirt-pattern.ai file.
This shirt template is going to be used for multiple patterns and colors. There are a lot of elements in this shirt that will make it easy to select the wrong object by mistake. To simplify things, we’re going to start by separating it between layers.
Choose the Selection tool
 .
.Click to select the main section of the shirt front.
We want to select everything that is colored with this blue and then separate it from the lines for easy selection. Go to Select > Same > Fill Color.
Now we have everything that has the blue fill selected. What we really want is everything that doesn’t have the blue fill, or the inverse of the current selection. Go to Select > Inverse.
If you aren’t already in the Layers panel, go to Window > Layers.
From the Layers panel menu
 , choose New Layer.
Rename it lines and press Return (Mac) or Enter (Windows).
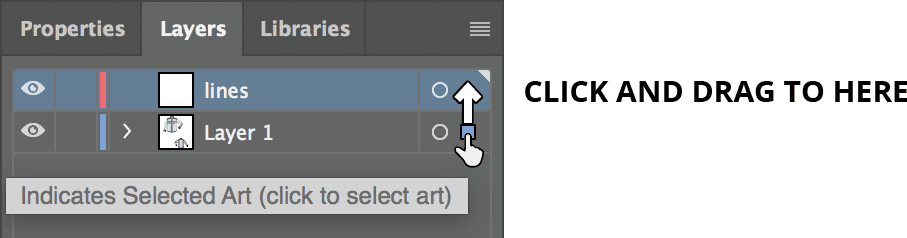
In the Layers panel, notice the small blue square next to Layer 1. That square represents everything currently selected. Click and drag the square up into the lines layer.
When finished, all the line artwork will be on its own layer. In the Layers panel, double–click Layer 1.
Name it color and click Return (Mac) or Enter (Windows).
Deselect by clicking off the artboard.
In the Layers panel, click the eye
 next to the color layer to hide it. Make sure that none of the blue-filled sections are still visible. (If some are, use the Magic Wand tool
  to select them, then drag the small red square from the lines layer down to the color layer. The remaining blue will disappear.)
When finished, click the eye
again to show the layer.We’re going to be coloring the shirt, so we don’t want to select the decorative lines. Click in the box to the right of the eye to lock the lines layer. A Lock icon
 should appear next to the layer.
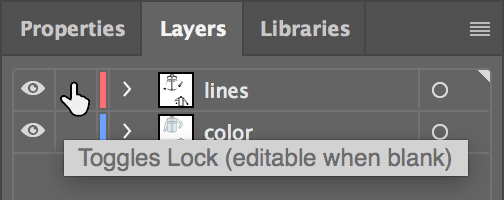
Getting the Colors Ready
Open the standalone Swatches panel (Window > Swatches).
Notice the color swatches. Each main color has a 75%, 50%, 25%, and 10% tint following it. In the Swatches panel, select the Brown color at the end.
Open the Color panel by going to Window > Color.
In the Color panel, slide the Tint (T) down to 75%.
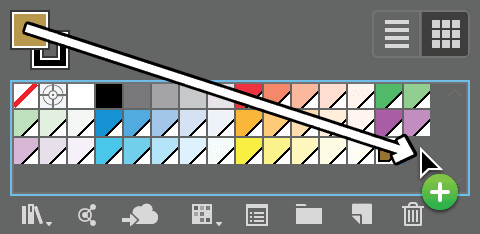
Add this new color to the Swatches panel by dragging from the Fill color near the top left of the Swatches panel down next to the Brown swatch at the end:
In the Color panel, slide the Tint (T) down to 50%.
Add this new color to the Swatches panel.
Continue this process, making swatches for 25% and 10% tints.
Making the Stripes
We’d like to make a stripe pattern for the shirt. If you think about it, stripes are just long rectangles that repeat.
In the Layers panel, select the color layer to activate it.
Select the Rectangle tool
 .
.Click once in a blank area below the shirt and enter:
Width: 0.09 in Height: 1 in Click OK.
Zoom in so you can see the stripe more clearly.
Switch to the Properties panel. Then give it a Brown 10% fill (in the Swatches
 ) and no stroke.
With the Rectangle tool
, click once to the right of the first rectangle and enter:Width: 0.03 in Height: 1 in Click OK.
In the Properties panel, give this one a Brown 50% fill and no stroke.
Choose the Selection tool
.Select both rectangles by Shift–clicking them.
In the Properties panel’s Align section directly under the word Align, click on the Align To button that looks like
 or
or  . Choose Align to Selection.
With the rectangles still selected, click Vertical Align Top
 .
.Click once on the left rectangle (the light brown stripe) to highlight it in a thicker blue. This important step sets the key object. It means this rectangle won’t move, and the other rectangle will be moved in relation to it.
At the bottom right of the Properties panel’s Align section, click the More Options button
 to display all the available options in the Align panel.
At the bottom of the Align panel, make sure Distribute Spacing is set to 0 in.
Click Horizontal Distribute Space
 .
.The two rectangles (light brown on the left and medium brown on the right) should now fit together with no space between them. That’s the meat of our pattern; now it just needs to repeat.
Creating a Pattern
Both the stripes should still be selected. If not, select them again.
Click and drag the stripes onto the Swatches panel, as if you were creating a new color swatch.
You just created a pattern swatch! Delete the stripes—we don’t need them anymore.
In the Swatches panel, select the newly created pattern swatch.
From the Swatches panel menu
, choose Swatch Options.Name it brown stripes and click OK.
Applying the Pattern
We have a shirt front and a shirt back to color. We’ll just focus on the front for now. Select the shirt front’s main section.
In the Properties panel, Fill it with the brown stripes swatch (our new pattern).
Notice that the pattern repeats seamlessly to fill the entire area.
NOTE: If you see small white lines between repeats, don’t worry—they are only display glitches. They will not print this way.
Press Cmd–A (Mac) or CTRL–A (Windows) to select everything in the color layer.
Click the brown stripes swatch to apply the pattern to the rest of the shirt.
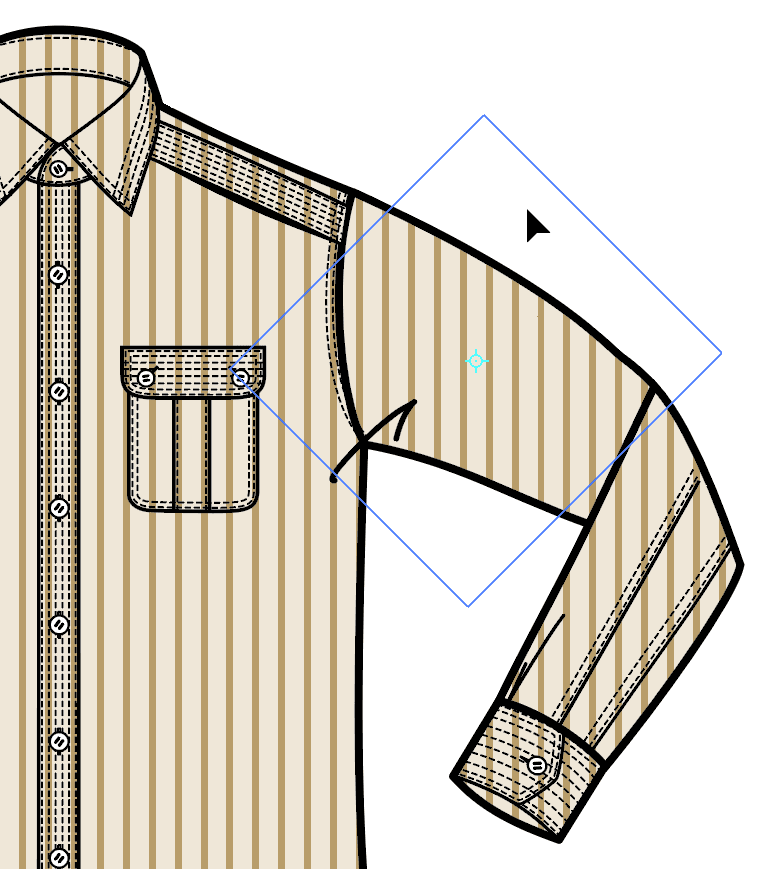
Click in a blank area of the document to deselect. Very nice, but the direction of the stripes should not all be the same across the entire shirt. The pattern on the sleeves and collars should be angled.
Select the sleeve on the left.
Double–click the Rotate tool
 . (If you don’t see it, click and hold on the Reflect tool
  to get it.)
Set the following, but do NOT click OK until we say!:
- Angle: 180°
- Check on Preview.
- Check on Transform Patterns.
- Uncheck Transform Objects.
Place the cursor in the Angle box.
Press the Down Arrow key to change the angle 1 degree at a time. Watch the pattern rotate in the background!
- The angle of the pattern should follow the direction of the sleeve, probably somewhere around 170 degrees, but set it however you think looks best.
- Click OK.
- With the Selection tool , select the top part of the sleeve on the right.
- Choose the Rotate tool .
While holding the Tilde (~) key, drag in a counterclockwise direction until the box rotates about 45° (as shown below). When done, release the mouse to see that only the pattern was rotated!
That’s a huge time saver! Holding Tilde (~) makes an adjustment that only affects the pattern, not the object.
- Holding Tilde (~), click and drag again as needed to rotate the pattern to the appropriate angle.
- Continue this process to rotate the other part of this sleeve, the collars, the shoulder pieces, and the sleeve cuffs if you’d like.
- Select the part you want to rotate.
- Choose the Rotate tool .
- Hold the Tilde (~) key as you drag to rotate only the pattern.
Scaling a Pattern
The back of the shirt has the same pattern, but the diagram is much smaller, so the pattern should also be smaller to look accurate.
Scroll down to the shirt back below.
With the Selection tool
, drag a selection box over the entire shirt back.Double–click the Scale tool
 and check the following options on or off as indicated, but do NOT click OK until we say!:
- Check on Preview.
- Check on Transform Patterns.
- Uncheck Transform Objects.
- Uncheck Scale Corners.
- Uncheck Scale Strokes & Effects.
Next to Uniform, type in 100%.
With the cursor still in the Uniform box, hold the Down Arrow key until you scale it down to 60%.
TIP: Shift–Down Arrow does bigger amounts so it goes faster.
Click OK.
The sleeve patterns need rotating as well. Use whichever method you prefer: either drag while holding the Tilde (~) key or double–click the Rotate tool
.
Adding the Finishing Touches
We should change a few minor things in the shirt front to clean this image up. We don’t want the pocket patterns to line up with the rest of the shirt front, even if their pattern angles will be the same.
Choose the Selection tool
.Select the top of the leftmost pocket on the larger shirt.
Hold Tilde (~) and press the Left Arrow key to nudge just the pattern to the left.
Select the bottom of the pocket on the left.
Hold Tilde (~) and press the Right Arrow key to nudge just the pattern to the right.
Do the same for the pocket on the right.
Select the inside of the shirt that is directly behind the collar.
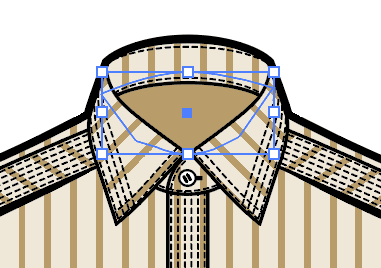
Give it a Brown 50% fill.
Select File > Save As and name the file yourname-shirt.ai.
In the dialog that appears, leave the default options checked and click OK.
Close the file.