Auto Layout: Introduction
Figma Productivity Tools
Plugins
Lorem ipsum, icon libraries, accessibility checkers, exporters.
Dev Mode
Inspect, copy CSS, export assets — for developer handoff.
FigJam
Whiteboarding companion — sticky notes, diagrams, brainstorms.
Branching (Org plan)
Git-like branching for design files.
Noble Desktop's UX & UI Design Certificate teaches Figma in depth alongside the full UX process.
Our Figma tutorial guides you through the use of features such as Tidy Up for Even Spacing, Auto Layout, Alignment Constraints, and more, helping you to arrange, reorder, resize, and adjust the space around or between design elements.
Exercise Preview

Opening the File
In Figma, if you’re not on the homescreen (file browser), do the following:
- In the Desktop app: Click the
 Home tab (Mac users can also choose File > Open File Browser).
 - In the Web app: At the top left, click the Main menu button
 and choose Back to files.
- In the Desktop app: Click the
- To open a local file, click
 Import file (may be an icon near the top right).
 Navigate into Desktop > Class Files > Figma Class and double–click on Hawaii.fig to choose it.
Once the file has uploaded, click Done and double–click on the file to open it.
Zooming into Your Selection (Preference)
This is a very tall page, so being able to zoom in on a specific area will be extremely helpful. There’s a preference to zoom in to your selection, but it’s off by default. Let’s turn it on.
- Click the Main menu button and in Preferences, if Keyboard zooms into selection does not have a check next to it, choose it to turn it on.
Using Tidy up for Even Spacing
- Select something at top of the page (the exact object doesn’t matter).
- Zoom to 100% by hitting Shift–0.
- If needed, scroll a bit so you can see the text in the navbar at the top.
- Let’s even out the spacing between the text links in the navbar. In the navbar, click on Maui.
- Hold Shift and click on the other 3 items (Oahu, Kauai, and Big Island).
- Zoom to the selection by hitting Shift–2.
We want to add auto layout, but it does not show up in the Design panel yet. Let’s see how to make it appear.
Hover over the selected text and click the Tidy Up button
 that appears at the bottom right of the text selection. You won’t see this button if you’re zoomed out too much. Another way to do this, is at the top right of the Design panel, click More options
  and choose Tidy up.
- With the text still selected, hover over Oahu and drag the pink dot that appears to the right, moving Oahu to the right of Kauai.
- That was cool, but undo that by hitting Cmd–Z (Mac) or CTRL–Z (Windows).
- Hover of the space between any of the text and drag the pink line left or right to see all the spaces adjust (if you don’t see the link lines, zoom in).
Another great feature, but undo it by hitting Cmd–Z (Mac) or CTRL–Z (Windows).
Using Auto Layout
Now that the objects are evenly spaced, the Auto layout option now appears in the Design panel on the right.
- In the Design panel, to the right of Auto layout click the Plus(+) button.
- In the Design panel, under Auto layout, hover over the Spacing between items
 icon and drag left and right to change the spacing.
 - Undo that by hitting Cmd–Z (Mac) or CTRL–Z (Windows).
Alignment Constraints
As you changed the spacing, the navbar grew from left to right. We really want the navbar to be anchored on the right so as changes it would grow from right to left.
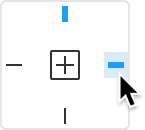
In the Design panel, under Constraints click the right constraint as shown below:
In the Design panel, under Auto layout, hover over the Spacing between items
icon and drag left and right to change the spacing.Notice that it now grows from right to left!
Let’s finish this by setting a specific amount of space. Set Spacing between items
to 30.