How to Set a Picture as a Background in Excel: Using the Page Layout Tab to Add Graphics to Your Sheets
Build a Dashboard
Source Sheet
Raw data lives on its own tab — never touched after import.
Pivot Sheet
Pivot tables that summarize the source data.
Dashboard Tab
Charts, slicers, and KPIs that draw from the pivots.
Refresh on Open
Right-click pivot → PivotTable Options → Refresh on open.
Noble Desktop's Excel Bootcamp covers formulas, pivot tables, data analysis, and VBA.
Continue your understanding of Excel's Page Layout tab with insights into the "Background" and "Print Titles" commands, where you can customize your sheet's physical view on your screen, structure your printed pages' layout, and much more.
In the last article on the Page Layout tab, we left off with the “Breaks” icon. Next is the “Background” icon. This puts a graphic in the background of the sheet. This background does not print, it merely shows on the physical viewing of the sheet on your computer screen. When you click it, you get this dialog:
From here, you can find an image (picture) from a file that already exists on your computer, or from a Bing image search, or from the cloud or Facebook! Here, a Bing Image search for “candy” yielded this result:

When the top right picture of candy corn is selected, and you click the Insert button, you see this in the worksheet:

Notice that the command “Background” in the ribbon became “Delete Background”. If you use this command, be sure to have your image be a light one, because it’s very difficult to see any data! Did you notice the $145.00 in cell H15?
The next command is the Print Titles command. When you click this command, you get this dialog:

This screenshot shows that row 1 will be repeated at the top of each printed page. Notice the dotted line after row 55. This indicates where the page break will occur. This is a “natural” page break, as opposed to one which you set manually by clicking on the “Breaks” command, which would show as a solid line. Without setting the print titles, page 2 and beyond would not have column headings. Setting Print Titles to be row 1 ensures the headings will show at the top of each page. Print titles can only be entire row(s) and/or entire column(s). If $1:$2 were selected as the “Rows to repeat at the top”, then the empty row 2 would also be part of the rows repeated at the top of each page. In addition, if $A:$A were selected as “Columns to repeat at left”, then that would print at the left of every page as well. The order of the printout can be Down then over or Over than down, as seen in the dialog.
This command shows the same dialog as the Custom Margins dialog (seen in Part 1 of 3), except the “Sheet” tab is the active one instead of the “Margins” tab.
This dialog, also known as the Page Setup dialog, can also be seen by clicking the little “dialog launcher” arrow under the Print Titles:

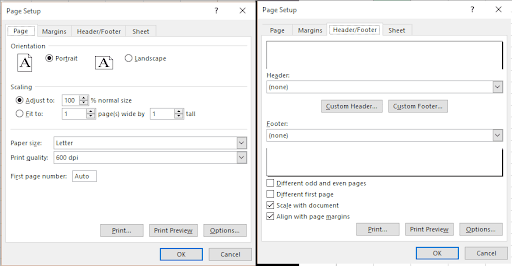
Here, you can access any of the 4 tabs of the Page Setup, which includes all the commands we’ve been showing in the Page Layout tab, so it’s the most powerful of all these commands because it’s all in one place. We’ve seen the Margin and Sheet tabs already. Here are the other 2 tabs
- The Page tab, where you can set portrait or landscape, the zoom factor of the printout (shrink so more will print on one page, or expand so less will print), how to fit the printout (for example, if you see (by Print Preview, for example) that it takes 2 pages to print everything but the 2nd page has 3 rows only, you can click the “Fit to” option button to force it to print on one page), the paper size, print quality, and what to use as the first page number (1 being the default if you select “Auto”). You can also remove the value in the number of pages wide or tall, and then Excel will adjust as necessary. For example, if you set it to be 1 page wide by (blank) pages tall, then it will print as many pages as necessary but will be one page wide.
- The Header/Footer tab, where you can set what shows on the header and/or footer of each page.
In part 3 of 3, we will be examining this last tab as well as the remaining items related to printing!