Social Media Ad: Animating Opacity & Audio/Video Fades
What This Tutorial Covers
Opacity Keyframes
Smooth visual fades in and out.
Audio Fades
Linear and exponential audio level animation.
Sync Points
Align fade timing with music or voice cues.
Noble Desktop's Video Editing & Motion Graphics Certificate teaches After Effects alongside Premiere Pro, Cinema 4D, and DaVinci Resolve.
In this After Effects tutorial, you'll learn to animate opacity, work with audio and video fades, modify work area and composition duration, copy and paste keyframes, and create a vignette effect using masks.
Exercise Preview

Darkening the Background Where the Logo Will Go
-
Use the Spacebar to preview the timeline:
- After the photo drop down, we want to add a logo and text.
- The logo will start black and then change to white.
- We want the black logo to blend into a black background, so let’s darken the background image (on the right side, over which we’ll be placing the logo).
- Move the timeline playhead to 6;14
- Select the background layer.
- If you don’t see the Effects & Presets panel on the right of the window, choose Window > Effects & Presets.
- In the Effects & Presets panel’s search field type linear
- Double–click on the Linear Wipe effect to add it to the selected layer.
-
In the Effect Controls panel (on the left of the window), set the following:
- Transition Completion: If the stopwatch
 is blue, click it to turn it white (we do not want to change this over time).
 - Transition Completion: 50%
- Wipe Angle: 0x-90° (notice it’s a negative 90!)
- Feather: 800
- Transition Completion: If the stopwatch
-
Move the playhead to 7;00
Adding the Logo
Let’s add the company logo and animate it, changing it from a black silhouette into the normal logo.
- Find the Project panel. You can click on the Project tab in the same group as Effect Controls, or choose Window > Project (near the bottom).
- In the Project panel, from the 01—Images folder drag logo.png into the Timeline above the smoke 2 layer.
- Hold Shift and press the Up Arrow key 3 times (to move the logo up, so there’s space below for some type).
-
With the
[logo.png]layer selected, hit Cmd–D (Mac) or CTRL–D (Windows) to duplicate it. -
Select the top
[logo.png]layer.- Hit Return (Mac) or Enter (Windows) and rename the layer logo—white
- Press Return (Mac) or Enter (Windows) again to finalize the name.
-
Rename the bottom
[logo.png]layer to logo—black -
Use the Spacebar to preview the timeline.
Notice how the logo does not move.
- Move the playhead to 7;00
- Select both logo layers (click on one, then hold Shift and click on the other).
-
Set the Parent menu (to the right far of the layer name) for the logo layers to 1.controller
-
Use the Spacebar to preview the timeline.
Notice how the logo now moves with the other elements (because it follows the parent null object controller).
- Move the playhead to 7;00
- Press Cmd–Shift–A (Mac) or CTRL–Shift–A (Windows) to deselect all layers.
- Click the eye
 for the logo—white layer to hide it.
 - Select the logo—black layer.
- In the Effects & Presets panel’s search field type fill
- Double–click the Fill effect.
- In the Effect Controls panel, to the right of Color, click on the color swatch to open the color picker.
- Change the hex code to #00,000 and click OK.
-
Click the eye
for the logo—white layer back to show it.
Animating Transform Properties: Opacity
- Move the playhead to 7;04
- Select the logo—white layer.
- Press T to show Opacity.
- Change Opacity to 0
- Click the stopwatch by Opacity to create a keyframe.
- Move the playhead to 7;24
- Change Opacity to 100
-
Use the Spacebar to preview the timeline.
You should first see the black logo silhouette, and then the white logo fades in. Nice!
Adding the Website Text
- Move the playhead to 7;24
- In the Timeline select the Rockin’ Guitar Picks layer.
- Press Cmd–D (Mac) or CTRL–D (Windows) to duplicate it.
-
Choose Window > Align.
-
In the Align panel:
- Confirm that Align Layers to is set to Composition
- Click the Align Center button
 .
.
- Hit P to show Position in the Timeline.
-
Set the second Position value to 380
This should move the text below the logo.
-
In the Timeline, double-click on the name of the new Rockin’ Guitar Picks 2 layer to highlight the text and:
- Type guitarpicks.com
- Hit Cmd–Return (Mac) or CTRL–Enter (Windows) to finalize the text change.
-
In the Tools panel at the top left of the window, choose the Selection tool
 .
.
Changing Work Area & Composition Duration
Our composition is 15 seconds long. We started with plenty of time, because it’s much easier to trim off extra time, than to add time. Now that we have enough of our animation done, let’s remove the extra time we don’t need at the end. We could go into Composition Settings and change Duration, but let’s see another way.
- If you can’t see the entire width of the timelime (from start to finish), keep hitting the – (minus) key to zoom out until you see the entire timelime.
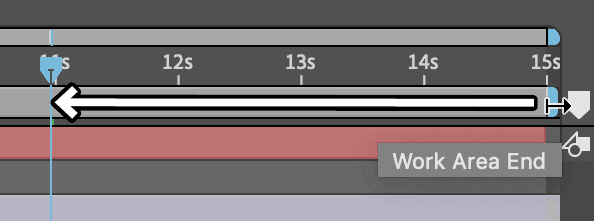
- Move the playhead to 10;29
-
As shown below, at the top right of the Timeline, drag the blue line for Work Area End over to the playhead while holding Shift (so it snaps to the playhead).
NOTE: The work area is used to define the following:
- The area that will be exported when creating the final video file.
- The area you preview. If you want to loop over a specific area of an animation, you can use the work area to watch only that part.
-
We could stop here and let the work area define the length for exporting, but then we wouldn’t be able to use change the work area in the future if we wanted to change the preview area.
Here’s a somewhat hidden trick. CTRL–click (Mac) or Right–click on the gray work area bar and choose Trim Comp to Work Area.
-
The unwanted end of the timeline has been removed!
NOTE: The benefit of using Trim Comp to Work Area is you can trim off the beginning and/or end. When you go into Composition > Composition Settings and change the Duration, it will only trim off the end.
-
Choose File > Save or hit Cmd–S (Mac) or CTRL–S (Windows).
Adding a Video Fade
For our entire animation, instead of starting and ending the abruptly, let’s add fade in and out the video and audio. A beneficial side effect of doing this will be the start and end will be the same, creating a seamless loop!
-
In the Timeline, select the photo2 layer (so the new layer will go on top of it).
-
Choose Layer > New > Solid, or press Cmd–Y (Mac) or CTRL–Y (Windows).
-
Click the Make Comp Size button to ensure this layer’s dimensions match the composition.
-
Click on the color swatch to choose a color and:
- Set the hex code to #00,000
- Click OK to close the color picker.
-
Click OK again to create the solid layer.
-
With the
[Black Solid 1]layer selected in the Timeline:- Hit Return (Mac) or Enter (Windows) to edit the layer name.
- Type in fade—in/out
- Hit Return (Mac) or Enter (Windows) to finalize the name change.
- Move the playhead to the beginning of the Timeline.
- Press T to show the fade—in/out layer’s Opacity.
- Click the stopwatch for Opacity.
- Move the playhead to 0;15
- Change Opacity to 0
- Use the Spacebar to preview and see this gives us a quick 15 frame (half second) fade in from black at the beginning.
- Move the playhead to 10;14
-
On the far left of the Timeline, in the keyframe controls
 click the Add or Remove Keyframe diamond
  to the left of the Opacity property.
This creates a new keyframe with the same value as the previous keyframe.
- Move the playhead to the end of the Timeline 10;29
- Change Opacity to 100
- Use the Spacebar to preview. Notice the fade out to black at the end, and how the loop is now visually seamless (but the audio loop is not seamless).
-
Hit T to hide Opacity.
Adding an Audio Fade
- Move the timeline playhead to 0;15
- Select the bg audio layer at the bottom of the Timeline.
- Hit the L key twice (LL) to reveal its waveform.
- Hold Shift and hit the L key to also show the Audio Levels.
- Click the stopwatch for Audio Levels to set the a keyframe.
- Move the playhead to the beginning of the Timeline.
- Change Audio Levels to -24 dB.
-
With the first Audio Level keyframe selected (it should be blue), hit Cmd–C (Mac) or CTRL–C (Windows) or choose Edit > Copy to copy the keyframe.
We’ll use it again later and don’t want to have to memorize the value.
-
Move the playhead to 10;14
- On the far left of the Timeline, in the keyframe controls click the Add or Remove Keyframe diamond to the left of the Audio Levels property.
- Move the playhead to 10;29
-
Press Cmd–V (Mac) or CTRL–V (Windows) or choose Edit > Paste to paste the keyframe.
-
Use the Spacebar to preview.
We now have an audio fade that matches the video fade, making a seamless loop.
-
Hit U to hide the keyframes.
-
Choose File > Save or hit Cmd–S (Mac) or CTRL–S (Windows).
Optional Bonus: Creating a Vignette Effect with a Mask
A vignette is a darkening of the edges around a photo/video. We can create this using a color layer and a mask.
- Move the playhead to 1;00
- In the Project panel, expand the Solids folder.
- Drag Black Solid 1 into the Timeline below the fade—in/out layer.
-
With the
[Black Solid 1]layer selected in the Timeline:- Hit Return (Mac) or Enter (Windows) to edit the layer name.
- Type in vignette
- Hit Return (Mac) or Enter (Windows) to finalize the name change.
- In the Tools panel, click and hold on the Rectangle tool
 and choose the Ellipse tool
  .
. -
Now that the Ellipse tool
is visible in the Tools panel, double–click on it.This creates a mask on the selected layer that matches the dimensions of the composition.
- In the Timeline, the vignette layer should now have a Masks option (with a Mask 1 in it).
- In the menu to the right of Mask 1 change Add to Subtract.
- Hit the F key to reveal the Mask Feather property.
- Change the Mask Feather property’s first value to 400
- Hit the T key to reveal the layer’s Opacity.
- Change Opacity to 85
- Hit the T key again to hide Opacity.
- Use the Spacebar to preview to finished animation.
-
Choose File > Save or hit Cmd–S (Mac) or CTRL–S (Windows).