Movie Photo Tiles: Working with Numerous Layers
InDesign Layout Essentials
Master Pages
Recurring layout elements like page numbers, headers, footers.
Paragraph Styles
Reusable type formatting that scales across long documents.
Frames & Threading
Text flows between frames — the heart of multi-column layout.
Object Styles
Reusable formatting for image frames, callout boxes, sidebars.
Noble Desktop's Graphic Design Certificate covers InDesign alongside Photoshop and Illustrator.
Dive into this comprehensive After Effects tutorial and learn about cropping layouts in Photoshop, randomizing layer entrances, orchestrating exit animations, and more. Develop your skills through practical exercises, including importing, scaling, and animating a tiled grid of 16 movie photos.
Exercise Preview

Scaling up Each Tile Using a Null Object
In the finished video, the tiles scale up steadily throughout the animation’s duration. Since we have so many layers, using a null object will save us a lot of tedious work!
Switch to After Effects, where yourname-Movie Intro.aep is open.
Press Cmd–I (Mac) or CTRL–I (Windows) or do a File > Import > File.
Navigate into Desktop > Class Files > After Effects Class > Movie Intro > Assets, and double–click on yourname-Movie Tiles-120 Scale.psd.
In the pop-up that appears, make sure the following options are selected:
Import Kind: Composition – Retain Layer Sizes Layer Options: Merge Layer Styles into Footage NOTE: Only the two Composition options can bring in the file with its guides intact. One of the reasons we’re choosing to Retain Layer Sizes is because the Composition option will crop away anything outside the PSD’s canvas such as our photos.
Click OK to finish importing the PSD (the cropped grid with a guide layout).
In the Project panel, double–click on the yourname-Movie Tiles-120 Scale comp (the one with a filmstrip icon
 to its left) to open it in the Timeline.
Go to Composition > Composition Settings and change the following settings:
Composition Name: 01-Movie Tiles Duration: 0;00;05;06 Click OK to apply the composition settings.
In the Timeline, select the NYC layer (the topmost one) so the null object we’re about to add will be added above it.
Go to Layer > New > Null Object.
Rename it Scale Null because we’ll use it to control the Scale property. NOTE: It’s important to do the next steps in order, otherwise the scaling won’t work properly.
In the Timeline, select the Scale Null layer and press S to bring up its Scale.
We want all the photos to be at their current size when the movie ends, so press End (or Fn–Right Arrow) to get to the last frame at 5;05.
Under the Scale property, click the stopwatch
 and set either value to 120%. This will not affect the photos yet.
Select all the photo layers: click on Layer 2 and Shift–click on Layer 17.
In the Parent & Link column on the left side of the Timeline, click into the menu of any selected layer. Change it from None to 1. Scale Null to make them all child layers.
We can set the initial keyframe, press Home (or Fn–Left Arrow) to get to 0;00.
In the Scale Null layer, change Scale to 100% and all the child photo tiles will have black around them, and their anchor points positioned on an intersection of guides.
Randomizing the Order in Which the Photos Animate in
We’re ready to create the entrance animation! Feel free to watch the movie again to see that the tiles randomly fade in and fall down into place until the 1-second mark.
Because we’ll need to animate into this grid, this is another time when it’s easier to animate from the last keyframe to the first. Click on the timecode
 and type 1
.(including the period) to get to 1;00 (1 second and 0 frames), the end of the animation sequence we’re about to create.In the Timeline, lock both the Scale Null and BG layers (the top and bottommost layers, respectively) by going to the left of the layer names and clicking the empty boxes under the Lock column
 .
.Go to the View menu and make sure both Snap to Guides and Lock Guides are checked on. (If both are unchecked, you’ll need to go into the menu twice.)
If the guides disappear, go to the bottom left of the Composition panel, click the Choose grid and guide options button
 , and check on Guides.
In the Timeline, select a photo layer and go to Edit > Select All. Because the null object and black BG layers are locked, they won’t be selected. Convenient!
Press the P key to bring up the Position property for all the layers.
Hold Shift and type T to also bring up the Opacity property for all the layers.
All of your layers should still be selected. It’s important to keep all of the layers selected until we say to do otherwise!
In any selected layer, keyframe the Position property by clicking its stopwatch
.Click the stop watch on for the Opacity property as well.
Our animation will start 15 frames earlier, so move the playhead to 0;15. (Remember that you can click the timecode to do this.)
In the Composition panel, press the Up Arrow key until you have moved all the tiles up by one and a half gridlines and the bottom row is positioned as it is in the image below. TIP: Use Shift–Up Arrow when starting off because it moves 10 times faster.
Change the Opacity for one of the layers to 0% and it will apply to them all.
To smoothen the exit, drag a selection around the entire column of keyframes
 at 1;00.
Go to Animation > Keyframe Assistant > Easy Ease In to slow down the animation as the playhead approaches this final set of keyframes.
Shorten the start of the layers at 15 frames: move the playhead to 00;15, and either press Option [ (Mac) or ALT [ (Windows). Or you can hover over the left end of the layer until you see a resize icon
 and drag it to the right.
Press Spacebar to play it back. So far, so good!
To jazz up this animation, let’s randomize the order in which the photos come in. Use any method to move the playhead to 1;00 where you can see all the tiles.
Click in an empty area of the Timeline to deselect all the layers.
In the Tools panel, choose the Selection tool
 if it isn’t already.
In the Composition panel, Shift–click to select 8 photos that are nicely distributed across the composition. The decision is up to you.
Go to Layer > Arrange > Bring Layer to Front to place all 8 selected layers at the top of the stack in the Timeline.
Then go to Layer > Arrange > Send Layer Backward, so they’re below the Scale Null.
Locate the “Label Color” column in the Timeline, under an icon that looks like a tag
 . Change the Label Color of one of the selected layers to Orange, to visually separate them from the rest.
Make sure your In column is showing in your Timeline. If not, CTRL–click (Mac) or Right–click (Windows) where it says Layer Name or Source Name at the top, and from the dropdown menu, choose Columns > In.
To the left of any selected layer, turn Solo
 on so we can see them in isolation.
Deselect all of your layers by going to Edit > Deselect All.
Set the In columns for each of the orange-labeled layers, several frames apart randomly. Type in any odd number from 15 to 29 for each In column. We found 27,15,19,29,21,17,25, and 23 to work well.
Slowly drag the playhead forward in time to see the randomized fade-in and drop down animation. Nifty!
Toggle Solo
off, then click in an empty area of the Timeline to deselect.To repeat the process for the remaining eight photo layers:
- Make sure the playhead is at 1;00 (you can use keyframe navigation).
- Scroll down in the Timeline so that you can clearly see the 8 photo tiles layers below the orange-labeled ones.
- In the Timeline’s In column, selecting the layers one at a time, set their In column values 2 frames apart, this time on even numbers 16-30. We found that 24,20,18,22,14,26,28,16 works well.
- Play it back using Spacebar.
- Make changes to the In column of both sets of layers, until you’re satisfied with the result.
- Press Spacebar to preview from the beginning. Congratulations, the first part of the animation is done!
Organizing the Exit Animation’s Diagonal Groups
In the finished video, you may remember that the layers fade out and fall down in diagonal groups, starting with the lower left photo and moving up to the upper right. (Feel free to re-watch it any time needed.) Before we add the animation, let’s get organized. We’ll reorder the Timeline layers from the bottom up, and change their label colors so we remember which diagonal group each photo tile is part of.
Move the playhead to 3;00, the start of the exit animation we’ll create.
Press Cmd–A (Mac) or CTRL–A (Windows) to select all the Timeline’s photo layers.
To make the photos easier to organize, Select All the photo layers with Cmd-A (Mac) or CTRL A (PC) and then collapse their info in the Timeline by clicking on the down arrow
 next to one of them.
Click in an empty area of the Timeline to deselect the photos.
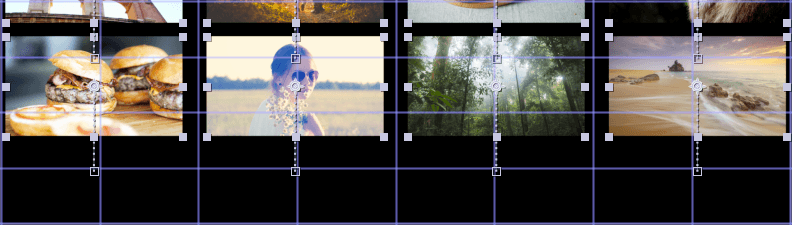
In the Composition panel, click on the photo tile in the bottom-left corner (the picture of three hamburgers). This will be our first diagonal.
In the Timeline, drag it down so it’s Layer 17, if it isn’t already.
Press Cmd–Shift–A (Mac) or CTRL–Shift–A (Windows) to deselect all.
Next in the animation sequence is a diagonal of two photos, one above the previous photo, and one to its right. Shift–click on both photos in this group, as shown in the screenshot below.

To visually distinguish these layers, click on the colored square to the left of the layer number and from the Label Color menu that appears, choose Green.
Notice the selection handles in the Composition panel and the layer bar color in the Timeline change to Green.
In the Timeline, drag the layers above Layer 17. They should become Layers 15–16.
Press Cmd–Shift–A (Mac) or CTRL–Shift–A (Windows) to deselect all.
Working upwards and to the right, continue Shift–clicking to select sets of diagonal photos in the Composition panel. Remember to deselect the previous ones before selecting the next group. Use the following table and the screenshot a few steps above to help you drag them to their proper place and assign a unique label color:
Group Where to Drag Label Color Third diagonal (3 photos) Above Layer 15 Red Fourth diagonal (4 photos) Above Layer 12 Pink Fifth diagonal (3 photos) Above Layer 8 Yellow Sixth diagonal (2 photos) Above Layer 5 Blue Last diagonal (1 photo) Below Scale Null (so it’s Layer 2) Fuchsia NOTE: The parent Scale Null layer should be Layer 1 so it is above its child photo tile layers. While the scale animation would work no matter where the null object is in our layer structure, keeping a parent layer above its child layers is best for keeping the Timeline organized.
Orchestrating the Exit Animation
With the playhead still at 3;00, select all unlocked layers (the 16 photos) by pressing Cmd–A (Mac) or CTRL–A (Windows).
Press the U key on the keyboard to show the pre-existing keyframes.
In any selected layer, add keyframes for both Y Position and Opacity by clicking the diamonds
 to the left of both property names.
Move the playhead forward 2⁄3 of a second later, to 3;20.
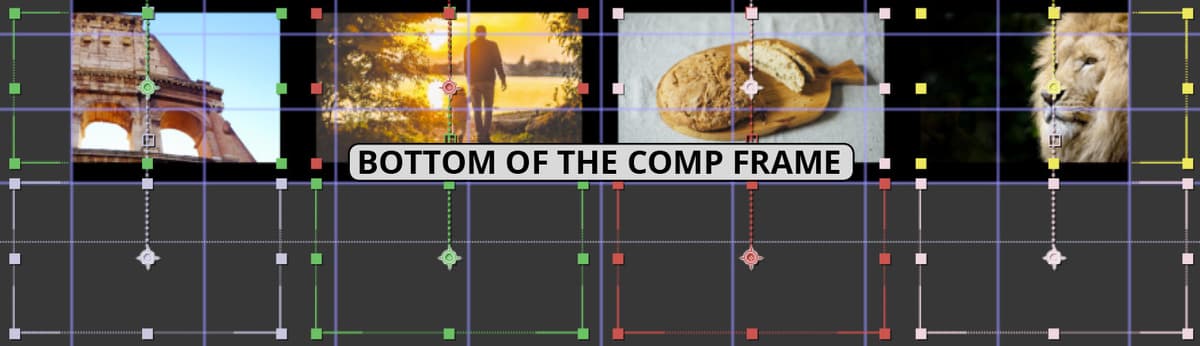
Use the Down Arrow key (adding Shift to the mix when you want to go fast) to move all the tiles down by around two and a half gridlines so the lowest row of photos is completely below the bottom of the frame, as shown below:
TIP: If you need to check your work, you can quickly zoom in to the Composition panel by pressing the period (
.) key enough times to confirm your result. To zoom back out, press the comma (,) key until you see the entire composition frame.Change the Opacity to 0% to add another set of keyframes here at 3;20.
To smooth out the beginning of this animation, drag a selection around the third column of keyframes
 at 3;00.
CTRL–click (Mac) or Right–click (Windows) on any selected keyframe and select Keyframe Assistant > Easy Ease Out to slow down the animation as the playhead leaves (goes out from) this second to last set of keyframes.
Press Cmd–Shift–A (Mac) or CTRL–Shift–A (Windows) to deselect.
Let’s stagger our keyframes based on the label colors. The bottommost layer (the three burgers with the Lavender layer color) is already done because it starts at 3;00. Move the playhead to 3;10, when the next diagonal will start falling down.
Near the bottom of the Timeline, inside the Green colored Layers 15–16, drag a selection around each of the two layers’ last set of 4 keyframes.
Start dragging the keyframes to the right, then press Shift. Release the mouse when the first keyframes in the set snap to the playhead at 3;10.
NOTE: Remember that if you press Shift before dragging, it will deselect the keyframe you clicked. That’s why it’s important to click and hold, THEN press Shift.
The Red keyframes will start their exit at 3;20. That’s 10 frames later, so we can use another nifty keyboard shortcut. Press Shift–Cmd-Right Arrow (or Shift–Fn–Down Arrow). Because we added Shift to the mix, we’ve moved forward in time by 10 frames!
Draw a box around all of the Red layers’ keyframes (that’s 3 sets of 4 keyframes).
Start dragging them forward, then hold Shift to snap to the first keyframes at 3;20.
Continue the process for the rest of the layer groups. Use the chart below to drag the playhead to the next position (which speeds up over time), then move the specified layers to that position:
Timeline Position Label Color 3;28 Pink layers (8–11) 4;06 Yellow layers (5–7) 4;12 Blue layers (3–4) 4;15 Fuchsia layer (2) Let’s preview! Press Spacebar and pat yourself on the back for a job well done.
Do a File > Save and leave this project open to use in the next exercise.