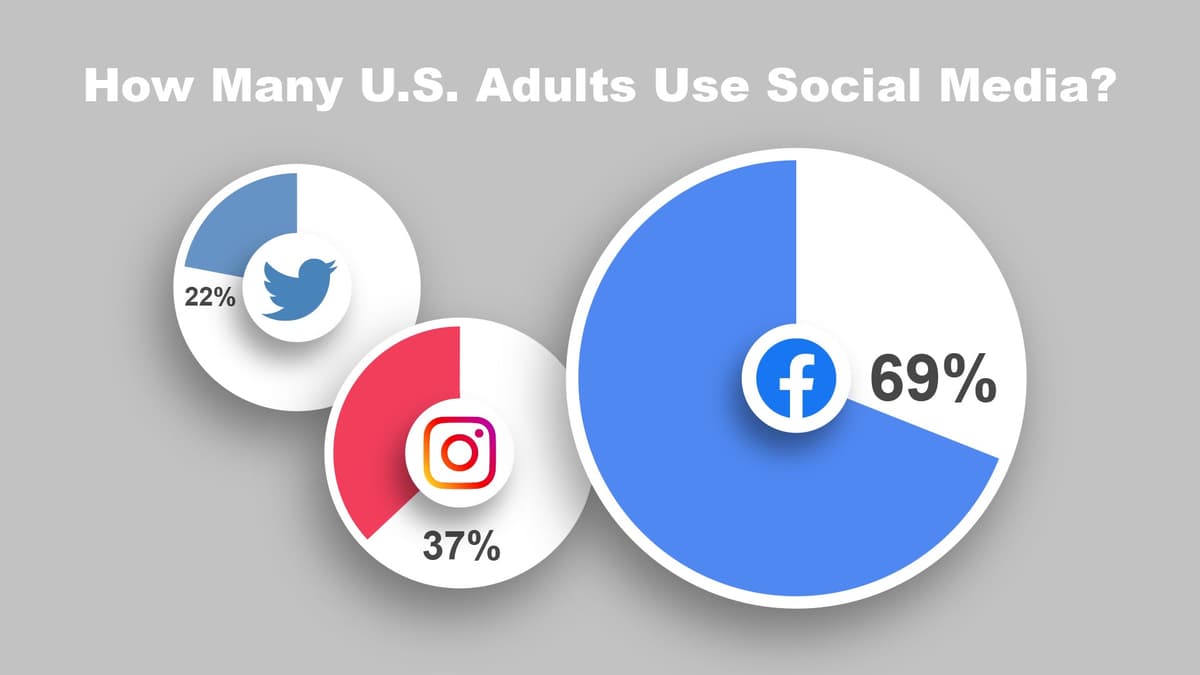
Creating an Infographic Animation
What This Tutorial Covers
Data Visualization
Animate charts, numbers, and graphs for storytelling.
Sequenced Reveals
Stagger element animation for clear data narrative.
Counter Animation
Animated numbers and percentages with expressions.
Noble Desktop's Video Editing & Motion Graphics Certificate teaches After Effects alongside Premiere Pro, Cinema 4D, and DaVinci Resolve.
Immerse yourself in this comprehensive After Effects tutorial that covers advanced techniques such as working with Adobe Illustrator files, converting Illustrator layers into native shape layers, trimming paths, and animating an infographic.
Exercise Preview
Organizing the Timeline
In the Timeline click on the Facebook Logo layer.
Hold Shift and click on the Facebook Circle layer (this also selects all the layers between them).
To the left of any of the highlighted layers, click the color box in the Label column
 and from the menu that appears choose Blue.
Select the Instagram Logo layer.
Hold Shift and click on the Instagram Circle layer to select all the Instagram layers.
To the left of any of the highlighted layers, click the color box in the Label column
and choose Red.
Select the X (formerly known as Twitter) Logo layer.
Hold Shift and click on the X Circle layer to select all the X layers.
To the left of any of the highlighted layers, change the label color to Purple.
- Select the Headline layer and change its label color to Yellow.
Select the X Logo layer.
- Hold Shift and click on the background layer to select all the in between layers.
- To the left of any of the selected layer’s names and to the right of the eye
 , locate the Solo switch column
  and click in the empty space to toggle it on for the selected layers.
- Press Cmd–Shift–A (Mac) or CTRL–Shift–A (Windows) to deselect all layers.
Turn OFF the Solo
for both the 22% and X Wedge layers.Now we can focus on only the layers we want to animate.
Animating Scale & Position
- Select the X Circle layer.
- Press S to reveal the layer’s Scale property.
Move the playhead to 0;15 and:
- Click the stopwatch
 next to Scale to enable animation.
- Click the stopwatch
Move the playhead to the beginning of the timeline and:
- Click on the either Scale value and change it to 0.
Move the playhead to 0;09 and:
- Change Scale to 125
There should be a Preview panel on the right side of the window.
If needed, expand the height of the Preview panel by dragging down the panel’s bottom divider to see all of its options.
- In the middle of the Preview panel, set Play From to Start of Range.
Return the Preview panel to its original size by dragging the bottom divider back up.
Press Spacebar to preview the Timeline. Observe the circle’s animation. The overshoot is a bit rough.
Press Spacebar again to end the preview.
CTRL–click (Mac) or Right–click (Windows) on the middle keyframe and choose Keyframe Assistant > Easy Ease (You can also hit the F9 key or fn–F9, depending on your computer’s setup).
- Use the Spacebar to preview the Timeline again. The overshoot bounce is a bit smoother now.
- Click on the X Circle layer’s Scale property name. You want to click on the actual name of the property to highlight all the keyframes (they’ll all become blue diamonds).
Choose Edit > Copy or press Cmd–C (Mac) or CTRL–C (Windows) to copy the currently highlighted keyframes.
Move the playhead to 0;09 (where the middle Scale keyframe is).
NOTE: You can use the J and K keys on the keyboard to navigate between keyframes. J jumps the playhead to the preceding keyframe and K jumps it to the next keyframe.
- Select the X Logo layer.
Choose Edit > Paste or press Cmd–V (Mac) or CTRL–V (Windows) to paste the copied keyframes onto the currently selected layer.
NOTE: The pasted keyframes will start at your playhead position.
Press U on the keyboard to reveal the keyframes on the selected X Logo layer.
Use the Spacebar to preview the Timeline.
Because the logo animation starts before the circle has finished, we created a slight stagger that adds appeal to the animation as a whole.
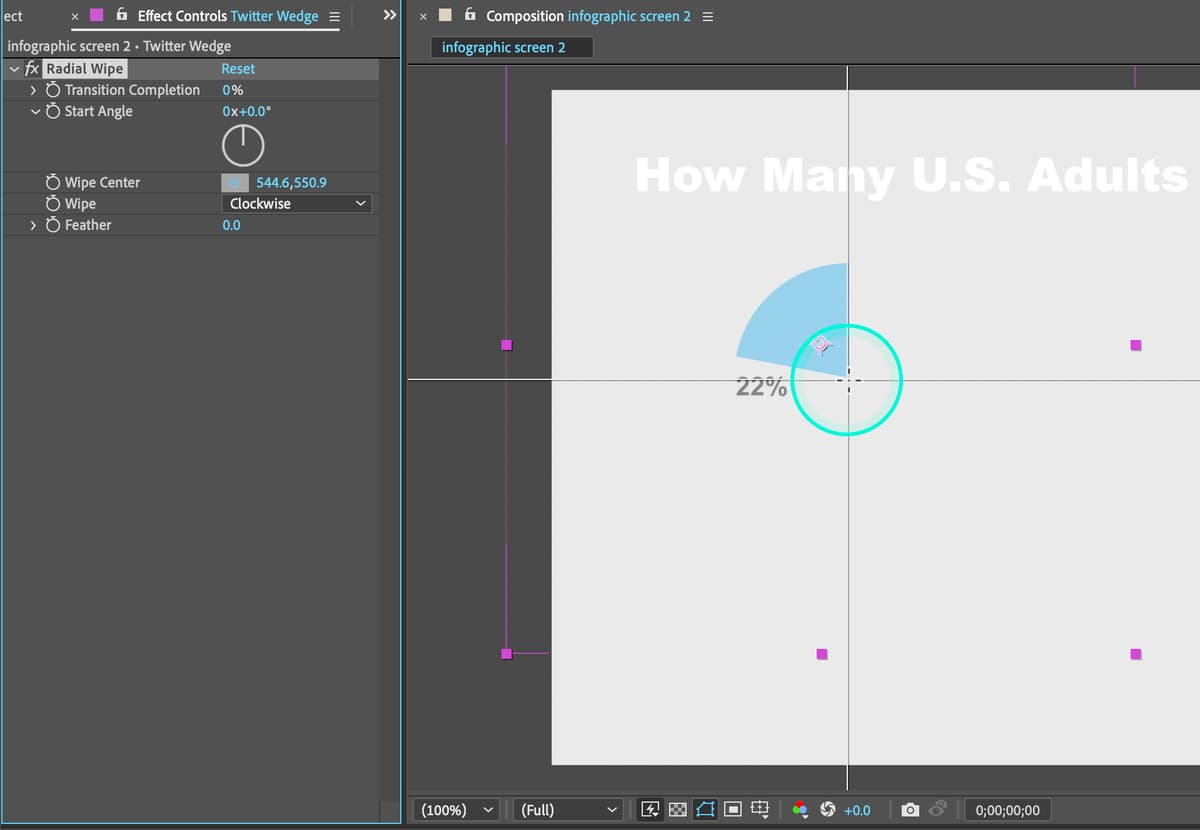
Animating with Effects: Radial Wipe
Effects are a powerful feature in After Effects that can completely change the look of your animation. Some effects alter existing layer content, some create completely new content and some can be used to animate a layer appearing on screen.
Click on the X Wedge layer to select it.
Click on the X Wedge layer’s solo
switch to make the layer visible again.Move the playhead to the beginning of the Timeline 00;00
In the Effects & Presets panel type radial wipe into the search field.
NOTE: You are looking for the effect the one listed under Transition. You do not want to use any presets that have a similar name.
Double–click on the Radial Wipe effect (Transition > Radial Wipe) to apply it to the selected layer.
NOTE: Applying an effect should open the Effect Controls panel. If for some reason it doesn’t you can choose Window > Effect Controls.
In the Effect Controls panel, locate the Wipe Center property:
- Click on the Point Selector
 to activate it.
 - In the Composition panel click at the base of the wedge.
- Click on the Point Selector
In the Effect Controls panel change Transition Completion to 100% and click on its stopwatch
.Press U on your keyboard to reveal the Transition Completion property in the Timeline.
NOTE: Pressing the U key reveals all properties with keyframes on your selected layer.
Change Transition Completion to 0 (zero).
NOTE: When you preview the animation if you notice that the wedge doesn’t appear at the wipe on in a single direction you may have to adjust the Wipe Center property.
Move the playhead to 00;15 (15 frames).
With the X Wedge layer still selected press the ‘[’ (left bracket) key on your keyboard to slide the layer’s In Point to the playhead.
Choose File > Save or hit Cmd–S (Mac) or CTRL–S (Windows).
Animating Transform Properties: Position
In this section of the lesson you will animate the 22% layer so it flies out from behind the logo.
- Move the playhead to 0;25
- Turn on the solo switch for the 22% layer so you can see that layer too.
- Select the 22% layer.
- Press P to reveal Position.
Click on the Position stopwatch
to create a keyframe for the 22% layer.This will be the ending keyframe of the animation.
Move the playhead to 0;20
Hover your cursor over the first Position value and drag to the right until the number slides behind the X logo.
We used a value of 430, but as long as the number is behind the logo it’s fine.
With the 22% layer selected, press Option–
[(Mac) or ALT–[(Windows) to trim the beginning of this layer to the playhead.This prevents the number from being visible before the logo appears.
Use the Spacebar to preview the animation.
The entire X animation is now complete.
Choose File > Save or hit Cmd–S (Mac) or CTRL–S (Windows).
Optional Bonus: Copying Animations to Other Layers
The Facebook and Instagram animations will work the same way. We can reuse the same animation by copying and pasting the keyframes we already made.
Turn off the solo switches
 for all of the X layers. This will make all layers in the composition visible.
Select the X layers (all the purple labeled ones) and:
- Press Cmd ~ (Mac) or CTRL ~ (Windows) to hide the properties of the all the layers.
- Press U to reveal the keyframes for the selected layers.
Click off the solo switch
for the Headline and background so all layers are visible.On the X Circle layer, click on the Scale property name to select all those keyframes.
- Cmd–C (Mac) or CTRL–C (Windows) or choose Edit > Copy.
- Select the Instagram Circle layer.
- Hold Cmd (Mac) or CTRL (Windows) and click on the Facebook Circle layer to select it too.
- Move the playhead to the beginning of the Timeline.
Press Cmd–V (Mac) or CTRL–V (Windows) to paste the keyframes onto the 2 selected circle layers.
NOTE: Pasted keyframes start at the current playhead position.
- Move the playhead to 0;09
- Select the Instagram Logo layer.
- Hold Cmd (Mac) or CTRL (Windows) and click on the Facebook Logo layer to select it too.
- Press Cmd–V (Mac) or CTRL–V (Windows) to paste the keyframes onto the 2 selected logo layers.
Use the Spacebar to preview the animation.
The circles and logos should all be animating in sync with each other. All that’s left to finish is the colored wedge line and percentage text.
Optional Bonus: Animating the Remaining Text Layers
Each percentage text animates slightly differently (coming in from a different direction), so we can’t copy and paste this animation.
- Move the playhead to 0;25
Select the 37% layer and:
- Press P reveal the Position property.
- Click the Position stopwatch .
- Move the playhead to 0;20
Drag the second Position value to the left until the number is hidden behind the Instagram logo (we used 780).
Press Option–[ (Mac) or ALT–[ (Windows) to trim the layer’s In point to the playhead.
Select the 69% layer and:
- Move the playhead to 0;25
- Press P to reveal Position.
- Click the Position stopwatch .
- Move the playhead to 0;20
Drag the first Position value to the left until the number is hidden behind the Facebook logo (we used 1270).
Press Option–[ (Mac) or ALT–[ (Windows) to trim the layer’s In point to the playhead.
Use the Spacebar to preview the animation. Each infographic should now have the same animation.