Cellphone Commercial: 4-Point Tracking in mocha AE
What This Tutorial Covers
Mocha AE
Imagineer Systems' planar tracker built into After Effects.
4-Point Tracking
Precision tracking for screens, signs, and rectangular surfaces.
Replace Composite
Pin replacement footage onto the tracked surface.
Noble Desktop's Video Editing & Motion Graphics Certificate teaches After Effects alongside Premiere Pro, Cinema 4D, and DaVinci Resolve.
Explore this comprehensive After Effects tutorial that delves into BorisFX Mocha for Planar Tracking, Drawing the Outer & Planar Surfaces, Tracking & Refining in Mocha, Compositing the Screen, Luma Mattes vs. Alpha Mattes, and Manually Tracking in AE.
Exercise Preview

Drawing the Outer & Planar Surfaces
Let’s make sure we’re in the right workspace for this part of the tracking. At the upper left-hand corner of the interface to the right of the Tools, click the dropdown and make sure it’s set to Essentials.
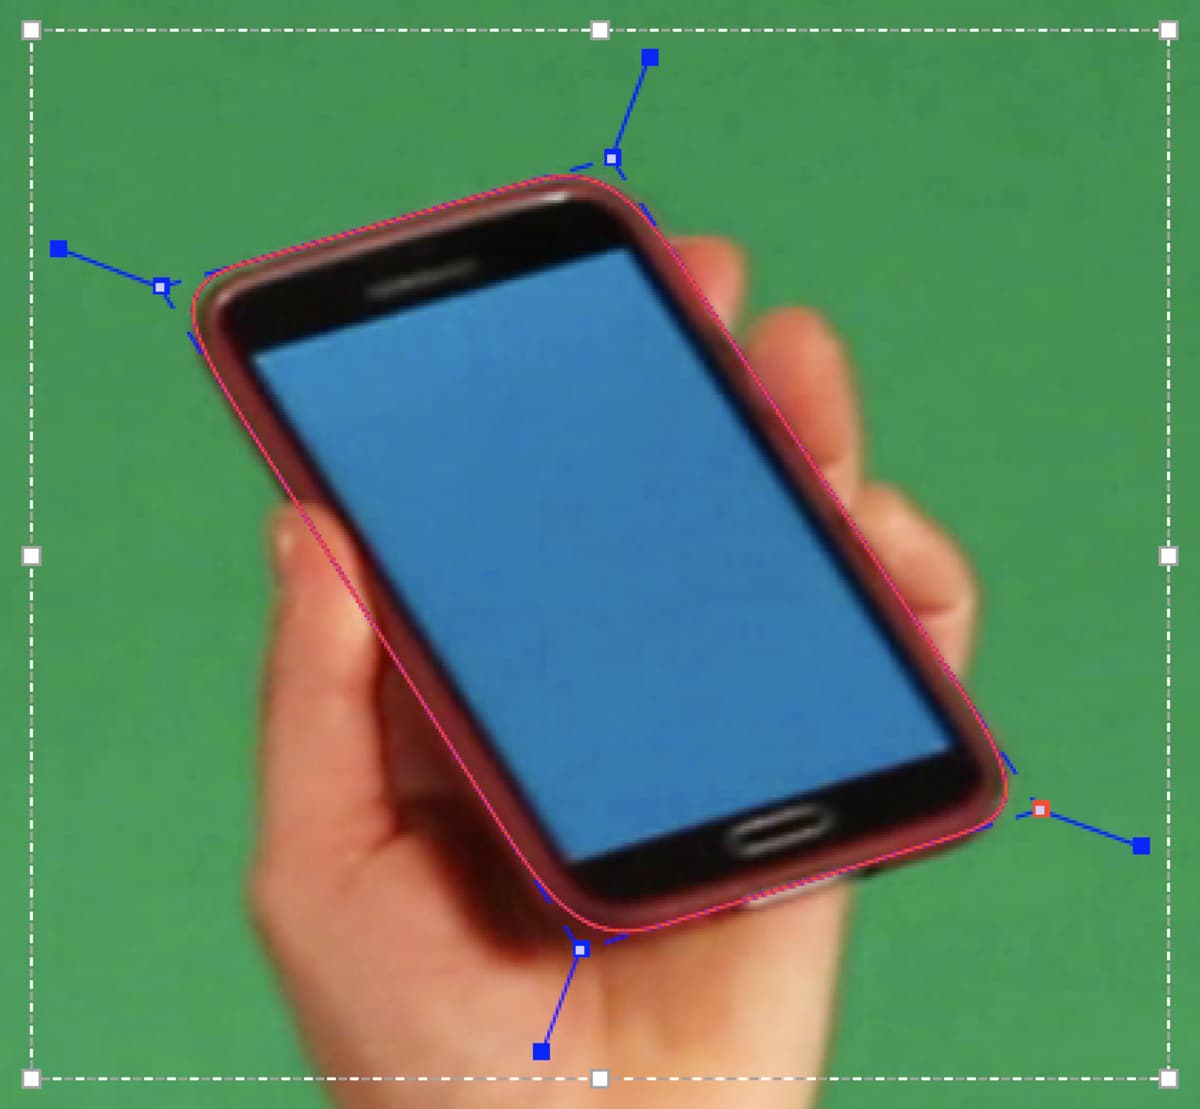
We’ll start by using a tool called Create Rectangular X-Spline Layer. An X-Spline is basically a fancy word for a mask where the points are outside of the mask shape. In the Tools panel at the top, select the Create Rectangular X-Spline Layer tool.
Draw a box around the entire phone, including her fingers. It’s OK if it doesn’t include the whole phone, as we’ll adjust its shape next.
In the Upper Left-hand corner of the interface, notice something called Layer 1 has been created in the Layers Window.
To delete a terrible X-Spline, simply click the name of the layer and hit the delete key on your keyboard.
To adjust your X-spline points, simply choose the Pick Tool (which looks like the Selection Tool in AE). Move your points so that they surround the phone and some of the space outside it. You can change the position of the spline points by dragging on them (at the base of the blue handles).
NOTE: Dragging on the blue box at the end of the handles will adjust the roundedness of the corners.
We can use keystrokes to temporarily switch tools. These are different from the ones in After Effects, so be aware NOT to press the Spacebar while doing the following:
- To access the Zoom tool, hold down the Z key and drag upwards on the phone to zoom in (dragging down zooms out).
- The Pan tool works like After Effects’ Hand tool. Hold down the X key and drag on the screen to pan around.

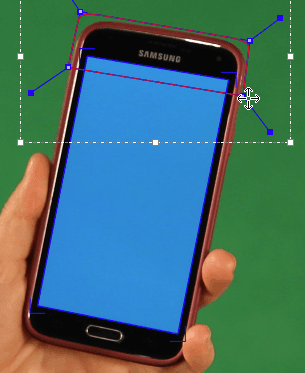
To the left of the main panel and below the Track section, click the Show planar surface button
 .
.A blue box will appear over the phone. Switch to the Zoom tool or hold down Z and drag up to zoom closer to the top edge of the blue screen.
Switch to the Hand tool or hold down X to pan around and move the view.
Select the Pick tool
 if it’s not already. This works like After Effects’ Selection tool.
Drag the corners of the blue inner box to match them to the corners of the blue screen, the area we want to replace. Keep in mind that it’s OK to extend a little extra, but it’s not OK to have too little coverage.
Doing the Tracking & Refining Frames with Misalignment
The next step is to track the footage. We can either track all the footage now, or go frame-by-frame. In some frames, Janet’s hand obscures at least one of the phone corners. This can diminish the level of confidence in the tracking, even in fancy planar trackers like mocha.
Locate the “Track Motion Options” in the “Essentials” window, and turn “on” Perspective if it’s not already.
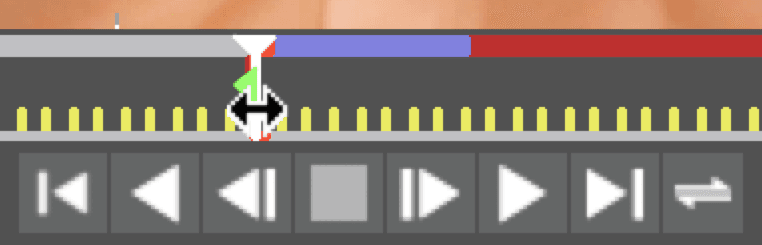
At the bottom of the viewing panel, locate the Timeline (which looks like a ruler) and the playhead within it. Make sure the playhead is at the start of the Timeline before you start tracking.
Then click Track Forwards button
 .
.When the blue box around the bottom of the blue screen is misaligned hit the STOP TRACK button (square).
We need to fix this. Go back to the beginning by dragging the white playhead at the bottom of the main screen to the green arrow:
Realign the planar surface (blue box), and you’ll see that this is near-impossible! We can’t actually see the lower 2 corners of the cell-phone screen because Janet’s hand is obscuring them.
Since we’re having a problem with the bottom tracking, instead of tracking this whole area with our mask, let’s see what happens when we just track the area around the top two corners. As shown below, drag up the bottom left and bottom right spline points (leave the planar surface/blue box in place):
Let’s see what happens when we track all the frames. At the bottom right of the main panel, to the right of Track, click the Track Forwards button
.Notice it looks pretty good! Some of the frames could use adjustment so it aligns to the bottom corners, but we can take care of that next by adding keyframes.
Go back to the beginning by dragging the white playhead to the green arrow.
Zoom in on the bottom of the phone screen by holding Z and dragging upwards.
If needed, use the Pick tool
to fix the alignment of the points.Hold Z to zoom out again so you can see the whole phone.
To adjust the track, we’ll need to switch workspaces. At the upper left-hand corner of the interface to the right of the Tools, click the dropdown currently set to Essentials, to Classic.
NOTE: The Classic interface has a lot more ability to customize and adjust your track for those “less than perfect” tracking shots. Which is most of them.
Adjusting the Track
Just like in After Effects, we only need to add keyframes at key moments. This means the next step is to identify the frames where the planar surface is most misaligned (or “suck” frames, as we call them). Adding just a few should be enough to fix all the frames where the automatic tracking drifts away from the corners.
On a sheet of paper or blank text document on your computer, and make a list of frame numbers where your track drifts the most. Depending on how you drew your X-spline and adjusted your Planar Surface (blue box with corners), your “suck frame” numbers may be different from the ones we’ve listed.
Look at the area below the timeline bar. Locate the Current Frame value (the middle number at the bottom left). While looking at this area, drag the white playhead a few frames forward to notice the Current Frame number change.
Drag the white playhead to frame 96 or so, around when the planar surface starts to drift.
At the bottom left area with the three Parameters tabs, click the AdjustTrack tab. This is where we add keyframes to fix areas of footage that’s already been tracked.
Within this panel, click the Set Master All button.
Go to frame 99. You can either drag the playhead or double–click the current value, enter the number, and press Return/Enter.
To check the alignment, it may help to use a grid. On the left side of the screen, find the Layer Properties panel. In the menu next to Insert Clip, choose Grid8x8.
Zoom in so you can see the bottom corners of the phone screen up close.
With the Pick tool
adjust any corners that are inaccurate, using the enlarged views in the corner. Notice that green arrow keyframes appear on the timeline.In the Layer Properties panel on the left, next to Insert Clip set the menu to None.
Go to frame 118 and adjust the corners again.
Especially with these kinds of subtle movements with the phone, we want to be as accurate as possible. Notice that the keyframes that are appearing are for each corner. It’s not all the corners at once, as you might be used to from After Effects.
Take your time to go through frame-by-frame from the beginning, zooming as needed and using the Pick tool
to move the spline points.TIP: To adjust an existing keyframe, you need to have the playhead directly over it. You can tell you’re directly on a keyframe by looking at the bottom right under the timeline and seeing the Delete keyframe icon
 is not grayed out.
Once you’re happy with your track, go to File > Save Project.
Close out of Mocha AE by clicking the red button in the upper left-hand corner of the interface, or by going to File > Exit Mocha AE.
Compositing the Cellphone Screen
Return to After Effects and make sure you’re in the 3-Janet-CUphone tab.
Select the [ExclamationPt-HDsize] layer (the logo comp) and go to its in point.
This is what we want to track on the phone screen, so turn on its eye
 .
.Anytime you’re tracking anything in After Effects using mocha, you need it to fill the frame of whatever comp you’re working in. To see what size we need to match, press Cmd–K (Mac) or CTRL–K (Windows) to see that it’s 1920 X 1080 px.
Click Cancel to close the window.
In the Timeline, double–click [ExclamationPt-HDsize] to open it in a new tab.
Select ExclamationPt-Portrait.
Go to Layer > Transform > Fit to Comp. The thing that fits to comp needs to be the ratio of whatever the screen is. In this case, our phone screen’s aspect ratio is 9:16.
Close the ExclamationPt-HDsize tab to return to the 3-Janet-CUphone tab.
Select the hands layer and go to its Effect Controls window.
In the Mocha AE CC effect, swivel open the Tracking Data section and click the Create Track Data button.
In the window that opens, click the sprocket on for the layer you wish to get tracking data from.
Back in Effect Controls, set the Export option dropdown to Corner Pin (Supports Motion Blur).
Then set the Layer Export To dropdown to 1-ExclamationPt-HDsize and click the Apply Export button.
With [ExclamationPt-HDsize] selected, press U. Notice that it gave us one keyframe for every frame of the screen tracking.
Feel free to scrub through with the playhead to see that the tracking alignment is pretty good.
If Your Tracking on the Phone Screen Doesn’t Work
If for some reason, the tracking you did doesn’t look quite right, you may choose to use the keyframe data we’ve provided for you.
- We need to delete the [ExclamationPt-HDsize] layer’s keyframes before we can replace them, so make sure they are showing.
- Select Corner Pin and press Delete (you may need to deselect first).
- Click the stopwatches
 next to Position, Scale, and Rotation to delete their keyframes.
 - Close up the layer, reopen it, and to the right of Transform click Reset.
- Go to the Desktop, navigate to Class Files > After Effects Level 2 Class > Cellphone > mocha, and double–click 3-Janet-CUphone-Noble.txt.
- Select all the text, then copy it.
- Close the file and return to After Effects.
- Make sure the playhead is at the beginning of the Timeline.
- With the [ExclamationPt-HDsize] layer selected, paste the data.
- Scrub through with the playhead and the keying should look good.
Notice that Janet’s hands are being covered by the logo when they hover over the screen. We can fix this by applying the phone matte.
Drag the phone matte layer up to be the topmost layer.
Show the phone matte by clicking its eye
 .
.Drag through with the playhead to see that most of the layer (including the hand) is black, and only the phone is white.
Notice that this layer is already being used as a Luma Matte for the [ExclamationPt-HDsize] layer, as you can see in that layer’s TrkMat column.
Luma Mattes Vs. Alpha Mattes
The alpha mattes we’re familiar with apply the layer’s alpha transparency data to the layer below it. Luma mattes work similarly, except After Effects uses the layer’s luminescence (brightness and darkness) to matte the layer below. The lighter the layer, the more the layer below will show. White fully reveals the matted layer, and black completely hides it (similar to a layer mask in Photoshop).
Hide/show the phone matte layer as many times as needed to see how After Effects used its luminescence data to reveal only the part of the magenta phone screen that’s not covered by the hand. Make sure the layer is hidden before you move on.
Drag through with the playhead to see that Janet’s hands are no longer hidden by the logo. This works because our phone matte was white wherever the phone was and we want the tracked screen to only show through the white of the phone matte.
More Tracking with Mocha
We’ll use mocha to do more tracking, but this time we’ll encounter some of its limits.
Switch to the Cellphone-MAIN Timeline tab.
Double–click the [2-Janet-phone] layer.
Scrub through the footage. The phone in the previous shot had a little wobble, but this phone is a full blown contortionist! Janet moves her phone a large distance, and it rotates and changes perspective.
At the bottom of your Composition panel, change your Resolution to Full.
Select the janet layer, the one we want to track.
Move your playhead to the beginning of the Timeline.
These free range corners don’t want to be pinned down, but it’s doable. Let’s see what mocha AE can do! Go to Animation > Track in BorisFX Mocha to add the effect to the layer.
Click the Mocha icon in the Effects Control window to launch it.
If a Registration window pops up, click Register Later.
In mocha, hold down the Z key and drag upwards on the phone to zoom in.
To move the view, hold down the X key and drag.
In the Tools panel at the top, select the Create Rectangular X-Spline Layer tool.
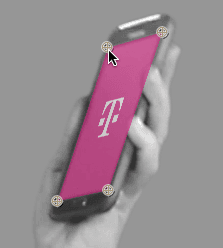
Once again, we want to draw a box around the entire phone. After drawing a rough box, adjust the corners as shown:
If you haven’t already, click on the first point again to close the shape.
In the Tools panel, make sure the Pick tool
is selected.Above the main panel, click the Show planar surface button
.Drag the corners of the blue inner box (planar surface) to match the corners of the blue phone screen, the area we want to be replaced. Use the enlarged view that appears in the top-left corner to help you perfect alignment. Keep in mind that it’s OK to extend a little extra, but it’s not OK to have too little coverage.
With a spastic target like this, who knows what Escher-like result we’d get if we tracked it all now… This is a clear cut example of when we want to be super methodical and track frame-by-frame. At the bottom right of the main panel, to the right of Track, click the Track To Next Frame button
 . (If you don’t see it, switch your workspace to Classic)
Keep clicking until you start to see the blue tracking box not aligning properly with the screen, probably around frame 86. At this point, when the path becomes misaligned, we’ll just stop and do the remaining tracking in After Effects. When you have footage with lots of movement like this, tracking by hand will have better results than poorly drawn automatic tracking.
We’ll use mocha’s AdjustTrack features to help us refine the good part we have. Towards the bottom left of the mocha app, click the AdjustTrack tab.
Go back to the first frame and if needed, realign anything that needs adjusting.
Click the Set Master All button to make this the master frame.
Our “suck” frames are toward the end, so go to frame 84.
Use the Pick tool
to realign the blue inner box with the screen.Move the playhead to 86 and realign again.
Go to File > Save Project. Exit Mocha by going to File > Exit Mocha.
Back in After Effects, select the janet layer and go to its Effect Controls window.
In the Mocha AE CC effect, swivel open the Tracking Data section and click the Create Track Data button.
In the window that opens, click the sprocket ON for the layer you wish to get tracking data from.
Back in Effect Controls, set the Export Option dropdown to Corner Pin (Support Motion Blur).
Then set the Layer Export To dropdown to tmo-HDsize and click the Apply Export button.
Continuing Tracking in After Effects
Return to After Effects and make sure you are in the 2-Janet-phone tab.
Select the [tmo–HDsize] layer, show it
, and go to its in point.Paste the tracking we did in mocha.
Press U to show the keyframes for the Corner Pin effect we just pasted.
Press K to keyframe navigate and preview the tracking frame-by-frame.
Stop when you get to the frame where the screen alignment goes off track. This should be around 2;28.
Drag a selection box around all the keyframes at 2;28 and after 2;28 (or wherever the alignment goes off track) and delete them.
With [tmo–HDsize] selected, press Shift–T.
Reduce the Opacity of the screen to 50%. Now we can see everything else better.
Select the Corner Pin effect.
Zoom in close to the phone on the Composition panel (make sure the Resolution is set to Full).
Make sure the playhead is set to 2;28 (or wherever you stopped and deleted keyframes), and the Selection tool
 is selected.
Drag the beige points around the Cellphone graphic to align it with the phone screen. Be careful NOT to drag the entire graphic, as that will change its Position!
As you do this, notice that new keyframes are being added for the corner pins.
Move forward one frame at a time, and realign the corner pins to match the screen.
When you’re done, set Opacity back to 100%.
Click in a blank area of the Timeline to deselect all.
Scrub through with the playhead. You may notice that at certain points, there’s a bit of edge showing through the screen. This is happening because there’s a bit of glow around the edge. Fortunately in this case, because the background is simple, we can fix this pretty easily.
If You Don’t Like Your Results
If you notice problems other than the screen glow, you can use the provided keyframe data. To replace your keyframes with ours, delete the Corner Pin effect and make sure you’re at the [tmo–HDsize] layer’s in point. Then copy and paste from mocha > 2-Janet-phone-Noble.txt.
Getting Rid of the Extra Edges Around the Screen
Remember when we did our keying, we did a separate key for the screen? That’s going to come in real handy here. Select the phone matte layer and show it
.Solo
 it and go to its in point.
To make this layer better for use as a luma matte, apply the Levels effect.
In the Effect Controls panel, look underneath the Histogram (the graph, not under the black-to-white gradient!) Drag the black (leftmost) slider to the right until the screen is as black as it can get.
Drag the white (rightmost) slider slightly to the left.
Un-solo the phone matte layer by clicking in its Solo column
.Press Cmd–Y (Mac) or CTRL–Y (Windows) to create a new solid.
We want this color to be the exact same color as the Cellphone background. In the Solid Settings dialog, click the eyedropper
 next to the color swatch.
With the eyedropper, click on the magenta Cellphone background.
Name it glowBG, make sure it’s comp size, and click OK.
Drag glowBG beneath the phone matte layer.
If you don’t see the TrkMat column, click the Toggle Switches / Modes button.
Black areas of the matte will be hidden in the matted layer. We want to show the phone screen, so we need an inverted matte. For the glowBG layer, click the menu in the TrkMat column and change it to Luma Inverted Matte “phone matte”.
Move the playhead to 2;29. This is where the keying for the phone matte ends.
Shorten the end of the glowBG layer by pressing Opt–] (Mac) or ALT–] (Windows).
Scrub through with the playhead and check out the logo on the phone screen.
If your phone screen isn’t glowing enough, go into the phone matte layer’s Keylight settings within the Effects Controls panel. Adjust the Screen Shrink/Grow, reducing it to anywhere between –0.5 and –1.5 per your taste. You can also increase the Screen Softness property to make the glowBG blur a bit.
Collapse the layers in the Timeline and close the tabs other than Cellphone-MAIN.
Save the project and leave it open. We’ll continue working on it in the next exercise.