2.5D Features in After Effects
What This Tutorial Covers
2.5D Layers
Add depth to flat 2D elements with simulated perspective.
Camera Moves
Animate cameras through layered 2D scenes.
Parallax Effects
Create depth-of-field illusions with layered movement.
Noble Desktop's Video Editing & Motion Graphics Certificate teaches After Effects alongside Premiere Pro, Cinema 4D, and DaVinci Resolve.
After Effects has a lot of tricks up its sleeve, from making rain effects to tracking motion in video to keylighting. We’ll be working with one particularly interesting ability of After Effects: 2.5D.
What’s 2.5D? Well, it’s when a 2D program manipulates shapes to give the illusion of 3D space. Don’t worry if this sounds a little abstract. We’ll be making a simple text animation with 2.5D to show the technique.

Enable 2.5D
1. First thing to do is to turn on the 2.5D switch. If you don’t see the icon, hit Toggle Switches/Modes at the bottom. 
2. Check the 2.5D boxes next to both text layers. This will enable 2.5D for these layers, adding a few more attributes we can manipulate.
3. Move the Playhead to00;00;00;00 if it’s not there already.
4. Select the WHIRL layer.
5. Hit S to open up Scale.
6. Click the stopwatch  next to Scale to enable keyframes.
7. Change the Scale to0.
8. Move the Playhead  to 00;00;00;10;
9. Change the Scale to 110%.
10. Move the Playhead to00;00;00;15.
11. Change the Scale to 100%.
12. Select all three keyframes with Shift-Click.
13. Hit F9 to Easy Ease them all. The words should pop in and resize to their right size. It may not look 2.5D now, but we’ll be showing that aspect off after we get the text keyframes in.
14. Move the Playhead back to the beginning, 00;00;00;00.
15. Hit R to open up Rotation. Since we toggled on 2.5D, this layer now has three dimensions it can rotate in: X, Y, and Z. For purposes of this tutorial, we’ll be using theY-axis, but feel free to fiddle with all three to experiment.
16. Hit the stopwatch next to Rotation to start keyframing.
17. Change the Y Rotation to 40 X +0.0°.
18. Move the Playhead to00;00;00;20.
19. Now alter the Y Rotation to0 X +0.0°. We actually won’t be adding Easy Ease to these, as it makes a few odd Rotations occur with the text. Onto the bottom layer!
20. Move the Playhead to 00;00;00;10.
21. Select theAND TWIRL layer.
22. Hit S to open up Scale.
23. Click the stopwatch to enable keyframes.
24. Change the Scale to 0.
25. Move the Playhead to00;00;01;10.
26. Change the Scale to 110%.
27. Move the Playhead to00;00;01;14.
28. Alter the Scale down to 100%.
29. Select all keyframes.
30. Hit F9 to Easy Ease them. Text keyframes done!
31. Now locate the glitter layer.
32. The visibility should be off, so just flip that on so the eye is visible. 
Onto the Camera!
Camera
1. Go up toLayer > New > Camera. This makes a new Camera, which can be used to move around your 2.5D space, allowing the viewer to see different sides of your objects. We’ll be adding some keyframes to make some dynamic Camera movements.
2. Move the Playhead to 00;00;00;13;.
3. With the Camera selected, hit P to open upPosition.
4. Hit Shift+R also to open up Rotation. You’ll see that Rotation has expanded to include a new dimension, the Z-axis, as well asOrientation.
5. Hit the stopwatch forPosition to start keyframes.
6. Do the same for Orientation.
7. Repeat the above step forX Rotation.
8. And once more, hit the stopwatch for Y Rotation.
9. ForPosition, change the attributes to be 636,600, -690.
10.X Rotation, change it to 17°.
11.Y Rotation is 30.
12. Move the Playhead to00;00;01;00.
13. Now changePosition to 770,545, -690.
14.X Rotation is0x -1.0°.
15. Y Rotation is 0x+12°. Your keyframes should look like this so far:
16. Move the Playhead to 00;00;01;16. Almost done!
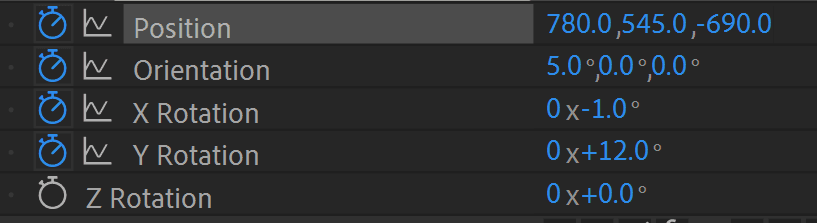
17. ChangePosition to 780,545, -690.
18. We’ll be animating Orientation now, so just hit the diamond shape  next to the word Orientation to put down a keyframe.
19. Move the Playhead to 00;00;02;00.
20. ChangePosition to 793,485, -622.
21.Orientation here is going to be 1.0°, 0,0.
22. With Shift+Click, select all your keyframes.
23. Hit F9 to Easy Ease them in. Can you believe we’re done now? Let’s just preview the animation.
24. Go to the beginning, 00;00;00;00 with the Playhead.
25. Hit Spacebar to preview your animation. You’ll see the text rotate in as our Camera moves around it in 2.5D space. Cool, right?