Vector Graphics, Colors, Shadows, & More
What This Tutorial Covers
Vector Tools
Pen, rectangle, and ellipse for vector design in XD.
Color & Gradients
Solid fills, linear gradients, and color libraries.
Drop Shadows & Effects
Add depth with shadow and blur effects.
Noble Desktop's UX/UI Design Certificate teaches Figma — Adobe paused major XD development, so most teams have moved on.
Learn the intricacies of Adobe XD through our detailed tutorial, covering topics such as importing and modifying vector graphics, aligning and distributing layers, layer opacity, reusing colors, and adding a drop shadow.
Exercise Preview

Importing & Modifying Vector Graphics
- In Adobe XD, go to File > Open from Your Computer or hit Cmd–Shift–O (Mac) or CTRL–Shift–O (Windows).
Navigate into Desktop > Class Files > Adobe XD Class > NYC and double–click on About Page—Ready for Graphics.xd to open it.
This design is further along than the earlier NYC exercises. We want to finish the navigation at the top by adding a logo and a semi-transparent background to distinguish the navbar area from the rest of the page.
To prevent ourselves from accidentally moving the cab photo, CTRL–click (Mac) or Right–click (Windows) on the cab photo and choose Lock.
TIP: You can also hit Cmd–L (Mac) or CTRL–L (Windows) to lock an item, or hover over a layer in the Layers panel and click the lock icon.
We need to add a logo to the top left of the page. We want to import the logo as a vector graphic so it remains as editable vectors in XD. While we could copy and paste from Adobe Illustrator into XD, let’s see how to import vector files into XD.
Go to File > Import.
Navigate to Desktop > Class Files > Adobe XD Class > NYC and notice:
- We’ve provided the NYC Logo in three file formats: AI, PDF, and SVG.
- The PDF file is grayed out on Mac, and not even shown on Windows.
- The AI (A dobe I llustrator) and SVG (S calable V ector G raphic) files are available to import.
- Double–click on the NYC Logo.svg to import it.
The logo was placed in the middle of the artboard. As shown below, drag the logo so its left edge aligns with the first aqua content column. Leave a little bit of space between the top of the logo and the top of the artboard, but don’t worry about an exact amount as we’ll tweak it soon.

- Zoom to 100% by hitting Cmd–1 (Mac) or CTRL–1 (Windows) so you can see the logo better (scroll so you can see the logo if needed).
- Let’s change the logo color to white. Make sure the logo is still selected.
- In the Property Inspector, click on Fill to open the color picker.
- Choose white.
- Hit Esc to close the color picker.
Let’s make the logo a little smaller. With the logo still selected, hold Shift (to maintain the aspect ratio) and drag the bottom-right handle to make the logo a little smaller (as shown below):

- We don’t need to see the grid anymore, so let’s hide it. Hit Cmd–Shift–
'(Mac) or CTRL–Shift–'(Windows) to hide the layout grid. Choose View > Guides > Hide All Guides or hit Cmd–; (Mac) or CTRL–; (Windows).
Creating a Navbar Background
Let’s darken the area behind the logo and navigation text links so they stand out more.
- To see everything, zoom to fit all by hitting Cmd–0 (Mac) or CTRL–0 (Windows).
- In the Toolbar, select the Rectangle tool
 .
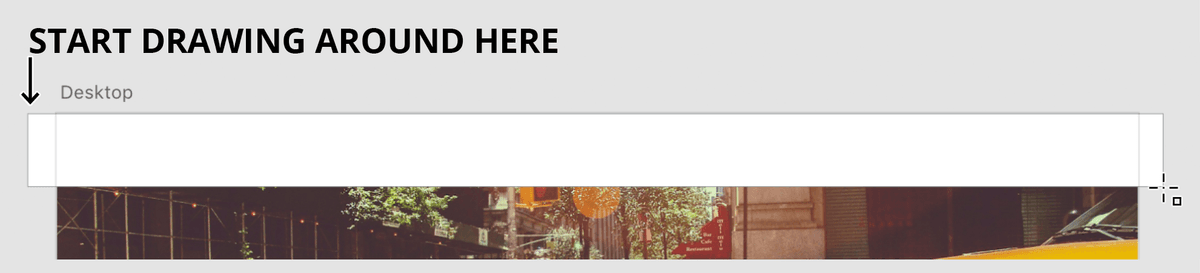
. As shown below, drag a rectangle across the entire top portion of the artboard. Extend the rectangle slightly off the left and right sides to ensure it completely covers the artboard (so we won’t see the left and right borders):
- In the Toolbar, choose the Select tool
 .
. - With the rectangle still selected, in the Property Inspector, set H (height) to 80.
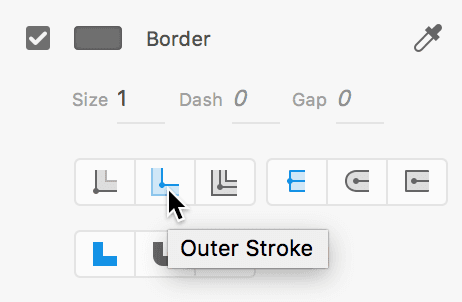
To ensure the top border is hidden outside the artboard, in the Property Inspector under Border click on Outer Stroke.
- In the Property Inspector, click on Fill to open the color picker.
Set Hex to 6b4656 and hit Return (Mac) or Enter (Windows) to apply it.
TIP: You can type in a single character hex color value (such as B) and XD will expand it to #BBBBBB automatically! You can also type in 3 character values (like 2ab) and XD will expand it to #22AABB for you.
- Click on Fill again to close the color picker.
- Click on Border to open the color picker.
- Choose white.
- Click on Border again to close the color picker.
- In the Layers panel, Rectangle 1 should be selected. Double–click on its name and rename it nav bg.
Drag the nav bg layer below the EVENTS text (the last item in the navigation).
Aligning & Distributing Layers
- Make sure you can see the three text links in the navbar at the top right of the page.
- Click on EVENTS to select it.
- Hold Shift and click on the two other text links: HISTORY and RESOURCES.
- To evenly space out the text, at the top of the Property Inspector, click Distribute Horizontally
 (the fourth icon from the left).
 - We want to vertically center all the navbar elements. If part of the NYC logo is positioned below the bottom of the navbar background, the alignment won’t work. Make sure the NYC logo is completely inside the navbar background before proceeding.
- Let’s select everything in the navbar. In the Layers panel, click on the NYC Logo group name to select it (do not click on the folder icon).
- Hold Shift and click on the nav bg.
- To vertically center all the elements to each other, at the top of the Property Inspector click Align Middle (Vertically)
 (the second icon from the left).
 - While everything is still selected, let’s group the navbar elements for organization. Hit Cmd–G (Mac) or CTRL–G (Windows) to group them.
- In the Layers panel, double–click on the new Group 1 name to edit it.
- Type nav and hit Return (Mac) or Enter (Windows).
- Click on a blank area of the canvas to deselect the group.
Layer Opacity Vs. Fill Opacity
Anywhere you use a color in CSS, you can specify opacity (using RGBA). XD offers the same control, so we can set different opacities on the layer, fill, and border.
- Let’s make the navbar’s background color semi-transparent. On the artboard, click on the navbar background to try to select it.
- Look in the Layers panel and see that the entire nav group is selected. This means the nav bg we want to edit is not selected.
- Click on a blank area of the canvas to deselect the group.
- Double–click on the nav background to enter the group and select it.
Look in the Layers panel and see that the nav bg layer is selected!
When dealing with nested groups you may have to double–click many times to drill down into the group you want to work in. Let’s see a more direct way.
- Click on a blank area of the canvas to deselect the layer again.
Hold Cmd (Mac) or CTRL (Windows) and click on the navbar background again.
Your click should have reached through the group and directly selected the nav bg layer. This works no matter how nested your groups are!
- With the nav bg layer selected, go to the Property Inspector and under Appearance, drag the Opacity
 slider to see that it affects both the fill and the white border.
 - We want the border to stand out to better delineate the content, so we only want to change the fill’s opacity. Put Opacity back to 100%.
- Click on Fill to open the color picker.
- To the far right of Hex, set transparency to 50%.
- Click on a blank area of the canvas to close the color picker and deselect the nav bg.
Notice the fill is now transparent, but the white border is still fully opaque.
NOTE: You can also set Border opacity the same way as Fill opacity.
Reusing Colors (Color Swatches)
We want to reuse the purple color you just create elsewhere in this file, so let’s save it as a color swatch. Colors swatches not only let you quickly apply colors, you can quickly change that color everywhere it’s used in the entire file!
- Hold Cmd (Mac) or CTRL (Windows) and click on the navbar background again.
- To open the Libraries panel, at the bottom left of the window click the
 icon.
icon. - In the Libraries panel, click the + button to the right of Colors to save it as a swatch.
- Click on an empty part of the artboard to deselect.
- The white border color was also turned into a swatch, but we don’t want it. In the Libraries panel, CTRL–click (Mac) or Right–click (Windows) on the white swatch and choose Delete.
- Scroll down to the bottom of the artboard and find the gray footer. Let’s change this to the same color we used for the nav background.
- Click on the gray footer rectangle on the artboard.
- In the Libraries panel, click on the semi-transparent purple color swatch.
- Look on the artboard to see that the footer is the same exact color we used for the nav background.
- In the Libraries panel, CTRL–click (Mac) or Right–click (Windows) on the semi-transparent purple color swatch and choose Edit.
- In the color picker that appears, drag to choose any new color (it doesn’t matter what you choose) and notice that the color changes everywhere in the file!
- Click on a blank area of the canvas to close the color picker.
- Let’s make one more color swatch to better understand how they work. Notice that the two headings (UNLIKE ANY OTHER CITY and Popular New York Attractions) are the same reddish color.
- CTRL–click (Mac) or Right–click (Windows) on either of those headings and choose Add Color to Assets.
- In the Libraries panel, CTRL–click (Mac) or Right–click (Windows) on the reddish color swatch that you just added, and choose Edit.
Drag to choose any new color (it doesn’t matter what you choose) and notice that the color changes both headings!
When you edit a color swatch, XD will change every place that exact color appears in the entire file. You didn’t have to apply the swatch to create a link as you do in many other apps. Think of this more like a search and replace for color. Pretty cool!
Tips for Working with Color Swatches
- You can name a color swatch by double–clicking on the swatch color name. (You must be in List View
 to see/edit the name.)
 - To quickly find a color in the Libraries panel, CTRL–click (Mac) or Right–click (Windows) on an object on the artboard and choose Reveal Color in Assets.
- To find where you’ve used a color swatch, in the Libraries panel CTRL–click (Mac) or Right–click (Windows) on a color swatch and choose Highlight on Canvas. A blue border will appear on any element using that color.