Making Custom Post Types
What This Tutorial Covers
register_post_type()
Register CPTs in functions.php.
Custom Fields
Add metadata beyond default post fields.
Template Hierarchy
single-{cpt}.php for custom post-type templates.
Noble Desktop's WordPress Bootcamp teaches WordPress for site builders and developers.
Dive into the complexities of WordPress 3.0 with this tutorial, where you'll learn how to add thumbnail support, create a custom post type, and register a taxonomy for a more organized and dynamic site.
Exercise Preview
Registering a Custom Post Type
In order to use a custom post type, you must register it in functions.php.
Switch to your code editor.
Open functions.php from the landmTheme folder (will be landmTheme-ready-for-custom-post-types if you didn’t do the previous exercise).
At the end of functions.php, just before the closing ?
>, add the following:/* Add support for thumbnails */ add_theme_support( 'post-thumbnails' ); set_post_thumbnail_size( 223,140, true );The add_theme_support
()function adds theme support for the post thumbnails feature. The set_post_thumbnail_size()function sets the post thumbnail size. We set it to scale the thumbnails to 223 X 140 pixels and crop any overflow. These thumbnails will be used to display small images of each car.At the end of functions.php, just before the closing ?
>, add the following:/* Registering the Cars custom post type */ add_action( 'init', 'create_post_type' ); function create_post_type() { register_post_type(); };These lines of code are used to register a post type. The first function, add_action
()is used to hook a function to a specific action. In this case, you are hooking the create_post_type()function to init (after WordPress finishes loading but before the header is sent). The function create_post_type()contains the register_post_type()function. This is the function that will create our post type; however, currently it is looking a little empty. Let’s add some arguments to it.To save some time, we have already typed up the arguments for you. Open arguments.txt from the Class Files > WordPress.org Class > landm Content folder.
Select all the code and copy it.
Hit Cmd–W (Mac) or CTRL–W (Windows) to close the file but not the folder.
Switch back to functions.php if you’re not already there.
Click inside the parentheses of register_post_type
().Hit Return (Mac) or Enter (Windows) twice to add some space between the parentheses.
In the new line you just added, paste in the arguments. It should look like the following (you may need to clean it up a bit so the indentation is easier to read):
function create_post_type() {
      register_post_type(
         'cars',
         array(
         'labels' => array(
                     'name' => __('Cars'),
                     'singular_name' => __('Car'),
                     'add_new_item' => __('Add New Car'),
                     'edit_item' => __('Edit Car'),
                  ),
         'public' => true,
         'hierarchical' => false,
         'rewrite' => array( 'slug' => 'cars'),
         'supports' => array('title', 'thumbnail', 'editor', 'excerpt', 'custom-fields', 'author')
         )
   );
};
The register_post_type
()function has two parameters,$post_type and$args. This post_type is called cars, and this is what WordPress will use to identify it. The next parameter is an array of arguments that helps define the cars post type. Here is a brief explanation of each of the arguments:labels: An array that contains the singular and plural name that will be displayed in the Dashboard for the custom post type. public: Determines whether a post type is displayed in the Dashboard. Defaults to false (hidden). hierarchical: Determines whether the post type behaves like a page or a post. Defaults to false (behaves like a post). rewrite: Rewrites the permalink structure so that the URL displays “cars”. supports: Contains an array of features that the post type supports. Save the file.
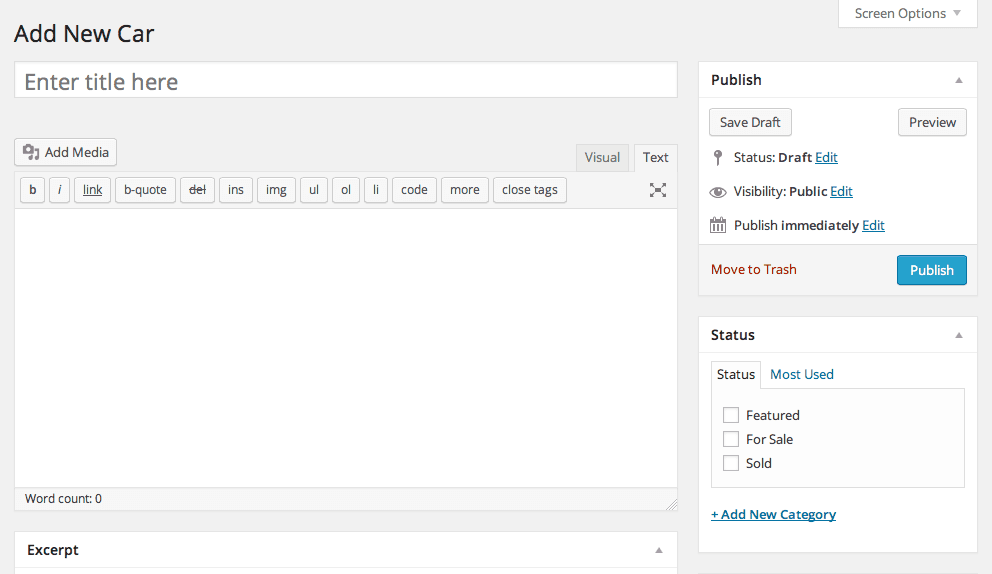
- Let’s see the Cars post type in action! Go to:
- Mac: localhost:8888/landm/wp-admin
- Windows: localhost/landm/wp-admin
Log in if necessary.
On the left side of the screen, you will notice a new menu called Cars. Hover over Cars. This is the custom post type you just created with a few lines of code.

Under Cars, click Add New.
Looks good, except the bottom of the page has an Author module. The Cars post type doesn’t need an Author module, so let’s fix it.
Switch back to functions.php in your code editor.
In the supports parameter, delete
'author'and the comma before it so that the line reads:'supports' => array('title', 'thumbnail', 'editor', 'excerpt', 'custom-fields')Save your work.
Go to the Dashboard.
Go to Cars > Add New.
Notice that the Author module is gone. Yippie!