Model Relationships
What This Tutorial Covers
Has Many / Belongs To
The fundamental Rails association pattern.
Foreign Keys
Database columns that link related records.
Validations
Ensuring relationships maintain data integrity.
Noble Desktop's Full-Stack Web Development Certificate teaches modern web development concepts that transfer across Ruby, Python, and JavaScript stacks.
Dive into this detailed tutorial on Ruby on Rails, where you'll learn to create models for cast members and genre, add objects to these models, update views, and navigate multiple exercises for a practical understanding of the framework.
Exercise Preview
Adding Records to the Cast Members Model in Rails Console
Switch to the Terminal.
Type the following to start up the Rails console:
rails consoleWe could create a form to add cast members, but for additional practice (and because it’s way faster) let’s use the Rails console to add cast members to the database. First, let’s look up a movie.
Type the following:
movie = Movie.find(1)This will return
Text M for Murder. Let’s add some cast members.Type:
movie.cast_members.new(name: "John Jones")
movie.cast_members.new(name: "Susan Shine")
movie.cast_members.new(name: "Ed Kovac")
movie.save
Terminal will return a bit of SQL, letting us know that three things have been inserted into
cast_membersand that all of them are associated with"movie_id": 1. Looking good so far.Type the following to see which cast members belong to Text M for Murder:
movie.cast_membersThis will return a messy, dense bit of code; if you look carefully you’ll see that there are three cast member records. There’s an easier way to count them.
Type:
movie.cast_members.countTerminal will print
3. We can also start referring to these cast members directly.Type the following:
movie.cast_members.first.nameTerminal will print
John Jones. (Note that it’s the first cast member’s full name, not the first name of a cast member.) We can also access cast members with arrays.Type:
movie.cast_members[1].nameBecause the count starts with zero, this will return
Susan Shine.NOTE: You may have noticed that Rails uses capitalized class names like
CastMemberwhen referring to the class by name, and a lowercase, underscored versioncast_membersin other contexts such as referring to a method. This can be confusing until you get familiar with the convention. It’s just a weird idiosyncrasy that Rails seamlessly switches back and forth between the two.Try typing the following:
susan = CastMember.find_by(name: "Susan Shine")Terminal will print all her information. This is a good way of finding her record without knowing her id number.
Type the following:
susan.movie.titleTerminal will print
Text M for Murder. This helps elucidate why one model getshas_manyand another model getsbelongs_to.In the diagram shown below, notice that one model has a reference (often called a foreign key) as rendered in italic text, and that model belongs to (
belongs_to) the model thathas_many. Therefore, cast_member with its foreign keymovie_idbelongs to movie. Meanwhile, movie has many (has_many) cast members! We are going to get more familiar with this concept over time, so don’t worry if it’s a bit baffling at first.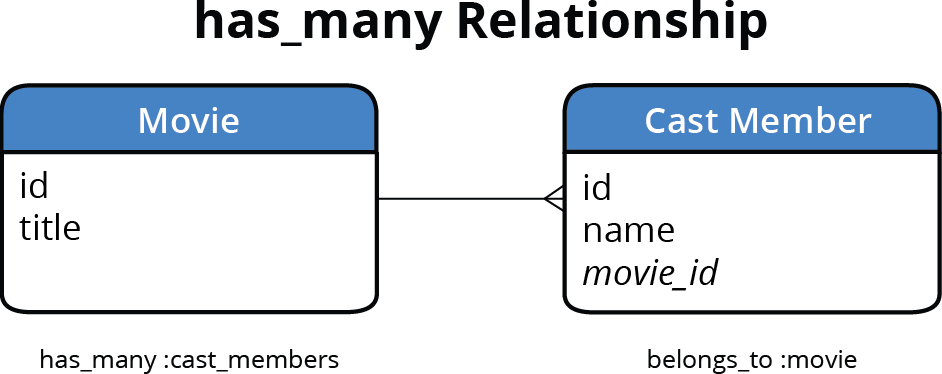
The foreign key refers to the field we created when we generated the cast_member model in this way:
rails generate model cast_member name:string movie:referencesThis created a field called
movie_idwhich is the foreign key. It is called “foreign” because it refers to another table, and called a “key” because it refers to that table’s primary key (id).We can create multiple records at once by passing an array of hashes. Let’s add the cast to Planet of the Apps (which has an id of 2) by typing:
Movie.find(2).cast_members.create([{name: "Mark Wallburg"}, {name: "Hellova Carter"}, {name: "Tim Rath"}])Remember that the
createcommand performs thenewandsaveactions in one fell swoop. Compared to the way we added cast members to Text M for Murder, usingcreateand passing an array of hashes saved a lot of work.To save you even more work, we’ve typed up cast members for the rest of the movies. Switch to the Finder.
Navigate to and open the following file, which will probably open in TextEdit: Class Files > yourname-Rails Class > flix snippets > cast_members.txt
Hit Cmd–A to select all the contents of the file and copy them (Cmd–C).
Close the file and switch to the Terminal.
Paste (Cmd–V) the text, then press Return once to apply the command.
Great, the cast members should all be added! Because they were added with
create(), the records are saved automatically.Type the following to exit Rails console:
exit